"This is a journey of my life since I was all of 12 yrs when I started my hand in cooking to now with displays of my learning and creations of recipes from around the world. My inspiration and role model has always been my Mum who has always created dishes from around the world and excellently well. I do not believe I would ever match to her culinary skills. I remember the times she could cook and bake almost 4-5 dishes in one go without ever letting one go under cooked or burnt! I was born and raised in Dubai, UAE and recently moved to India for family reasons. Kitchenette just means that over the decades, my kitchen has changed from that of my mum's to my uncle and aunt's, to my home in UAE and now in India. Pala't'te, describes both global cuisines ('Palatte'-diverse flavours) and pleasing diverse 'Palates'."
Showing posts with label Eggs. Show all posts

Wednesday, 1 June 2016

Celebrating crossing 100,000 page views - Mango Soufflé #FoodieExtravaganza

G'Gina's Kitchenette has crossed another milestone and I am so thankful to all our readers. Reaching this milestone would never have been possible without my Good Lord and my constant inspiration Mummy.


So to celebrate this milestone, I would like to share my Mango Soufflé recipe as a part of our Foodie Extravaganza June event. I had a choice to either bake this soufflé or to use the normal double boiler method. I preferred the latter to allow the natural flavours of mango to appear. Not only did my little one like this soufflé, two of my friends (and neighbours) Divya and Ribu, did too. I missed on giving some to another friend and neighbour, so I may make this again this afternoon. In fact the talk of my making this soufflé was two-fold, one was as a part of the Foodie Extravaganza challenge and the other one is because there is a tradition that I follow from Mum. We never return an empty container back to anyone who offers us their food/delicacies. Ribu made this awesome fish curry for me to try and Divya offered me one of my many staples I used to regularly have in Hyderabad (Gongura Pickle). 


Tuesday, 10 May 2016

Cinnabon-style Cinnamon Rolls - Mummy's First Anniversary

I have always wanted to make these rolls. I have been missing Cinnabon's rolls since moving from Dubai, UAE. Most times I miss Cinnabon's Cinnamon rolls during a rainy day :) And would you believe it actually rained today (the first rain) and quite heavily may I add!


It has been a year since I first joined Bread Bakers. I still remember how a few days after joining Bread Bakers and the first event I was to participate in, I had heard of the sudden and untimely demise of my dear Mum. Today marks the first year since Mum left for Heavenly Abode. Mummy has always been my inspiration to bake and cook. She was a fabulous cook and her presence is truly missed in my life. I am grateful to our Good Lord for letting Mum continue to advise and be my guide especially in difficult moments and even when in the kitchen. The difference between how it was earlier when Mum was just a phone call away and now is that I listen to her advice to the 'T' with no questions asked. So yes I am thankful she still guides me. I still miss her like crazy though. Today I am quite spent from the difficult night I had mulling about Mum and our good ol' times.I miss Mum's jokes, laughter and smiles the most. Love you Mum and miss you loads.


I will be trying this recipe again. My biggest critic is my part time maid Betty. Since she loved the flavour of these rolls and my hubby and I felt it lack some more of the fluffiness to make it like Cinnabon's layers, I will definitely be going at this again. These reason for the slight flatness of these rolls is when I placed the tray into the oven to bake at 200°C, our apartment building's gas supply was over and they had changed it to the new supply during the bake. So for 5 of the 15 minutes of the bake the temperature was automatically changed to much higher than it was meant to be. Of course I figured this out at the last few minutes of the bake.


Unfortunately this recipe was meant to go into today's Bread Bakers' event of theme : Rolls. I had to go to church and when I came there was the first downpour of rains this year. I still tried to make it but looks like I messed up on the time conversion this time. I just heard its owing to the Daylight savings time which is an hour forward.


To make these super simple and luscious rolls, 

You need:

For the dough:


  • 1/2 cup warm milk (110 degrees F/45 degrees C) 
  • 1/4 cup white sugar 
  • 1 1/4 tsp dry active yeast 
  • 1 egg, room temperature 
  • 1/6 cup or 40 gms of melted butter
  • 21/4 cup plain flour 
  • 1/2 tsp salt


For the spread and sprinkle:
  • 1/2 cup brown sugar, packed 
  • 11/4 tbsp ground cinnamon 
  • 1/6 cup or 40 gms butter, softened 

For the topping:
  • 40 gms cream cheese, softened 
  • 30 gms butter, softened
  • 25 gms castor sugar or icing sugar 
  • 1/4 tsp vanilla extract 
  • Pinch of salt 


The Make:
Preparation time: 10 minutes | Resting time: 10 minutes | Baking Time: 15 minutes | Makes 9 rolls

1. In a small bowl, mix the yeast with the lukewarm milk and sugar. Allow to activate. If it does not froth, you need to try with a fresh batch of yeast.
2. In a large bowl, place all the dough ingredients and the prepared yeast and mix well.
3. Turn the dough out to a floured surface. Cover and allow to rest for at least 10 minutes. You will find the dough has doubled in size.
4. Preheat the oven to 200°C and lightly grease a baking 9X13 inch baking tray.
4. In a small bowl, combine the brown sugar and cinnamon powder.
5. Roll the dough into a 9X13 inch rectangle. Spread the dough with the 40 gms of butter. Sprinkle the dough evenly with the sugar-cinnamon mixture.
6. Carefully roll up the dough to a log. You can also use a baking mat to do this if unsure. Cut out 9 rolls and place them on the prepared baking tray.
7. Bake the rolls in the preheated oven until golden brown up to 15 minutes.
8. While the rolls are baking, beat the cream cheese, butter, icing sugar, vanilla essence or extract and salt.
9. Once baked, spread the frosting on the warm rolls just before serving.

Bon Appetit! Hope you enjoy this bake.


Sunday, 6 December 2015

Jamie Oliver's Aussie Humble Pie

Yes, yes yet another one of Jamie's specials and a long standing share from my side. 


I had used the filling two ways, one in a recipe I have already shared with you - A Tribute to my Inspiration, my Mummy - Pie Meat & Mushroom buns with Sesame and the other as the pie filling to Jamie's Aussie Humble Pie.


This make was a delightful  and savoury one both to my little one and my hubby. 


I simply love the golden crunchy crust. Thanks Jamie for yet another delicious dish.


I halved the recipe as the original was for 8 servings. This recipe calls for two of  some of my favourite treats Beef and Pie. 


Although Jamie had used pale ale in his recipe, I did my own subsitutions as ale was not available.


You can substitute it with chicken broth, ginger ale or white grape juice. 


I did a combination of chicken broth and ginger ale. 


Pale ale is a beer which is made by warm fermentation using pale malt mainly. The lighter colour of the ale is owing to the higher propotion of pale malt.


Recipe source : Jamie Oliver


You need:


For the filling:

  • 1/2 kg beef cum into 1 cm chunks (ideally beef skirt - cut of beef from the 'Plate'. See image)
  • Black Pepper
  • Olive oil
  • 1/2 whole nutmeg, grated
  • Salt
  • 1 large carrot, peeled
  • 1 red onion, peeled
  • 2 sprigs of fresh rosemary, leaves picked
  • 125ml pale ale (learn more here)
  • 1/2 tbsp full of plain flour
  • 1/2 tbsp tomato pureé
  • 125 gms button mushrooms
  • 1 medium egg yolk, beaten
  • Drinking water
  • Cold water
 For the pastry:
  • 300 gms plain flour, plus extra for dusting
  • 75 g cold unsalted butter, cubed, plus extra for greasing
  • 75 g Cheddar cheese
The Make:
Serves : 4 adults | Preparation Time: | Resting Time: 3 hrs - overnight | Cooking Time: up to 1 hr, 43 minutes

1. Place the beef chunks in a large bowl. Add a heaped tsp of pepper, salt to taste or a good pinch of it and 2 tbsp of Olive oil.

2. Grate in quarter of a nutmeg, toss well and coat all chunks. Set aside. Roughly chop the carrots, onions and rosemary leaves.

3. In a wide, medium sized pan/wok, heat a drizzle of olive oil over medium heat. Add the beef chunks and cook for about 15 to 20 minutes, or until the meat is browned all over and any liquid has evaporated, stirring frequently.

4. Meanwhile, heat another medium pan over a medium heat. Add the chopped vegetables and a drizzle of olive oil and cook for about 15 to 20 minutes, or until softened and caramelised, stirring frequently. Set aside.

5. Add the ale or the ale substitute to the beef, turn the heat up to high and allow the liquid to boil and bubble away, stirring and scraping all those lovely sticky bits from the bottom of the pan.

6. Next stir in the flour and tomato pureé and cook for 2 to 3 minutes, or until it forms a thick paste. Add the softened vegetables into the pan and pour in 1 litre of cold water. Roughly slice and add the mushrooms, then bring to the boil. 

7. Reduce the heat to medium, cover and simmer for 11/2 hrs then take off the lid and simmer for another 30 minutes, or until thickened and reduced and the beef is nice and tender, stirring occasionally. Season to taste, transfer to a bowl and allow to cool completely for a few hours or preferably overnight in the fridge. 

8. Meanwhile, make the pastry. Combine the flour and a good pinch of salt in a bowl, then grate in the Cheddar and rub into the flour along with the butter, until it resembles fine breadcrumbs.

9. Gradually add 125 ml of cold water, stirring continuously to combine, then use your hands to bring it together into a rough dough – be careful not to work it too much. Wrap the dough in cling film and place in the fridge until needed.

10. Preheat the oven to 180ºC. You can either serve this individually as Jamie did or as I did as one baked pie dish. For a single dish do the process of the pastry just once. For the individual pie dishes: Grease 4 individual pie dishes (roughly 15cm x 10cm) with a little butter and dust with flour. Divide the pastry into 4 equal-sized pieces, then roll out a portion on a flour-dusted surface to the thickness of a pound coin. Place 2 of the pie dishes side-by-side, roll the pastry around the rolling pin, hold it over the dishes and carefully unroll the pastry to cover. Gently press the pastry into the sides of the dishes, then rough ly cut away the excess so you end up with 2 lined pie dishes. Repeat with the remaining pastry, reserving the excess for later.


11. Equally divide the steak and ale filling between the dishes and brush the edges with the beaten egg. Divide the excess pastry into 4 equal-sized pieces, roll out to the thickness of a pound coin and place over the filling. Trim away any excess, crimp the edges with a fork and with the tip of a sharp knife or kitchen blade cut a little cross into the top. Brush over a little more beaten egg, then place in the hot oven for 25 to 30 minutes, or until golden and piping hot through. Serve warm with a dollop of ketchup or favourite sauce, your favourite seasonal greens and your favourite chilled drink.


Bon Appetit!


*Veg option:
You can make this same recipe using a vegetarian option of cottage cheese / paneer. 
1. Cut the cottage into cubes. You can easily reduce the cook time by half as paneer does not take that long to cook.  However I would suggest you play this by trial. Reduce the initial saute time to 10 minutes. 
2. Make sure to first saute the chopped vegetables and then the cottage cheese. 
3. Also the bake time can be reduced to 15 minutes or until the pastry is golden. 
4. Also instead of the egg wash over the pastry, brush the pastry with a tad bit of milk.


Thursday, 26 November 2015

Jamie Oliver's Best Eggnog in the World - The Ultimate Eggnog

Aha you must think that I am a die hard fan of Jamie Oliver. Well kinda. I dig his recipes for sure and especially his simple recipes to make awesome, delicious dishes which you can make in a matter of minutes and still look like you have slaved away in the kitchen.


So here goes the eggnog recipe from Jamie's Food team which is claimed and now I confirm to be the best eggnog in the world. I made two versions a virgin one for my little one and the full version. This I did last Christmas 2014. So for those of you who have been following G'Gina's Kitchenette's Facebook page or our Twitter page, the chapter must slowly be unfolding as to what I meant last Christmas by saying this :
"It gets tough to cook Christmas Eve Dinner, Christmas Breakfast and Lunch!! This year got special with Jamie Oliver taking over the kitchen! Thanks Jamie! You Rock! Merry Christmas all from G'Gina's Kitchenette!"

The author from Jamie's Food team who wrote this recipe, Meredith Steele did teach me something new about eggnog. She mentioned how the name 'eggnog' was acquired from a 14th century English drink called posset. Posset was a drink of curdled hot milk with ale and over sometime eggs were added to the concoction.


This preparation of this creamy, sweet drink starts with infusing cream with milk and cinnamon, nutmeg and vanilla beans. It is the warm infused milk which slowly streams into the beaten eggs and sugar. Then your rum or bourbon is what lifts its spirits. It is then refrigerated before the fluffy egg whites join the party of the eggnog for that face uplift. I however separated a portion of the eggnog from the main jug to serve to my princess later. I refrigerated hers separately and then added a portion of the fluffy egg whites to her serving.


Thankfully my parents rear poultry so my chicken eggs were fresh from their home farm.


This was my first try at making eggnog. Mummy used to serve a mean fruit punch/ cocktail punch. Never tasted her eggnog though.


You need:

  • 3 cups or 700 ml of whole milk
  • 1 cup or 240 ml of heavy or double cream (I used refrigerated Amul cream)
  • 3 cinnamon sticks
  • 1 vanilla bean pod, split and seeds removed
  • 1 tsp freshly grated nutmeg (set aside some additional for garnish - about a tsp)
  • 5 eggs, separated (I used our farm eggs)
  • 2/3 cup of granulated sugar
  • 3/4 cup of bourbon or Dark rum


The Make:
 Serves 8 | Preparation time: 10 minutes | Resting Time: overnight-3days

1. In a saucepan, combine milk, cream, cinnamon, vanilla bean, vanilla seeds and nutmeg. Bring it to a boil on medium heat.

2. Once it reaches a boil, remove from the heat and allow it to steep.
3. In a large bowl, whisk the egg yolks and sugar until combined and thick strands are formed when the whisk is lifted.
4. Next whisk in the milk and continue to mix until smooth and well combined.
5. Add the bourbon or rum and mix. Refrigerate overnight or up to 3 days.
6. Before serving, whisk the egg whites in a large bowl until soft peaks are formed. Then gently fold into the eggnog until combined.
7. Garnish with nutmeg and serve cold.

Happy Holidays all! Seasons Greetings from G'Gina's Kitchenette!

Wednesday, 25 November 2015

Crispy Fried Chicken


I know I said that I would be sharing recipes for Roasts and sides in the weeks to come. I did however forget to mention that the sides would not just be dips and salads/breads but also meaty (protein - veg/non-veg) starters/bites. After all you need to prepare a complete meal for the upcoming #Thanksgiving, #Christmas and #New Year celebrations. So the Crispy Fried Chicken did resonate out of Mummy's recipe of KFC (Kentucky Fried Chicken) - the recipe of which I will share another day (will not specify when ;) )


This is an all too easy recipe to create. I did mention in one of my recent posts of my little one's love for Chicken Drumsticks. Well this was to please my princess. I served this Chicken starter with the Coleslaw - the KFC way and some dips as well. Yes and this is one of those long overdue recipes that has been sitting on the back burner as well.


My little one raved about the crispiness of the chicken and to top it was all drumsticks. She loved it to the very last bite.


You need: 


  • 7-8 chicken drumsticks, cleaned
  • 3-4 cups of breadcrumbs
  • 2 large eggs, whisked
  • Salt to taste
  • Ginger and Garlic powder (optional)
  • 1 chicken stock cube (optional)
  • Oil - for frying battered chicken

Ammo required:

  • A large wok
  • A large flat plate with breadcrumbs
  • A perforated ladle
  • A perforated vessel lined with kitchen towel/tissues
  • A large bowl to whisk eggs and dip the chicken drumsticks


The Make
Preparation time: 5-10 minutes | Cook time: 20-30 minutes | Serves 4-6 adults

1.  The first step in the process of making the Crispy Fried Chicken is to lay out all the required vessels and ingredients. If using the ginger and garlic powder and the stock cube, make sure to powder the stock cube and add it along with the ginger and garlic powder to the breadcrumbs. Alternatively you can also add it with the egg but sometimes all of the egg does not get used.
2. In a large wok, heat the oil on medium-low heat. Meanwhile, roll the drumsticks in the whisked eggs draining off the excess back in the bowl and roll it evenly over the flat plate with the breadcrumbs already spread out.
3. Once the oil heats up, gently slide in the prepared drumsticks and line up without any overlapping or interaction between each drumsticks. After 2-3 minutes, using the perforated ladle, turn over the drumsticks and repeat after another 2-3 minutes. Ensure that the batter does not burn and if the oil gets too hot between batches, lower the heat and repeat. Each batch to follow would take lesser time to fry. The first batch may take up to 8-10 minutes depending on the size of your wok and weight of the drumsticks. Transfer the fried chicken to the perforated vessel to drain off the excess oil.
4. Once the batches of the chicken drumsticks are fried and drained off the oil, serve hot with your favourite sides. In my case, it was the coleslaw, hot chili sauce for me and hubby and tomato ketchup for the little princess. The tartar sauce was for the calamari -the recipe of which will follow soon enough.

Hope you and your little one(s) enjoy this make as well.

Thursday, 23 April 2015

Kids' Special # 2 - Ghee Chapatti (Indian Flatbread with clarified butter) with steamed buttered veggies and poached egg

If you have been following my posts since last week you may have noticed that I have started a new recipe series dedicated to the most precious beings in our lives..Our Kids! So for all your SAHMs and SAHDs, I am hoping to provide you with a variety of meals/snacks for the kids.


As I mentioned in my last Kids' Special series #1 last week, I did tell you that I want to make it easy for you to cook up your kids' meal simultaneously with the adult meal or taken from a part of the adult meal.


So here is this week's Kids' Special meal -  Ghee Chapatti (Indian Flatbread with clarified butter) with steamed buttered veggies and poached egg.


For the recipes:

Ghee Chapatti 

Steamed Buttered Veggies

Poached Eggs

Hope your little one(s) enjoys this meal as much as mine did!

The Almost Perfectly Poached Egg!

I have made poached egg for the family a couple of times now. They have so far enjoyed it quite a bit until I stumbled upon this video from BBC Good Food. I actually was in search of another egg recipe and found this.


Then I knew that my poached egg was just no where near perfect and I still believe after trying the tips in this video that I can improve upon the poached egg. I will let you know where I went wrong and you too can try to improve on your poached egg recipe accordingly.


The perfect poached egg when cut into would ooze out with the yolk!


You need:

  • 1 large and fresh egg (remember if there is no fresh egg, then don't bother trying this recipe)
  • Salt and Pepper to taste
  • Dash of vinegar
  • Water to poach 
  • A medium sized saucepan
  • Kitchen towel
  • A slotted spoon


The Make:
Preparation time: 2 minutes | Cooking time: 3 minutes | Serves : 1

Source: http://www.bbcgoodfood.com/technique/how-poach-egg

1. Heat water in the sauce pan and allow to simmer. Make sure you are using a medium sized saucepan.
2. Add the small drizzle of vinegar to the pan of simmering water.
3. Crack the egg carefully in a small cup or bowl, making sure not to cut into the yolk. Some like to crack the egg by tapping on a hard surface whilst others use the stem of a spoon or butter knife to crack at the shell. If you are following the latter approach make sure u crack only the surface, else if you touch the yolk with the metal spoon or knife, you can loosen the yolk into the egg white whilst pouring into the cup.
4. Create a whirlpool in the water using your spoon. This would ensure that the egg white wraps well around the yolk.
5. Tip the egg into the center of the whirlpool or pan of just boiling water. Lower the heat to medium-low and allow the egg to cook for 3 minutes.
6. Once cooked, remove the poached egg with the slotted spoon and leave any feathery edges by cutting it using the edge of the spoon against the pan.
7. Drain the egg on a kitchen towel else you would find eggy poaching water with your egg.
You can also trim the edges of your poached egg once at room temperature to make it into a perfect tear drop shape (the kind you would find at your fine dining restaurants) :)

Season with salt and pepper and serve with toast, flatbread or on top of your salad.

My kid loves poached egg esp. when she sees the yolk spill out of the white when cut into.


Bon Appetit!


Friday, 17 January 2014

My Chocolate Souffle - Happy New Year 2014

Happy New Year 2014 my dearest readers, family and friends! I started this New Year with three letters of the alphabet 'Y.E.S'! This is the year of Good Tidings and all Good News! So for my first recipe of the New Year, I wanted to begin with something deliciously sweet. Incidentally, it also something borrowed (from almost a decade ago) and a rather simple make!


This recipe creation is one dear to my heart. It reminds me of a time when I was with my family in Dubai. This was before I was married and was staying with my parents, sisters and bros-in-law. My eldest sis was expecting her first bundle of joy then! My BILs used to tease me with the name souffle (sou-fly, etc.) I had made 'my chocolate souffle' all too often and it was a welcome dessert at home. It was a sure way to get to the heart! No wonder I remember this recipe so fondly!

You can make this recipe with cocoa or chocolate. You can also choose to use the dark-bitter sweet chocolate, white chocolate or regular cooking chocolate. I had used cocoa, a decade ago when I used to make the souffle often. This time I tried it with cooking chocolate.


Now for the souffle, it would be advisable to use ramekins however if you do not have ramekins available, your options could range between sturdy coffee cups, thick glass bowls, steel bowls or even orange peels as pointed out by my foodie group friend Sanaa.


You need:

  •  500 gms butter
  • 150 ml milk
  • 75 gms castor sugar/ brown sugar
  • 25 gms cocoa or 20 gms of cooking chocolate
  • 100 gms plain flour and 1/2 tsp of baking powder or 100 gms of all-purpose flour
  • 3 eggs, separate whites and yolks
  • Extra castor sugar for dusting
  • Water for cooking souffle and melting chocolate


The Make:
Makes 4 standard size ramekins | Preparation Time: 5 minutes | Cooking Time: 20-25 mins

1. Butter the ramekins well on all corner even the rim of the ramekin and set aside.
2. Melt the butter, milk, sugar and cocoa or chocolate in a double boiler.
3. Once melted, turn off the flame and set aside.
4. Add in the sifted flour in the melted chocolate mix and whisk well.
5. Whisk in the egg yolks and mix well.
6. Next add in the egg whites and whisk well till evenly blended.

For the cooking process, you can do this two ways, either on stove top or in the oven. In both cases, you need to place the ramekins in a deep-bottomed pot with a lid. Make sure to add enough water to half cover the ramekins from the base.

7. Pour the whisked batter into the prepared ramekins up to 3/4th of each of the ramekins allowing room for the souffle to expand. Tap the bottom of each ramekin on the table top to ensure the batter evenly sits in the ramekin.
8. Place the ramekins carefully in the prepared pot on a medium-low flame. Cover and cook for 20 minutes. If you are using the oven, preheat the oven to 180°C and place the deep-bottomed pot in the center of the oven and allow to cook for 15-20 minutes.
9. The souffle would have risen over the ramekin at least to 2/3rd its original height and would jiggle a bit but the top would be set.

I personally love having this souffle nice and warm but you can also have it at room temperature or cool as has been enjoyed by a few friends of mine.

Hope you enjoy making and serving this souffle. I call this 'My Chocolate Souffle' as I have experimented with this souffle so much over the years that it has become 'mine' :)

With Valentine's Day in less than a month you might want to try experimenting with/practicing this recipe creation ;) This recipe as I mentioned earlier is a sure way to one's heart :) You can  serve the souffle by making a small dip in the center of the souffle and adding a spoon of ice cream or cream or grated white chocolate or even melted cheese.

Bon Appetit!

Sunday, 24 February 2013

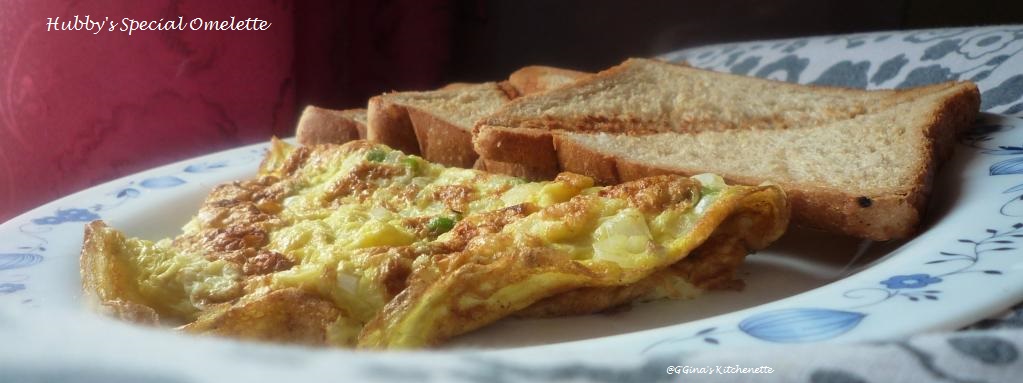
Hubby's Breakfast Special Omelette w/Toast - Hubby's Special!!


Yes I know, I know who can't make an omelette! But ask yourself this question what is a perfect omelette? One that has the flavour, does not break and evenly cooked. Of the many omelettes I have had, I have to admit the one that caught my taste buds has been the one that my hubby Anup cooked for me. What a way to woo the wife on the first morning home after the wedding celebrations. On my lazy morning days, I normally ask him to chef the breakfast and on one such morning, he made this omelette delight. Served with toast and OJ what a way to begin the day!


Now confession time, my omelette sucks! No seriously compared to what Anup or mom makes, mine really sucks. Anup also does a neat cheese omelette. But this one is by far, the best. The technique is what makes it truly unique. I will try and share this as closely as possible without losing any details. I also will try and upload a video if possible so you can see it in action and know what I am talking about.


You need:


  • 2 large, organic eggs or farm eggs
  • 2 green chilies, diced finely
  • 1 onion, diced 
  • Salt to taste
  • 2 tbsp cooking oil
  • Toasted bread of your choice


The make:
Serves 2 adults | Preparation time: 5 minutes | Cooking time: 10 minutes

1. Heat a non-stick skillet and add the oil. Grease the skillet on all sides and pour out the excess oil in a bowl and set aside.
Tip: Remember the oil is required just enough to grease the pan. So you can reuse it in case you wish to use the egg batter in 2 batches.

2.  Add all the remaining ingredients in a bowl and whisk lightly.

3. Pour the egg mixture evenly on all sides of the skillet. Ensure the egg mixture is uniform on all sides of the skillet.

4. After about a minute, loosen the sides of the egg to allow it to be flipped after 4 more minutes of cooking.

5. Next toss the egg on the other side and press the tip of the spatula randomly on all sides of the egg surface to ensure the heat goes through egg base. 
Tip: Remember not to tear the egg in doing this process. 

6. Allow it to be cooked for 4-5 minutes and evenly undo the egg from the spatula and place on the serving plate.


7. Serve with toasted bread and OJ.

Bon Appetit!

Friday, 17 August 2012

Anniversary Chocolate Love Cake Surprise


I had made this Chocolate Surprise for my partner last Anniversary and he loved it to bits. He is not a very Chocolattey fan but this one definitely took a large share of his heart! Not to forget my lil' munchkin Izzy who had her face full of chocolate as she enjoyed it to bits. She like me loves chocolate. I gained a nickname of being called "Chocolate" by one of my ex-colleagues Thomas Forsch. Every time I achieved something at work he promised me a bar of chocolate, instead one fine morning he surprised me with the most moist melt in your mouth chocolate cake from one of the bakers in Sharjah, UAE.

Anniversary Love Cake


I must confess that I started my cooking and baking adventures with baking chocolate cakes. Every birthday I remember my parents used to get me chocolate cakes only as they knew I loved it. Going through family pictures, one thing that remained constant in all my birthday pictures was the assured chocolate cake and I pride in making good chocolate cakes. Its a sure way to get my heart thumping!

Ready to Surprise


I do not enjoy sugar coated icings or butter icing as much as I do the one made with bitter-sweet real chocolate. This is a simple chocolate cake guaranteed to melt-in-your-mouth! Please do not expect this cake to last long on the cake tray but I would ask you to share the cake as it is quite rich in flavour.

To make this cake,

You need:
  • 1 cup (250ml) water
  • 150g unsalted butter, cut in medium pieces and softened naturally
  • 4 tablespoons cocoa, sifted
  • 2 cup (300 g) sifted plain flour (You can also use all-purpose flour ideally but I do not have this available in India)
  • 1/2 tsp bicarbonate of soda, sifted
  • 1/2 tsp baking powder
  • 2 cups (440 g)powdered sugar or castor sugar(11/2 cups would also be ok if you do not want it too sweet)
  • 2 eggs
  • 1/2 cup (120 ml) fresh full-cream milk (sieve the cream out after boiling and cooling)
  • 1 tsp vanilla essence
  • Chocolate Cream Icing


The make:

Cooking Time: 45 minutes| Preparation Time: 30 minutes| Serves 8 adults

1. Sift the flour, cocoa, baking powder and bicarbonate of soda  and keep aside in a separate bowl (this is going to be your main mix bowl so make sure its fairly large). Leave this to rest for at 20-30 minutes. You can do this well ahead of the preparation and baking time owing to the resting time required.

2. In a separate bowl, whisk the eggs well until fluffy. Add the sugar and whisk further for another 5-10 minutes. Set aside.

3. Add the egg mixture to the flour bit by bit and mix well as you add the egg mixture. Add the softened butter to the mix and continue whisking well.  Leave the cake batter to rest for about 15 minutes. Add the milk bit by bit checking for consistency. Note: You may not need to add all of the milk.

4. Preheat the oven for about 10 minutes on a medium heat.

5. Dab a little butter on your cake tray to moisturise the cake tray (you can also used baking paper). Lower the heat to about 150C (which is normally on the lower end of the heat scale).  Bake for about 40-45 minutes or until cooked when tested with a toothpick/skewer.

(Hint: Be alert of the cooked smell of the cake and check through the oven window to see  if the cake has risen. wait a few minutes, open the oven door and check with a skewer to see if it is cooked. The skewer should come clean, i.e. no wet batter on the skewer).
6. Allow to cool in the cake tray for 5-10 minutes. Turn out onto wire racks/ clean tray to cool completely.

7 . Touch the cake top. If it has cooled completely, use a butter knife to dab the chocolate cream icing or Nutella and run the knife evenly across the sides of the cake and the top. Smoothen out any uneven layers. The kids normally love it when you top it with Gems or on the sides of the cake or shaved chocolate pieces.

The First Slice Shared

The Moist Cake Center


And there you have it your Chocolate Love Cake ready to Surprise your Love! Enjoy (I'm sure I do not have to say that;-) )
Close Up