"This is a journey of my life since I was all of 12 yrs when I started my hand in cooking to now with displays of my learning and creations of recipes from around the world. My inspiration and role model has always been my Mum who has always created dishes from around the world and excellently well. I do not believe I would ever match to her culinary skills. I remember the times she could cook and bake almost 4-5 dishes in one go without ever letting one go under cooked or burnt! I was born and raised in Dubai, UAE and recently moved to India for family reasons. Kitchenette just means that over the decades, my kitchen has changed from that of my mum's to my uncle and aunt's, to my home in UAE and now in India. Pala't'te, describes both global cuisines ('Palatte'-diverse flavours) and pleasing diverse 'Palates'."

Wednesday 30 September 2015

Coleslaw (the KFC way)

Eating out is something which every family may want to do sometime or the other, most times during the weekend and with kids at home, it would probably be from the fast food chain. I quickly noticed on my move from UAE to India, that the one thing missing from most and literally all fast food chains was 'Coleslaw'. Even when I finally found one that did include coleslaw along with the main protein, it lacked the flavour that a good coleslaw contained.


Kentucky Fried Chicken (KFC) is one such outlet in the UAE, whose coleslaw I came to like. I say came to like as when I was young anything related to mayonnaise would give me a headache like you would not believe. I disliked coleslaw as a result back then.


Well I have been meaning to try out mum's version of KFC for a long time now and I am getting close. In fact hers is the non-fry version, so I am keen to share it very soon. Since I bought a second head of cabbage quite recently and mainly for the purpose of making coleslaw, I went all out yesterday and made it along with some Crispy Fried Chicken and Calamari as well.


Oh my I did not expect the turn out of the coleslaw to be so good! It tasted so close to the KFC make itself, I am quite surprised I nailed it. In fact the only thing I would have done differently is to have used a smaller size onion and preferable a white onion with white pepper powder (not black pepper). I have made notes of this in the Ingredients section below.


I can guarantee that once you make this your kids would probably think you bought it from a KFC outlet. Actually I would recommend you serve it in one of your KFC takeaway bowls. Foolproof and a sure winner!

You need:

  • 4 cups of finely chopped cabbage (approximately 1/2 of a cabbage head) 
  • 1/4 cup shredded carrot (1 medium carrot) 
  • 1 tbsp minced white onion
  • 1/4 cup mayonnaise 
  • 1/3 cup granulated sugar 
  • 125 ml milk 
  • 125 ml buttermilk 
  • 11/2 tbsp lemon juice 
  • 3/4 tbsp white vinegar 
  • 1/4 tsp salt 
  • Pinch of white pepper powder

The Make:
Preparation Time:10-15 mins | Serves 5-6 adults

1. Ensure that the cabbage and carrots are diced finely to the size of rice grains. You can use your food processor. I used my very handy Philips hand blender.
2. In a large bowl, combine the rest of the ingredients and whisk well until smooth and creamy.
3. Next add in the chopped vegetables and onion and mix well.
4. Cover the bowl and refrigerate for at least 2 hours before serving.

Serve on the side of your favourite protein. 

Friday 25 September 2015

Pepper Chicken drumsticks in a light Tomato gravy

I had made this chicken dish as an accompaniment for the Carrot-Coconut rice.

My little one prefers the drumstick pieces of the chicken. So she asked,  "Mama, why can't you buy just the drumsticks?" And so I did. I had a little fun at it too. When she actually expressed how she enjoyed this make (when Dad was over last weekend), I had a bit of fun saying, "Hey see Mama found a chicken who had only legs and that's why there are so many in this gravy!" :D She is too smart for me though! She caught me out in less than a minute.


Although I ventured to make this recipe in my mum's way, I realised that it was not possible without red chili powder, so I just took the inspiration and ran a modified version to the same recipe to accommodate both Daddy's and Isabelle's taste buds and tummies. I will add Mum's complete version once I have tried the same.


This recipe calls for a slow cooking process to add more flavour.

You need: 

  • 14 pcs of chicken drumsticks, cleaned and slit across the fleshy part of the drumsticks
  • 2 medium onions, diced finely
  • Salt to taste
  • 2 medium size tomatoes, chopped
  • 1 tbsp pepper powder
  • 1 tbsp coriander powder
  • 1/2 tsp turmeric powder
  • 1/2 tbsp Garam Masala
  • 1-2 cups of drinking water
  • Oil to drizzle

The Make:

1. In a large non-stick pan, drizzle some oil. Toss in the onions on medium heat and saute well until translucent.
2. Next toss in the chopped tomatoes and lower the heat.
3. Saute on low heat and then add the salt and all the spices. Cover and allow to cook slowly on low heat.
4. Uncover and add in the chicken pieces in about 2-3 minutes and cover the pan once more and continue to cook slowly for the next 40 minutes.* Add water as required only. Most likely you would not need to as the chicken releases the liquids which makes for a very nice gravy.
5. Once cooked, turn off the heat and serve hot with rice or rotis.

Enjoy!!

*Note:
 i. If I had used the whole chicken, it had to be cut into small sized pieces and would take an hour and a half over slow cooking process to get this recipe right.

Tuesday 22 September 2015

Asian inspired Snake gourd


This recipe has been a repeated experiment for quite a while now and I have the ingredients experimented across a variety of veggies but most commonly for the humble bitter gourd. This time I tried it with snake gourd.


It was an excellent accompaniment to the Keralite spicy fish curry and rice. Yum!


You need:

  • 500 gms of snake gourd, thinly sliced
  • Salt to taste
  • 2-3 tbsp of jaggery
  • 1 tbsp of black sesame seeds (you can use the white, split ones as well)
  • Oil to drizzle
  • 1 tbsp soya sauce
  • 1 tbsp of pepper powder
  • 1 tbsp of ginger-garlic-chili sauce or you could just add a tbsp of ginger-garlic paste and a sprinkle of crushed, dried red chili


The Make:
Preparation Time: 10 minutes | Cook time: 15-20 minutes | Serves 2 adults

1. In a non-stick pan, add a drizzle of oil, toss in the snake gourd, salt and saute well.
2. Next add in the mixture of jaggery, black sesame seeds, soya sauce, pepper powder and the ginger-garlic sauce/paste.
3. Saute well  and cover and cook for about 20 minutes.
4. The resultant snake gourd would be sticky, sweet and somewhat crunchy. Serve hot on the side of rice and spicy fish curry.

Bon Appetit!

Monday 21 September 2015

Jollimama's Coconut Chutney

I have always made coconut chutney Mummy's way as she was the one to teach me how to make the coconut chutney which goes so well with both Idlis and Dosas. After mum passed away, Jollimama (my Dad's sister) came to stay and helped us a great deal! Loved having her with us. She has such a comforting voice and her presence helped us a lot.


At the time, I learnt how to make her version of the coconut chutney which included the addition of small onions/shallots/pearl onions ('Kunjulli '<Malayalam>) , popularly known as sambar onions in India. Mum did use small onions when available or even the normal pink/purple onions (Allium cepa). Jollimama also advised to grind some of the curry leaves while grinding the pearl onions, so that is what added so much flavour to the chutney. Besides that the make was similar to Mum's make.


You need: 

  • 2 cups of coconut gratings
  • Salt to taste
  • Curry leaves -  1 sprig
  • Ginger - 1", chopped
  • 1-2 green chilies (depending on how spicy you would like it)
  • 1 tsp mustard seeds
  • 1 tbsp of oil
  • Drinking water - a tad bit*


The Make:
Preparation Time: 5 minutes | Cook Time: 5 minutes | Serves on the side approximately of 20 idlis or 12 dosas

1. Grind the coconut gratings, salt, half a sprig of curry leaves, ginger and the green chili well.
2. In a deep bottomed pot/pan, add the oil and splutter  the mustard seeds. Add the remaining curry leaves and fry on medium heat.
3. Next add in the ground coconut mixture on low heat and allow to cook. Clean out the grinder with a tad bit of drinking water, enough to form a thick gravy*, taking care not to add too much water which will ruin the consistency and flavour.
4. Add the water to the ground coconut mix. Turn off the heat when the chutney warms up. Do not bubble away which would split the chutney.

Serve warm on the side of idlis or dosas.


Enjoy!! :)

Sunday 20 September 2015

Coconut-Carrot Rice

Ah such a comforting meal we just shared with Dad who is in town. This recipe came out from two recipes, one from my sis-in-law Bhavna and the other from the Thai Coconut rice that I had shared. I tweaked the latter a bit more with the toasted coconut gratings. It was amazing. Just goes to show that if you put a little bit of love in the cook, it comes out unexpectedly amazing. The rice was nice and fluffy too. I am sure that Mum would have loved it and plus the texture was exactly as she enjoys it -not mushy at all.


You need:

  • 1 cup of fresh coconut gratings or 1 cup of coconut cream
  • Salt to taste
  • 2 cups of basmati rice / long grained rice, cleaned and set aside in bowl with water to soak
  • 2 cups of boiling hot water
  • 3-4 large carrots, grated
  • 1 tbsp of butter (optional)
  • 2 drizzles of oil


The Make:
Preparation time: 10 minutes | Cooking Time: 15-20 minutes | Serves 3 adults

1. Grind the coconut to take the first milk and second milk (Refer Coconut Milk recipe here). Set aside the gratings from milk extracted coconut.
2. In a large wok, drizzle some oil and saute the residual coconut gratings until lightly browned. Set aside.
3. In the same wok, add a little oil and fry the carrot gratings on medium-low heat. Sprinkle some salt to taste. Saute for 5-10 minutes.
4. Add a tbsp of butter and then lower heat. Add in the second extraction of the coconut milk and the boiling hot water to the wok.
5. Once the water reaches boil point, add the cleaned rice from the soaking bowl, a fistful at a time.
6. Cover and cook for 10 minutes. Then add the first milk. Cover and cook for another 10 minutes. Check in between to see if the rice is not sticking to the wok. In the last few minutes before turning off the heat, top with the toasted coconut gratings.
7. Fluff the rice with a fork a and transfer to a serving bowl once cooked.

Serve hot with your favourite gravy. For us it was Pepper Chicken Drumstick in a light tomato gravy and Cucumber Raitha.

Bon Appetit! "This is what's for dinner tonight folks!"

Saturday 19 September 2015

Okra curry - Mum's recipe

I always, always loved Mum's Okra curry. I miss it lots now! The other day as I was stewing thinking of what to make for lunch the following day, my thoughts treaded upon mum's okra curry and I found myself yearning for it, then teared up.


I then felt a convincing voice/thought that said, "Oh you can make it from memory! After all how many times have you witnessed this make?"


So I ventured on making Mum's Okra curry (Vendakya curry).


It turned on somewhat quite close to what she made but what would I not give to taste her make one more time. Sigh! Sorry dear readers the grieving process from losing your mum esp. one who has inspired your cooking/baking, etc is tremendous that I am quite unsure if I would ever come out of this. Love you Mum and miss you loads.


You need:

  • 500 gms of lady's fingers/okra, chopped
  • 1 tbsp of red chili powder
  • 1 tbsp of coriander powder
  • Salt to taste
  • 1 large onion, diced lengthwise
  • 2 medium sized tomatoes, chopped finely
  • 1/2" ginger, chopped finely
  • 3-4 cloves of garlic, chopped finely
  • 1/4 tsp mustard seeds
  • Curry leaves - 1 sprig
  • Drizzle of oil
  •  Up to 1 cup of drinking water or 1/2 cup drinking water & first and second milk of half a medium sized  coconut.


The Make:
Preparation Time: 10 minutes | Cooking Time: 20-25 minutes | Serves 3-4 adults

1. In a non-stick pot, drizzle some oil and once warm, add in the mustard seeds. Allow to splutter.
2. Then toss in the curry leaves on medium low heat.
3. Add in the onions and saute on medium heat until the onions are translucent. Next add in the ginger and garlic and saute for a minute. Then add the spices and salt and saute well for another minute.
4. Next add in the okra and saute well.
5. Add in the tomatoes stir well until the tomatoes have softened and the stickiness of the okra disappears. This would take between 3-5 minutes.
6. Add about half a cup of water and stir well. Check to see if the okra is almost fully immersed in the gravy, else add another half cup of water or the second milk of the coconut gratings.
7. Cover and allow the okra to fully cook and flavour the gravy over the next 15 minutes. Then lower the flame and add in the first milk of coconut gratings. Allow to warm up and turn off the flame.

Serve hot with piping hot rice or your choice of roti. Bon Appetit!

Friday 18 September 2015

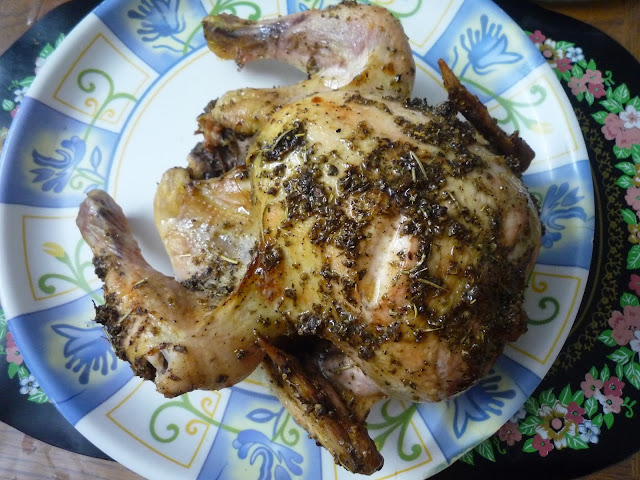
Lemon and Herb Roast Chicken

I am baaaack. Didn't expect me so soon did you :)? Well I am here and this time again with another super simple recipe.

Although I specify two herbs, you can add more or different herbs as well. I tried this combination and I have to say I am quite inspired with this experiment.

This chicken borrows more of a Mediterranean flavour. Herbes de Provence, a mixture of several dried herbs such as thyme, oregano, rosemary, marjoram and savoury, is typical of the Provence region of South East France. Oregano is common in the Mediterranean region.


You need:


  • 1.2 kgs of whole chicken with skin on, washed and cleaned well
  • Salt to taste
  • Half a shake of Herbes de Provence
  • A good shake of Oregano
  • 1 tbsp Pepper powder
  • A drizzle of olive oil
  • 1/2 a lemon
  • 2 drops of clove oil (you just have about 3-4 cloves sitting in some warm oil for about half a day, strain and use) - optional *
* You can also use biriyani oil in case available.


The Make:
Preparation time: 10 minutes | Roast time: 1 hour | Resting time: 10 minutes | Serves 3-4 adults

1. Preheat the oven to 180°C. Form slits all around the chicken with a sharp knife edge and allow the cleaned chicken to drain in a colander.
2. In a bowl, mix the herbs, pepper, olive oil and salt to taste.
3, Rub into the chicken well, taking care to tuck in some of the spice rub into the slits on the chicken and some in the cavity as well.
4. Squeeze the lemon juice over the spice rub and massage the chicken once more.
5. In a large roasting pan, lay the spice rubbed chicken carefully and pop it into the oven.
6. Roast until golden brown on top and the chicken is cooked well for about an hour.
7. Rest in the oven for about five minutes and then remove from the oven and rest for five more minutes.

Serve hot with a side of your favourite salad and choice of bread.


Bon Appetit! My little one loved this chicken make as well (PS for those of you who do not know - my little one is my biggest critic ever! :) )

Thursday 17 September 2015

Papaya Pudding

Most of my recipes have either come from mom, inspired by mom, learning inspired from some of my favourite chefs from around the world or my loved ones/friends. But like I have mentioned time and again from the inception of this blog, although my recipe creations have been 'inspired' by some of my heroes/heroins, a lot have been experimented and re experimented.


This is one such simple recipe. It was meant to be a papaya juice/milkshake but ended up being a pudding and a very good one at that. What is comforting to know, is that Our Good Lord already blessed us with some naturally sweetened produce, so I did not use even an ounce of sugar in this pudding. For a 5 year old to say "its superb mama" with zero sugar in it, is commendable, not on my part but on our Lord's part for creating such naturally sweet and lovely produce for us.


Although the Fall season is in, Papaya bears fruit almost all throughout the year. It is either spherical in shape or pear shaped and has a world of health and nutritional benefits.


(This wasn't the exact Papaya I made the pudding with as I had forgotten to snap a picture before attempting this make. The skin has to be less of to no greens and more of yellow.)

Dad and Mum have a spectacular collection of homegrown fruits, veggies, herbs, flowers, etc. Some trees have been there for many, many decades since grandma used to live in the same home while we were overseas.


Dad and Mum have been living next door to Dad's cousin and I just learnt that Geeappapa (Geemon) and Pushpa aunty's papaya tree just fell owing to the heavy rains and it was full of lovely papayas. When I was at home a week ago Dad gave me two varieties of papaya, one was planted by my dear mum and has borne such lovely papaya fruit and really big sized ones as well. Dad sent a couple of papayas to my sisters overseas as well. We all wanted to have mum's first crop of papaya produce. We miss her very dearly.
It is still very green and raw, but I wait on with bated breath for it to ripen so I can create something special in mum's honour. I almost have an idea what it is going to help me create in the weeks to come.


The other papaya is a longish, less broad. The pulp when the fruit is fully ripened has a very sweet and somewhat nutty taste when over-ripened. So while I waited for this papaya to ripen, it actually over-ripened overnight although it did take quite long to reach that state. I am not sure why it does that. I feel this variety of papaya actually taste better in a mashed form than when chopped up into slices.


Cinnamon has a unique quality of taking the place of sugar and beats the artificial sweeteners any day. You may want to try cinnamon as a healthy substitute even in your every day coffee or milk. It has so many nutritional/health benefits as well.

When I mentioned a few thoughts ago that this recipe is a simple one, you cannot imagine just how simple it is! Let me tell you now how simple it is,

You need:

  • A medium sized papaya (preferable the longish variety as shown in the picture above), chopped
  • 2-3 tbsp of milk powder of your choice
  • 2 tsp of cinnamon powder (I like my a little less than finely powdered)
  • 1 cup of cold water
  • Finely chopped almonds or cashew nuts (optional)

The Make
Serves 3 adults | Preparation time: 5 mins | Resting time: 3-4 hours minimum

1. Pulse the papaya pieces,1 tsp cinnamon, milk powder and water in your standing grinder or juicer for  20 counts on high and 10 counts on low. Rest and repeat twice.
2. Stir in the optional almonds or cashew nuts into the mixture at this stage if using (I did not use it this time).
3. Transfer to a large serving bowl or individual serving cups. Cover and refrigerate for 3-4 hours.
4. Sprinkle the remaining cinnamon on top of the serving bowl or in each serving cup.

Serve cold. Bon appetit. (Trust me if a 5 year old who does not really fancy papaya much loved this so would your loved ones/kids)