"This is a journey of my life since I was all of 12 yrs when I started my hand in cooking to now with displays of my learning and creations of recipes from around the world. My inspiration and role model has always been my Mum who has always created dishes from around the world and excellently well. I do not believe I would ever match to her culinary skills. I remember the times she could cook and bake almost 4-5 dishes in one go without ever letting one go under cooked or burnt! I was born and raised in Dubai, UAE and recently moved to India for family reasons. Kitchenette just means that over the decades, my kitchen has changed from that of my mum's to my uncle and aunt's, to my home in UAE and now in India. Pala't'te, describes both global cuisines ('Palatte'-diverse flavours) and pleasing diverse 'Palates'."
Showing posts with label Thyme. Show all posts

Friday, 18 December 2015

Mediterranean style Roasted Chicken with Garlic basted Roasted veggies


For a new twist to your traditional Christmas home roast, why not try a Mediterranean one.


Living and working in the Middle East esp. the cosmopolitan Dubai, you get to meet a whole lot of people from all over the world.


I have a fair share of friends from all over the Middle East. Learning their cultural cuisines was one of my favourite learning. So I did get a lot of recipes and tips from them.


This one is for the adventurous YOU who just doesn't want a traditional Christmas roast but exploring each year and wow-ing your guests and loved ones each time.


What you need:

For the Marinade


  • 1 lemon
  • 1 cup of Tomato paste or puree 
  • 1/2 tbsp paprika
  • 1/2 tbsp coriander powder (freshly powdered from coriander seeds)
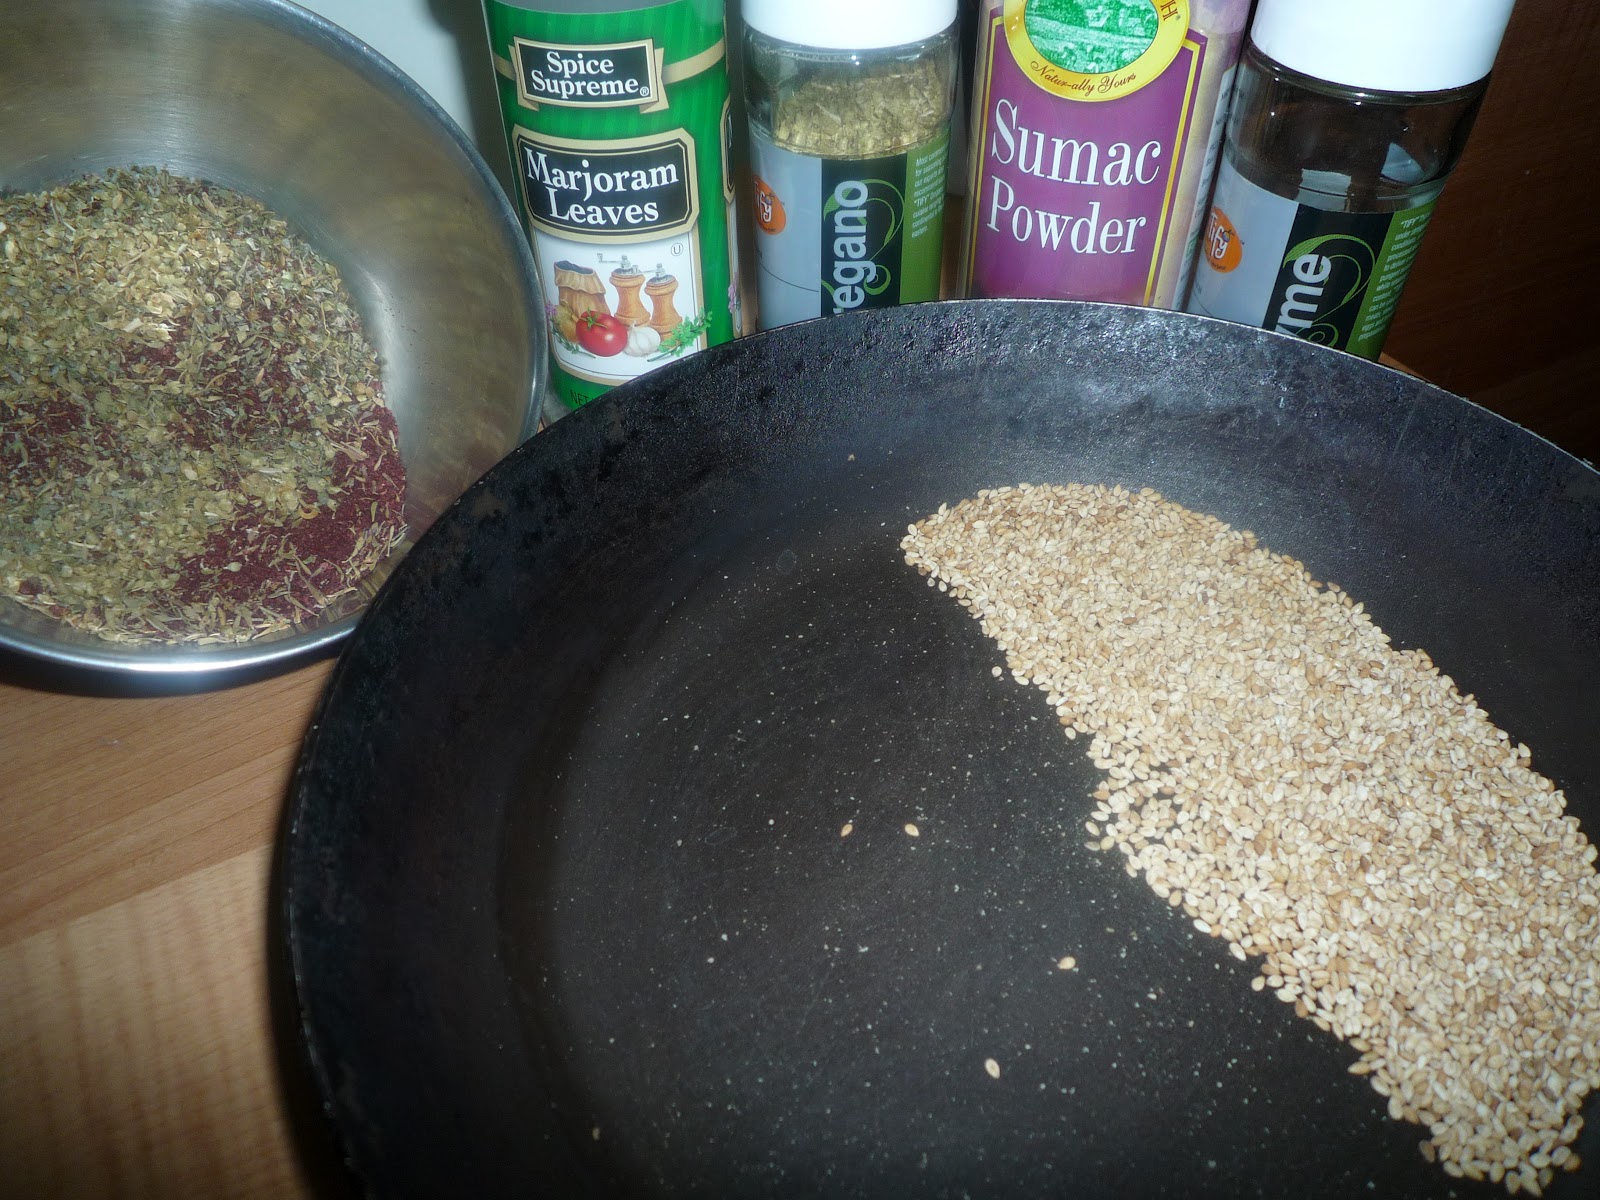
  • A mix of herbs such as Marjoram,Oregano,Sumac,Thyme and Rosemary
  • 1/2 tsp cumin powder (freshly powdered from cumin seeds)
  • 1 tbsp Salt

Other ingredients:

  • Whole spices such as Bayleaf, Cinnamon, cloves
  • 5-6 Garlic cloves - crushed
  • 4-5 medium sized potatoes (skin-on), cleaned well
  • 1200 gms chicken (skin-on)
  • Extra virgin olive oil (EVOO)
  • 2-3 tomatoes, chopped
  • Shallots/Onions, chopped


The Make:

Preparation time: 10 minutes | Cook Time: 15 minutes | Roasting Time: 1-1 hr and 20 minutes

1.Boil the potatoes with a few stabs in between (no need to cut them now) until half boiled. You can added carrots or other veggies too if you like.

2.Slit the chicken on all sides esp. legs taking care not to cut too much into the meat. On a non-stick roasting pan, add 2 tbsp EVOO, and brown the chicken on all sides, esp the legs as they take longer to cook.

3.Then wait for the chicken to cool down a bit and then add the whole spices in the roasting pan around the chicken. Also place the shallots around in the pan. Rub the marinade well on the chicken and in the cavity and into the slits made earlier.

4. Boil a lemon whole for 5-10 minutes. The larger lemons (not available here) need 10 minutes. Next stab in a couple of times around the lemon and stuff it into the cavity of the chook.

5. Toss in the boiled potatoes cut in quarters.

6. Roast chicken on wire rack (optionally) with the same roasting pan below at 150°C for an hour and then up to 20 minutes on 180°C breast side facing down until the skin is nicely crisp.

7. Meanwhile, to prep the roasted potatoes crush 5-6 cloves of garlic using a mortar and pestle (you can also use an electric grinder) add a little EVOO and further crush to a creamy garlic paste.


8. Add a dash of salt and marinade chopped tomatoes with the creamy paste. When the chook is ready, place the potatoes on a serving dish, pour the garlic paste with tomatoes and some of the juices from the roasting pan.

9. Add some lemon juice from the lemon from the chook's cavity and toss well.

Serve the roasted potatoes on the side of the chicken with some hummus and white rice if you need.


Bon Appetit! Hope you liked our Mediterranean style Christmas Chicken roast!

Try G'Gina's Kitchenette's Hummus recipe here

Wednesday, 25 November 2015

Jamie's Oozy Beans with Spinach

This recipe is long overdue and as I had mentioned my last blog post on Chicken Masala Roast with Soya Sauce, I will be sharing roasts as we get into the holiday season of Thanksgiving, Christmas and New Year to help you prepare your celebratory meal. This is a perfect side to your Roast. I had served this with Jamie Oliver's Perfect Pork Loin with Crackling. Of course Jamie's Oozy Beans were Borlotti Beans (aka Cranberry beans) served with Agretti. Since Agretti was unavailable, I substituted with Spinach and Parsley. Also since I had no idea of where to get Borlotti Beans from or if they were even available in the local market, I substituted it with black-eyed beans or black-eyed peas which in some cultures are served within a New Year meal as it is supposed to ward of evil eyes. As noticed above, I have also substituted a couple of ingredients owing to the fact that it was no available in the local market.


This has to be the most simple side dish you can prepare to go with your elaborate main course and it is incredibly healthy. 


You need:
  • 1 small potato, cut in half
  • 1 large tomato
  • Water as required
  • 3 cups of black-eyed peas/ black-eyed beans
  • Bouquet of garni (as Jamie calls it - thyme, bay and sage leaves tied together. I used dried sage instead)
  • Pinch of Soda Bicarbonate
  • 6 tbsp + 1 drizzle of EVOO (Extra Virgin Olive Oil)
  • Pinch of salt
  • 1 tsp white vinegar
  • 1 bunch of parsley, few basil leaves, chives, thyme leaves (as available), finely chopped
  • 1 bunch of spinach, cleaned and chopped


The Make
Preparation time: 10 minutes | Soaking Time: 4 hours min | Cooking Time: up to 1 hour | Serves 4-5 adults

1. If you were using dry Borlotti Beans then you could soak it overnight in  a large pot with the beans covering only 1/4 of the pot and the rest covered with water and a pinch of soda bicarb. Then discard the water. In my case, since I was using the smaller black eyed peas, I soaked mine for 4-5 hours only.
2. In a large pot add the beans, herb bouquet, potato and tomato in full. Fill the pot up with water (twice as much as the beans).
3. Bring the beans to a gentle simmer for 50-60 minutes. When it is about to boil, turn down the flame. Resist the urge to cook these beans in a pressure cooker as the turn out would be different and so would the taste.
4. Next take out the potatoes, the herb bouquet, squish some of the tomato pulp with the back of a ladle into the pot and take the tomato out.
5. Next pour out 80% of the residual liquid from the pot into a bowl. Mash up the cooked potato halves and put some of it back to the pot to add a creamy texture.
6. Add the olive oil in the pot with the salt and vinegar and toss it over in the pot taking care not to mash the beans. Add one more drizzle of EVOO on top.
7. Add the chopped herbs and toss once more.
8. Cook the chopped spinach in salted, boiling water in another pot for 2 minutes and then drain it out and toss it in the roasting pan of your cooked choice of roast as if cleaning the roasting pan with it.
9. Add a bit of the reserved residual liquid from the pot which was set aside earlier to the beans pot and toss. Taste and add more EVOO and vinegar if required.
10. Serve the beans on a flat serving tray and top with the spinach tossed in the roasting juices. Then pour any residual juice from the roasting pan on top. Top with a slice of the pork loin or your roast and pour some of the roast's prepared gravy on top.

Jamie added a very important tip for those who hate beans for the obvious breaking wind ;) add Summer Savoury herbs. I checked it is available as an online buy on Ebay here. You can also add a few cloves of chopped garlic when cooking the beans.

Serve these Oozy beans with your favourite roast or Jamie's Perfect Pork Loin with Crackling.


Wednesday, 7 October 2015

Jamie Oliver's Perfect Pork Loin with Crackling #FoodieExtravaganza

Ah this was a long wait. I made this for Christmas 2014 and its taken 10 months to write this post. I remembered the cook took a fairly long time too as I started late in the morning after church and a hearty breakfast after our fully vegetarian pre-Christmas lent of 24 days. Also I had a couple of eggnog breaks as well in between ;). Still remember how mum was kinda' scolding me over the phone for having started the cook late. Izzy and Anup were happy campers though as they had a ball of a time and over this meal as well. Well it sure was worth the wait! Thanks Jamie for making our Christmas 2014 a special one. He was practically there for the cook as I had to follow his online video to make this one. So yes this recipe is all him!


Mum has a large part to play in my courage to make dishes so hearty and large as these. Don't get me wrong it is not a difficult dish at all to plate up. Just that I wouldn't have the nerve had I not seen her make such large and wonderful festive meals. Love you Mum! You will always be at my side while I cook/bake.


I decided to post this recipe to honour Foodie Extravaganza{Party}'s October event 'Pork'. This is the first event I have joined of Foodie Extravaganza. The first 'Wednesday' of every month, Foodie Extravaganza {Party} hosts a theme based cook-off where food bloggers come together to celebrate the food event of the month from the American National Food Holidays. October's Foodie Extravaganza Pork Party was hosted by the lovely Lauren Mitchell of the blog 'From Gate to Plate'. 


Jamie is right, this is the most perfect pork recipe and is full of flavour as he promised! I did do a twist on his recipe of 'Oozy Beans and Agretti' side that accompanied this pork. That recipe I will share soon enough (hopefully not 10 months from now ;) )!


I have altered the recipe quantities based on the weight of the pork loin that I got from my butcher. Yes and I did get the fat separated from the meat of the loin at the butcher's place. If you do not have that luxury, then do follow Jamie's video here where he displays quite simply how to do the slice off.


You need:
  • 2 kgs pork loin, fat separated
  • 2-3 sprigs each of rosemary and thyme, chopped
  • Salt and Pepper to taste
  • Drizzle of EVOO (Extra virgin olive oil)
  • Half a bottle of balsamic vinegar (about 250 ml)
  • 10-12 cloves of garlic with skin on, smashed


The Make
Serves 12-15 people | Roasting Time: 60-70 minutes | Preparation and Resting Time: 15-20 minutes

Source: Jamie Oliver

1. First score the white side of the fat strip of the loin meat. I did a criss-cross scoring.
2. Rub the skin and meat with the chopped rosemary and thyme leaves along with salt and pepper all around.
3. Use a little EVOO to ensure that the leaves stick to the meat and fat all around.
4. Score the crackling skin with a sharp cooking blade or if you have a sharp pointy kitchen knife you could use the same. Use the tip to form the scores.
5. Put the skin fat side down first on a medium heated non-stick pan and hold for a minute until lightly browned.
6. Using tongs, take out the skin out carefully, and next place the skin side down of the pork meat and lightly brown for a minute . Then turn it over and caramelise the other side as well for about 2 minutes on medium-low heat.
7. Drizzle half a bottle of balsamic vinegar over the caramelising pork meat. Turn it over to coat the meat and then transfer it to a oven-friendly tray and pour all the balsamic vinegar over the top of the pork.
8. Place the garlic cloves into the tray all around.
9. Move the tray to an oven of 180°C . If you have a dual heating oven (top and bottom), you can place the skin on a grill sliding tray on top of the pork tray so all the juices would drip on top of the pork meat keeping it moist all through the cook. If not, you can do what I did and grill the skin separately in another compartment with a spill tray to hold the juices and intermittently using a ladle pour over the cooking pork in the pork tray. This would help create an amazing, simple gravy.
10. Roast over 60-70 minutes, intermittently turning the meat and the skin.
11. Take off the heat Rest the pork in the pork tray with all the juices for 10 minutes. Then take out the pork with a tong or a large fork and place on your serving tray.
12. Pour out the juices from the tray into a jug. You can then see the fat separated atop the jug. You can then take a ladle and scoop up the fat (even if a little gravy comes with it, that's ok) into a storing jar and refrigerate which can be used as a flavoursome stock later on.
13. Sieve out the juices from the jug, making sure to squeeze the garlic cloves to ensure its flavour comes through. This forms your gravy.
14. Serve your pork meat as a whole  or sliced with cracking strips at the side (the earlier scores will help you cut it through) and with some of Jamie's Oozy beans with Agretti  or my take of Jamie's recipe of beans (recipe to follow later). Pour over some of that amazing gravy.

And as Jamie said you are sure to hear of this make for years to come!

Bon Appetit!

Some delicious recipes from our fabulous Foodie Extravaganza members:

Thursday, 23 April 2015

Steamed Buttered Veggies


This is a very simple dish and is often used as a side to a protein main course. If you want to reduce on your carbs intake then it is best had as a filler as well. Kids who dislike veggies also tend to like this simple side dish owing to the flavour of the butter or duck fat.


You need:
  • Vegetables of your choice, diced well : 2 cups
  • 1 tbsp of Butter or 1 tbsp of Duck fat
  • Thyme leaves - 2 sprigs (optional)
  • Salt to taste
  • Water to steam
The Make:
Preparation time: 10-15 minutes | Cooking Time: 20 minutes | Serves 2

1. Fill a pot with half full with water and place a colander on top to hold the veggies.
2. On high heat, cover the colander with the veggies. 
3. Once the water reaches a boil reduce heat to medium and cook for 15-20 minutes.
4. Once cook, transfer to a bowl and toss in with the butter or duck fat, optional separated thyme leaves and salt to taste.

Serve hot with your favourite main protein Roasted Beef with baked potatoes.

Bon Appetit!


Sunday, 26 January 2014

Tri-coloured Macaroni - Cheesy Baked Macaroni with Spinach and Carrots - An Indian Republic Day special

I was contemplating on whether to post this recipe so late in the day and it struck me that some of the readers from across the globe could still be beginning their day. I had a very long weekend with the family as it was my munchkin Isabelle's birthday on the 25th. Actually her birthday officially is on 25th  as per UAE time as she was born in the UAE. But as per Indian time she was born on 26th so you can say she is a Republic Day baby :)


I have been awfully busy, what with the three celebrations my darling had for her 4th birthday! I am glad to see she had a wonderful time with her friends. I too made some new friends as a result.


I know Macaroni is not a very Indian trend but all the main ingredients for this recipe were 'Made in India' and it reflects the colour of our Indian flag (Saffron, White, Green) so I am truly happy that what was a coincidental make actually turned out to be right in time for our Republic Day celebrations! Of course I would have loved if I could I have incorporated the Navy Blue Chakra colour as well but I think I will leave that for next time. Doing it this time amidst the birthday rush would have been a bit too ambitious! This is what is for dinner tonight folks, so I hope you enjoy making this simple Tri-coloured (and healthy) pasta.


You need:


  • 500 gms macaroni/pasta of your choice
  • 2 cups of grated cheese of your choice (you can opt for the low fat version)
  • 4 cups of grated carrots
  • 4 cups of finely diced spinach
  • 4 cloves of grated garlic
  • 1 small shallot, finely diced
  • Pepper to taste
  • Pinch of thyme
  • Pinch of dried Parsley leaves (you can use the fresh version)
  • Water to boil
  • Olive oil
  • Extra virgin olive oil  (EVOO)for drizzling (optional)


The Make:
Serves 7 adults | Preparation Time: 10 minutes | Cooking Time: 20 minutes

1. In a large pot of boiling water, add the macaroni and some salt. Lower the flame and allow to cook over the next 5 minutes. Stir occasionally to evenly cook. Make sure the pot is sufficiently large to allow the macaroni to cook and avoid breaking or sticking together.
2. Meanwhile, heat the oil in a deep-bottomed wok and saute the shallots until lightly brown.
3. Add the garlic, carrots, spinach, thyme and parsley, pepper and a pinch of salt and cover and cook on medium-low heat.
4.  Next in a Pyrex oven resistant baking dish, layer the macaroni, followed by a layer of grated cheese and the cooked veggies and then another layer of cheese and repeat.
5. Place the dish in the oven at 150°C and bake for 5-10 minutes. Leave in the oven until serving time. Drizzle some EVOO over the macaroni before serving.

Serve hot! Happy Republic Day dear citizens of India!

*Note: Non-vegetarians you can add some cooked mince to this dish with the veggies if desired. I didn't as I had vegetarian guests and also I wanted it to look similar to the colours of our Indian flag :)


Tuesday, 11 June 2013

Tea Smoked Chicken Breast with Spinach and Herbs

This was for dinner a few weeks ago. Chicken breast can get relatively dry on cooking, although if done right can be cooked/baked or grilled in a succulent manner. Served with salad on the side this makes for a complete meal itself. I used lean chicken breasts without the skin/fat since I am opting for more healthy options. You can choose to make it with the skin on.

I had just thought of trying the chicken with some tea that we got from Munnar hills. The rest of the recipe evolved around those main two ingredients followed by some lovely spinach leaves, lemon zest and herbs.


I have also included a vegetarian option with this recipe. If you are a facebook member of G'Gina's Kitchenette's facebook page, you would have read my status update on the review of this meal. If you haven't let me tell you, I could actually hear a lot of pleasant oohs and aaaahs on the dining table that night and no it was not because the diners were being tortured. On the contrary, they enjoy this meal very much as did I!

To make this simple dish,


You need:


  • 4 chicken breasts
  • Olive oil  - 2 tbsp or less
  • Salt and Pepper to taste
  • Sprinkle of sage and fresh thyme leaves
  • 2 bundles of spinach - diced
  • 2-4 tbsp of Tea leaves of your choice - Munnar black tea leaves
  • 4 strands of thyme leaves - additional
  • 1/2 large lemon or 1 small lemon
  • 1 tsp Apple Cider Vinegar
  • Pinch of cinnamon powder
  • Celery sticks
  • Sour cream/Mayonnaise (optional)
The Make:

Serves 4 | Preparation time: 10 minutes | Cooking Time: 20 minutes


1. Pan sear the chicken 2 mins on each side on a non-stick lightly greased (brushwith olive oil). Let it rest for a minute.


2. Meanwhile saute spinach in a drizzle of olive oil and salt. Top with flax seeds. Saute for about 5 minutes or until the spinach is drained off the water.

3. Sprinkle the chicken with salt, sage, lemon zest, fresh thyme leaves and pepper. Stuff each chicken breast with the spinach. Hold in place with a skewer or toothpick.


4. Layer a foil on a baking tray and top with parchment paper. Top the parchment paper with the stuffed chicken breasts and sprinkle the remaining thyme strands around the chicken breasts and Munnar black tea leaves or any other fragrant tea leaves of your choice. Cover with the remaining parchment paper and sides of the foil.


5. Heat the oven to 180°C and place the baking tray. Cook for 15-20 minutes. Let it rest in the oven for 5 mins.

6. Dressing: Meanwhile squeeze half a large lemon or a small lemon with a drizzle of apple cider, 1/2 tbsp EVOO, pinch of salt and a pinch of cinnamon in a bowl.

7. Brush the chicken breasts with dressing. Serve each chicken breast with celery on the side and a scoop of sour cream/mayo.


Veg option:For vegetarians, stuff zucchini or bell peppers (with soya granules and spinach). Cooking time will reduce to 10 mins.


Do visit our facebook page and do 'Like' our page  to get our latest recipes. Promote our page https://www.facebook.com/gginaflavorspalatte by 'Share' ing it with your family and friends!

Bon Appetit!


Thursday, 13 December 2012

Turkey Roast Delight- A Thanksgiving Special for Christmas!

Seasons Greetings all! Its a season to be jolly...falalalala...lalalala! Hope you have not been too naughty this year! ;)

Thanksgiving is celebrated in various parts of the world. Although we do not celebrate Thanksgiving, Turkey used to feature in our Christmas lunches at home almost every Christmas and I would like to share this attempt at Turkey that I tried my hand in after arriving to India. I must say it was a task as we did not get the prepared Butterball variety. So I actually had a tedious turkey cleaning process last Christmas.

This is the first of my Christmas recipes for this year. Hope you enjoy making them. My guests certainly enjoyed the meal I whipped up for them last year.

Mummy's cooking always woos us and her Turkey lunches for Christmas is greatly missed..sigh! After moving to India, I don't think she has had the chance to make us her famous Christmas meal although whatever she makes is amazing!

I had made an elaborate Christmas dinner last year that I seriously had no time to reach out for my cam nor click the Turkey in its full form although it would have been worth it after the immense effort I went through in making this bird. I do hope I get a chance to post the Turkey picture in whole the next time I roast one. So please excuse me this time.

To make this delightful Turkey meal,

You need:

For the Turkey roasting:

  • 3 kgs of Turkey (Butterball usually has a conversion of lbs to number of servings, however after much research, I came up with a 1:2 ratio, so 3 kgs of turkey would serve 6-7 adults. Necessity is a mother of invention would rightly apply in this case)
  • Olive oil or melted butter
  • 1 large shallot
  • 1 leek stem finely diced (optional)
  • 2-3 carrots, half diced for stuffing and rest for topping (when served)
  • 1 bunch of celery
  • 1 half boiled potato, quartered (optional)
  • 1 bunch of fresh parsley
  • Sprigs of thyme or rosemary (you can also use a combination of both)
  • Juice of 1 lemon
  • 1 tbsp of paprika
  • Salt and pepper to taste
* Mum would usually not add the celery, rosemary or thyme but I added it for extra flavour.

The make:

Preparation Time: overnight + 1 hour | Cooking Time: 3-3.5 hours | Serves 6-7 adults

Tip:Remember to defrost the turkey overnight or the morning of as it does take time to bring it to room temperature. While doing so some tips to remember, let the turkey defrost in the packing/plastic in the refrigerator (not freezer) on a separate pan overnight so the juices would be confined to the pan. Do not immerse in hot water to speed up the process as the skin would pull away. If you are defrosting it the morning of, then you can leave it to defrost outside, just make sure you keep it the pan itself and cover with a net or a foil sheet to avoid contamination. Clean the turkey as if you were cleaning chicken and remove any left over feathers or stubs. In case of stubborn stubs like I found in the one I got last Christmas, use a new scrubber (which you can discard after use to light scrub the stubs out and/or pick out with previous washed and sterilised tweezers or just use a new pair of tweezers). Pat dry with paper towels. Reserve the spare parts such as the neck and giblets(heart, liver, gizzard) to make stock for the stuffing.


  1. Marinate the turkey with the juice of half a lemon both on the inside and oil. Next rub on some of  the olive oil or butter  and some pepper and salt both on the inside and out.
  2. Preheat the oven to 215C (approx 400F).
  3. Stuff the inside of the turkey with the carrots, tops and bottom of the celery, sprig of thyme and a sprig of rosemary, half of the shallot - peeled and quartered, diced bunch of parsley, half of the carrots diced, the potato and leek. Add a ball of foil paper in the body cavity to prevent the stuffing from falling out. Next carefully tie the legs of the turkey with a kitchen string (avoid colored string or any other strings other than the ones used for roasting as you may end up like Bridget Jones with a coloured turkey bottom or maybe in whole!). You can also use metal skewers to close up the turkey cavity.
  4. Stuff the turkey neck with some parsley and rosemary sprigs and close it up with string and thin skewers. Make sure to fasten the turkey wings with a string around the body.
  5. Rub more butter or olive oil on the outside of the turkey with a good sprinkle of salt and pepper and/or paprika.
  6. Now depending on the type of oven you use, flip the turkey on its breast side first or the roasting  rack with a roasting tray at the bottom of the rack to retain the juices that drip from the turkey. The idea behind this is to ensure that the turkey breast retains the juices of the turkey and is succulent. Add sprigs of thyme and/or rosemary to the outside of the turkey as well for extra flavour.
  7. Now cook the turkey on a high 215C (approx 400F) for the first half hour. For the next two hours, reduce it to 200C and for the last hour at 180C. You can flip the bird on its back on a high of 250C for about 3-5 minutes, in case you want the breast side slightly more brown. You can either monitor the temperature of the turkey using a meat thermometer or just use a butter knife to insert into the breast, the juices should be clear and not pinkish. Once you take out the turkey from the oven, wait about 10-15 minutes before you carve the meat.
  8. Serve on a bed of cleaned romaine lettuce with remaining diced carrots, rosemary/thyme sprig and with choicest rolls or spiced rice of your choice! Serve with Turkey Stuffing and Gravy! Enjoy!

Friday, 15 June 2012

Za'atar ( A Middle Eastern Spice Blend)

Born and raised in the UAE (United Arab Emirates), I have gorged on several Arabic and Mediterranean dishes. Some of my friends have been asking me to post recipes of Arabic cuisine and this is my first post of Arab cuisine.

Za'atar is a herb which is a blend of several flavoursome spices. Since I am now in India, it took us a while to go around town to pick up these spices, luckily not in vain. I finally reach the Godrej's Nature Basket in Hyderabad where I actually found the Za'atar spice blend. However as I learnt while living in Dubai, there are different proportions of blending these spices across the Levantine region specific to Lebanon, Syria, Jordan and Palestine to make Za'atar. The result is that the flavour is slightly varied. My personal favourite is the Lebanese version. I decided to make my own Za'atar as I was unsure of the consistency of the packaged Za'atar at the store. The store also had all the herbs required to make Za'atar although I picked some of mine from Q-Mart that I visited the day before.

Za'atar can be topped on meats, rice , veggies and most importantly breads like Manakish (made of wholewheat or fine flour dough similar to Pita bread) or on Pies (thicker and smaller rounds). Again I prefer the Manakish wrap over pies. You can use the same dough mix. The difference lies in the rolling of the dough. To make Za'atar -

You need:
1/2 cup dried sumac *dried lemon peel can be used if unavailable
The ingredients
4 tbsp dried thyme
2 tbsp toasted sesame seeds
4 tbsp dried marjoram (a version of oregano however varied)
4 tbsp dried oregano
2 tsp of kosher salt/coarse salt

*Note: I tried making Za'atar with the above quantities of sumac, thyme and sesame seeds. However, the next time, I plan on using equal quantities of sumac,and thyme or may be more thyme and lesser quantity of sumac than thyme and at least 1/2 cup of sesame seeds which I felt was lacking in my blend.

Method:


Preparation Time: 10 minutes| Makes 3/4 of a small jar/bottle
  • If you do not have ready made roasted sesame seeds, you can dry roast it in a skillet (do not burn). Alternatively, you can also place it on a baking tray and toast it. However I find it takes lesser time to dry roast the sesame seeds and I can control the roasting process. It took me all of 2 minutes on a medium flame to do this.
Sesame seeds just landed on my skillet

Roasted Sesame Seeds
  • Semi-grind the roasted sesame seeds with the remaining ingredients
  • Store in a sterile, air tight jar or bottle and keep in a dry, cool and dark place. You can also store it in a zip-lock bag. 
If stored properly, this blend would last at least 3 months.

Za'atar 
 *Note: as you can see from the mix above, the sumac was overpowering the blend, however I wanted to have the Lebanese mixture, so next time I will increase thyme and reduce the sumac quantity. Also I will add more sesame seeds.

Za'atar all bottled up ready to rest
When using the Za'atar on bread, take the required quantity of Za'atar and add olive oil, mix well and top on your favourite bread!

Wednesday, 13 June 2012

French Mackerel Fish in Sweet and Savoury Cranberry sauce

This is an old recipe from one of my handwritten recipe books. I am not sure of the origin - it could be from a 'Weekend' or 'Friday' magazine or from my cousin's recipe collection. I learnt a lot of international cuisines growing up in 'Cosmopolitan' Dubai. Back then I had many a opportunity to learn a lot of new recipes and most of it was first tried and tested (almost always right) by Mum.
French Mackerel served up


This is a very savory fish recipe and the thyme lends such an excellent flavour and fragrance as well. It is best made with fillet of mackerel (as otherwise mackerel has a lot of bones and it could be a pain to eat with this savory base). I tried this out with the bone-on this time and also this is best had as a full fish rather than cut however this time I had my fish clean and cut at the seller's place itself before I decided to make this one.Also I used the Indian Mackerel variety as I did not have a choice! Cranberries and Red currants are not readily available here. I tried even in the import shops but in vain. I had a choice to use Red Grapes but it is not in season now, so I chose the packaged cranberry juice version.


Indian Mackerel

You need:
    Diced white onions, thyme sprigs
  • 2 medium sized mackerel  in full or mackerel fillets
  • 4-6 cloves of garlic
  • 1 medium sized white onion diced
  • 1 tbsp unsalted butter (or if you are using the salted butter, then take care whilst adding salt separately)
  • 1 sprig thyme
  • Salt to taste
  • 1/2 tbsp ground black pepper
  • 1/3 cup of dry white wine or white wine vinegar (I used homemade white wine - recipe to follow:) )
  • 1 cup of cranberry (freshly juiced or packaged. In case of packaged sweet version, do not add sugar as below). (Other options: You can also use red currant or red grape)
  • White wine(L), Cranberry juice(R)
  • 1/2 tbsp of powdered or castor sugar


Thyme Sprigs


The make:

Cooking Time:20 minutes| Preparation Time: 20 minutes| Serves 2 adults
    Onion and garlic in butter

  • Clean the fish and/or fillet as required.
  • Place the fish on a baking tray or pan ( I used my iron skillet - taking care to use oven mitts as the handle will heat in the oven)
  • Take the juice of the cranberries and strain or packaged version and set aside.
  • Crush the garlic and dice finely. Next, add the diced onions and garlic to the butter in a heated skillet until translucent (Do not brown). Do this on a low flame and allow to blend for about 5-10 minutes only.
  • Mackerels before going into the oven
  • Next add the juice, sugar(only if the juice is freshly juiced and not for sweetened packaged version), wine/wine vinegar, salt(only if butter is unsalted) and pepper to the skillet. Allow it to warm not boil. Turn off the flame.

  • Pour the liquid over the prepared mackerel in the baking tray/pan and top with the fresh thyme sprig. 
  • Place it in a hot oven (heated on high flame). Lower the heat to medium and allow to cook for about 10-15 minutes maximum. (In case your oven, does not have a heating device on top, then 5-7 minutes into the cooking process, flip the mackerel over. In case you have additional cranberries/red grape/red currants left, then chop them up and place over the fish and allow to blend with the fish in the oven.
Mackerel in the pan done with thyme sprigs
Mackerel in Cranberry sauce

Bon Appetit! My Indian Fish loving HD...loved this one so much that I reserved some of the remaining sauce for another appetising meal :) Do let me know how you like this one!