"This is a journey of my life since I was all of 12 yrs when I started my hand in cooking to now with displays of my learning and creations of recipes from around the world. My inspiration and role model has always been my Mum who has always created dishes from around the world and excellently well. I do not believe I would ever match to her culinary skills. I remember the times she could cook and bake almost 4-5 dishes in one go without ever letting one go under cooked or burnt! I was born and raised in Dubai, UAE and recently moved to India for family reasons. Kitchenette just means that over the decades, my kitchen has changed from that of my mum's to my uncle and aunt's, to my home in UAE and now in India. Pala't'te, describes both global cuisines ('Palatte'-diverse flavours) and pleasing diverse 'Palates'."
Showing posts with label Sweet. Show all posts

Wednesday, 5 October 2016

Crispy Chocolate Surprise Balls #FoodieExtravaganza

Aaaah I'm back and for one of my favourites 'Chocolate'! Thank you Kathleen for my favourite Chocolate theme in time for me to pick up the pace on my food blog as well.


Kathleen Coe Clegg is the wonderful hostess of our October's theme 'Chocolate' over at Foodie Extravaganza. She is the owner of 'Fearlessly Creative Mammas', a wonderful blog sharing recipes from her home.


This time I wanted to do something similar to cake pops except it is presented a lot differently.


I enjoyed making this treat as I knew my little girl would love it.


Mango Jam #noPectin

It has been a while since I last posted a recipe on the G'Gina's Kitchenette. You know what they say, 'When life hands you lemons make lemonade!( or in this case use it as a part of your Jam - I know PJ)' But what do you do when it hands you death, accident, unwanted troubles and family and friends' health issues?


Well not to burden you with the details but I have had quite a few check in on me..I lost my Dad-in-law in July and have had some issues with family health. Also an unfortunate accident happened, one that I will learn from. I had once lost all hope. But I trust God will bring peace and favour to us.


Tuesday, 14 June 2016

Celebrating G'Gina's Kitchenette's Fourth Blogiversary: Mango Jam Rolls with Cremé, Fresh Mangoes and Jam filling #BreadBakers

This challenge could not have been announced at a better time when Mangoes are in plentiful! So I got to try many a recipe involving the delicious Mango this year.


It is Monsoons here now as I type this so the number and variety of mangoes have significantly dwindled. I explored recipes with at least 4-5 types of mangoes this year.


I could not post my Bread Bakers' recipe in time for May's event of theme ' Rolls' owing to the issue with the Daylight savings time. I had made Cinnabon-style Cinnamon Rolls. I missed by an hour or so. So this time I posted well in advance.


Friday, 10 June 2016

Ramadan Kareem : Iftar 2016 : Mango Soufflé with Caramelised Ginger and Caramel

Ramadan Kareem!


My earlier batch of Mango Soufflé that I made and posted to celebrate G'Gina's Kitchenette crossing over a 100,000 page views was made slightly differently. The flavour was varied too in the second make. In fact I preferred the second one to the first.


I have always enjoyed making desserts for my loved ones and when someone asks to taste a dessert of mine, I tend to go all out and whip up a huge batch. Funnily enough, it turns out better than I ever imagined and more than the original recipe I created. So when it was mentioned how I had shared my first batch with a couple of my neighbour friends I was asked to make it again for a few more of my neighbour friends.


I made this recipe for my dear and sweet friends and neighbour Zaira Shaan, Shaan Rahman and their all too adorable son Rayaan Shaan (Rayu darlin'). Actually my chief taster was darling 5 year old Rayu who said he loves desserts and when I asked which one, he said yellow one with caramel. I asked if the yellow meant Mango as being Mango season it was all about mangoes for me! Zai prompted he meant cremé caramel.


Wednesday, 1 June 2016

Celebrating crossing 100,000 page views - Mango Soufflé #FoodieExtravaganza

G'Gina's Kitchenette has crossed another milestone and I am so thankful to all our readers. Reaching this milestone would never have been possible without my Good Lord and my constant inspiration Mummy.


So to celebrate this milestone, I would like to share my Mango Soufflé recipe as a part of our Foodie Extravaganza June event. I had a choice to either bake this soufflé or to use the normal double boiler method. I preferred the latter to allow the natural flavours of mango to appear. Not only did my little one like this soufflé, two of my friends (and neighbours) Divya and Ribu, did too. I missed on giving some to another friend and neighbour, so I may make this again this afternoon. In fact the talk of my making this soufflé was two-fold, one was as a part of the Foodie Extravaganza challenge and the other one is because there is a tradition that I follow from Mum. We never return an empty container back to anyone who offers us their food/delicacies. Ribu made this awesome fish curry for me to try and Divya offered me one of my many staples I used to regularly have in Hyderabad (Gongura Pickle). 


Wednesday, 4 May 2016

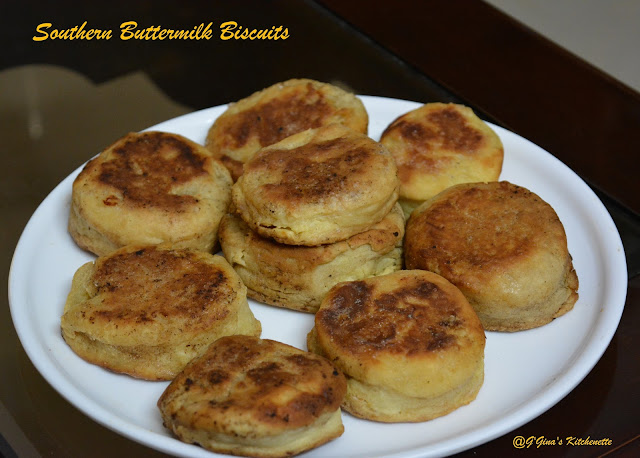
Southern Buttermilk Biscuits #FoodieExtravaganza

May's theme of Foodie Extravaganza is Buttermilk Biscuits. Our host is Kathleen Coe Clegg of Fearless Creative Mammas has picked a theme true to her roots. Her family is from the South of the United States where biscuit is a staple. The idea behind this month's theme is to get fun and creative with the staple biscuits of the South. 


Thank you Kathleen for sharing with us about your family's roots and I can honestly say I enjoyed learning more about the South. I have always loved Southern cooking and will attempt more recipes from the South of US in my cooking.


I first misunderstood the biscuits to be that of a normal crispy,flaky biscuit. So when I attempted to make them and found them to be more scone like, I was a little puzzled. I imagined it to be a flaky, crunchy biscuit. Of course, the biscuit ended up having a nice, crusty exterior with a moist, flaky interior. 


You can either try to slap some butter, jam, jelly or honey in this biscuit in which case I would ask you to sprinkle some sugar on top which would be a nice addition or you can have it as a savoury. In my case, when my sister-in-law and family were visiting our home a few weeks ago, I had attempted a savoury muffin, so I used the same kind of filling for the biscuits as well. It made for a nice and satisfying meal.


My first ever biscuits or cookies were attempted at Mum's kitchen in our home at Dubai. I even remember how I had a little tea party with my school friends. My first batch of perfect biscuits were made for my school buddies and I had iced their names on each biscuit.


Mum's first anniversary is in six days. I cannot imagine how I lived a year without Mum. Of course the Good Lord has been Kind and Merciful as always to me. I have always heard Mum's voice or felt her guidance through Him in every time of need. I could have been angry with Him for taking her so soon or for even taking her on Mother's Day last year.  Life will never be the same without Mum. You know what though, He always brings her voice or memory or guidance even when I need her the most. 


There is a little something I am expected to allow in my life but I have not been able to so far. Let's see how life progresses on that. Until then if you believe in God or say prayers, do keep me in your prayers or just send happy thoughts my way.


The best way to eat these biscuits are right out of the oven and in the US it is eaten as a savoury on top of chicken pot pie filling, slathered with some gravy on the side or even with fried chicken. A shorter description of these biscuits are that they are moist, fluffy and light.


You need:


  • 2 cups of plain flour or pasta flour (if you can find pasta flour, it would be the best)
  • 1/4 tsp baking soda
  • 1 tablespoon baking powder
  • 6 tbsp of cold butter (cut into cubes and refrigerated) + 1 tbsp reserve
  • 4-6 tbsp of sugar (optional)
  • 1 cup of chilled buttermilk
  • 1 tsp salt (in case of unsalted butter)


The Make:


Preparation Time: 10 minutes | Resting time: 10 minutes + 10 minutes (optional) | Baking time: 15-20 minutes | Makes 9 biscuits of 7" in diameter each


I did not use a food processor or the kind, just my good ol' hands. So I am unsure if your queries revolve around how to make this recipe using a food processor or a Kitchen Aid or the kind. I am sure the below instructions would serve well for both methods although I cannot be completely sure. So do let me know if you are using any processor to make these biscuits.


1. Preheat your oven to 200°C.

2. In a large mixing bowl, add the flour, baking soda, baking powder and salt and sift well.
3. Next add 6 tbsp of the cold butter to the flour mixture and mix in until it appears like a coarse meal. Place the flour-butter mixture back into the refrigerator. This will help create those lovely flaky layers of the biscuit. Let it stay refrigerated for at least 10 minutes. If you have left it in longer, it does not matter and will not affect the biscuit in anyway negatively.
4. Next add the cold buttermilk bit-by-bit into the flour-butter mixture until just combined. You will have a sticky, clumpy mixture and not a smooth dough. You will be left with at least 2-3 tbsp of buttermilk which you can use to brush on top of the prepared dough circles. Refrigerate the dough for 10 minutes if you find that your butter has melted.
5. Take the dough onto a floured surface and pat gently to about 1/2" thick. Fold the dough and repeat the process. Do this at least 5 times. Then gently pat the dough down to 1" thick.
6. Using a round cutter, cut out at least 8-9 circles and place them on a buttered baking tray about 1" apart to get a crusty top and bottom. Brush the top of the biscuits with the remaining buttermilk.
7. Bake at 180°C for about 10 minutes. Brush the top and bottom of the biscuits with the remaining butter and continue baking for at least 5 minutes when a golden brown colour is achieved. If you are planning to use the biscuits with a sweet filling, you could sprinkle some sugar on top.

Your biscuits are ready to be eaten straight out of the oven. So hope you have your sides or fillings and your family/guests ready to gobble these flavoursome delights right away.


Today's Foodie Extravaganza day is celebrating the Buttermilk Biscuit. Kathleen, from Fearlessly Creative Mammas is the host this month, and to celebrate her southern roots, she picked Buttermilk Biscuits as the theme. 
May 14th is actually Buttermilk Biscuit day, but we get to pick from any of the foods in the specific month, so Buttermilk Biscuits it is. We pick our foods from the website The Nibble
Posting day is always the first Wednesday of each month. If you are a blogger and would like to join our group and blog along with us, come join our Facebook page Foodie Extravaganza

We would love to have you! If you're a spectator looking for delicious tid-bits check out our Foodie Extravaganza Pinterest Board! Looking for our previous parties? Check them out HERE


Thursday, 17 December 2015

Crispy Roast Duck with Sticky, Sweet n Spicy Glaze

As promised, I am back with another Roast for your big Christmas meal. With Christmas around the corner, schools too are gearing up towards their Track Events(Sports Meet), Christmas celebrations, Carolling, etc. And this just means Mama has to be on her toes.


My little girl had a successful track event yesterday where she bagged a prize 'medal' in the school track event. So hence the delay in posting this roast recipe. I am going to try and get you as many roast recipes before Christmas week hopefully if all goes well on the home front.


This recipe was created after reviewing several recipes. It took a while but the resultant Roast Duck was flavoursome and fabulous and was out of some sheer experimentation. Yes this time too I tried for a Jamie Oliver recipe. In fact I saw far too many including Jamie's many duck recipes and then settled to take some tips from Jamie and have a twist of my own based on my Chicken roast success to have a crispy, succulent duck roast. It helps to experiment in the kitchen before hand so you come up with some unexpected savoury/sweet sauces.


It pleasantly surprised me to see such a proud and pretty duck roast coming out of my oven.


Without taking up more time, let me give you the recipe..

You need:

For the duck:


  • 1.7 kgs duck, cleaned well-free of quills and dressed (skin-on)
  • Sea salt
  • Freshly ground black pepper
  • 2 tbsp of five-spice powder (or if you do not have this: mixture of star anise, cloves, cinnamon, pepper and fennel seeds)
  • 1 medium sized orange
  • 2-3 bay leaves
For the glaze:

  • 1 tbsp soya sauce
  • 1/8 cup of honey
  • 1/8 cup molasses or palm jaggery
  • 2 tbsp of orange juice
  • 1 tbsp of your choice of chili sauce (optional)


The Make:
Preparation Time:10 minutes |  Roasting Time: up to 4 hrs, 17 minutes | Serves:5-6 adults

1. Make sure your well-cleaned duck is patted dry. Then with a kitchen blade or the tip of your sharp kitchen knife, make criss-crosses on the skin of the duck (try the diamond pattern), taking care not to delve into the meat of the duck.This will ensure that the fat escapes through the cuts created on the skin and the more the fat escapes, the more crispier the duck skin would turn.
2. Rub the salt, black pepper and five spice on the duck. Cut the orange in quarters and stuff it in the cavity of the duck along with the bay leaves. Truss the legs crossed with a kitchen twine or butcher's twine. Tuck the wings under the duck.
3. Set the oven to 150°C and set the duck on a wire rack with a roasting pan below to hold the glorious duck fat. Roast the duck for an hour. When 1 hour is done, take it out and poke the skin of the duck especially the legs which has more fat content, taking care not to hit the meat.
4. Flip the bird carefully on its breast facing downwards. Cook for another hour at 150°C.
5. Repeat step 3 and 4 once more on 150°C. At the fourth hour, prepare the glaze.
6. After the fourth hour, tip the fat off the roasting tray into a storing jar. You need to do this now to ensure that the glaze does not get into the fat.
7.Next turn breast side up, poke, flip and roast at 200°C for 10 minutes. This is to allow for some extra crisping up.
8. Brush with the glaze and roast at 200°C for another 5-7 minutes. Keep a close eye on it to avoid burning.
9. Rest for about 10 minutes, carve and serve hot.

Sticky, Sweet and Spicy Glaze:
1. In a wok, take all of the ingredients required for the glaze and mix well on simmer.
2. Once the glaze thickens over the flame, turn off and use the glaze to coat the duck with a oil brush.

Bon Appetit! I served the Duck with my Easy make Dinner bread rolls and Crunchy Rosemary and Honey Soda bread.

Note/Tip:
1. Any excess skin can be cut off and trimmed and used to render and reserve the duck fat. Try not to take off too much of the excess skin which can be used to keep the duck moist.
2. Flipping the bird on to the breast will ensure that the breast remains soft as the juices flow to the center.
3. In case the glaze turns cools down and becomes too thick to coat the duck, then slightly heat up on the stove and it will liquify right away.


Saturday, 28 September 2013

Kumble (Kumbul/Kumbil) Appam (Jackfruit wrap)


This recipe has been waiting to get posted since last year. Kumble leaves or a cousin version of the all-familiar Bay Leaf is used to make this wrap. It looks exactly like the bay leaf except bigger. The bark of the kumble tree does not get used commonly unlike the bay leaf tree whose bark  produces a milder variety of cinnamon. Kumble is pronounced as Kumbul or Kumbil not Kumbley as one would be tempted to especially the Cricket fans out there! :D


There are several versions to this wrap. I am posting the one that was made two holiday breaks ago (last September) at my parent's home in Kerala. Valsamma our maid/cook was behind this creation based on my mum's recipe. The recipe is fairly simple however it was being made for a large number of people which can be quite cumbersome.You can make it for a smaller number of people by equally reducing the quantities. The cooking time would also considerably reduce. It takes 20-30 minutes to make about 8-10 wraps.

The flavour of these leaves would go into the appams during the steaming process which is absolutely divine!


You need 
  • 20-30 nos. Kumbul leaves/ large bay leaves, cleaned and dried (You can even use banana leaves in case you do not get the Kumbul leaves)
  • 1 kg Jackfruit, diced (this is the actual weight of the jackfruit not after deseeding)  
  • 1 kg Rice flour 
  • 1 tbsp cumin (jeera) powder 
  • 1 tbsp cardamom powder 
  • Jaggery to taste and colour (I prefer the darker coloured kumble appam and it taste better too. 500 gms for 1 kg rice flour) / you can substitute with sugar but it just won't be as good  or healthy as jaggery :)
  • Water as required
  • Grated coconut (optional)


 The Make 

 Makes 20-30 wraps | Preparation Time: 15 minutes | Cooking Time: 60 minutes

1. Cook the jackfruit on low heat with jaggery, cardamom and jeera. If you have a slow cooker, this would work well. In our case, it was done at the fire place. This takes at least 30-40 minutes.

The jackfruit should soften and the resultant mix should be nice and pasty. Most of the water content should be gone, with just enough moisture and water content for the next step.


2. Once the mixture is cooled to room temperature, add the rice flour bit by bit and mix well. If the water content is insufficient, add a tad bit of water to help the mixture to be moulded together.

3. Next take about a golf ball sized dough and place the dough on end of the one of the leaves. Fold the other end tightly over the dough and use the remaining part of the same leaf to tuck into the dough as a pocket top. Repeat this for the remaining dough.


This version had lesser jaggery and some coconut as well

4. While doing the above process, heat water in the steamer or idli vessel and place the porous plate over it. Once the wraps are complete, place it in the steamer and cook each batch for at least 20-30 minutes. It would be helpful to have at least two steamers working in parallel for such a large batch.


Serve hot or cold as a snack or even as a breakfast meal. Bon Appetit!


Wednesday, 8 May 2013

Celebrating over 10,000 blog visits and over 100 likes on Facebook (gginaflavorspalatte) - Red Velvet Chocolate Lava Cupcakes and Cake - An Anniversary Special


Thank you dear readers, fellow bloggers, friends and family for making this milestone possible! G'Gina's Kitchenette has had over 10000 visits and the facebook page has over 100 likes. I am thrilled and humbled at the same time for having achieved this milestone which at one time I must admit I thought was never possible! I would like to apologise for the delay in this blog post as our family has been grieving the loss of my dear aunt (God rest her soul!). She was an excellent cook and hostess as well! I will miss her very dearly.


I started this blog with friends insisting that I should publish my food creations and hope one day that dream would be realised in print and other wise. I am thankful most especially to 'my mum' who unknowingly has inspired me as a child to create cuisines from all over the world - be it Indian, English, American, Italian or Mediterranean. For those of you who do not know this, this is how I christened the theme of my blog - 'Flavors from around the world'. Mum always was and will always be my mentor, guide and more. The love she puts into the food she creates has always touched our hearts (through our tummies of course ;-) ). The one thing I learnt from Mum is that always cook for 4 even if there are only 2 guests, you never know as more may drop in. (She actually got that from my granddad (God rest his soul!). Which has always been the case with Mum, there were always additional guests to share in the wonderful meals she cooked. Not only has she been an excellent cook, she is an excellent hostess as well. 
Thank you dear readers, family and friends! Immensely grateful!
http://www.facebook.com/gginaflavorspalatte


Now let me get right to the recipe. I had created this recipe for our 4th Wedding Anniversary which was on April 19th. 4 years flew past and we have a wonderful daughter, who I must say enjoyed this creation. So your little ones would definitely enjoy this make.


Red Velvet Cake is normally made with cream cheese topping but I could not do that as the icing needs to be firm and for the chocolate lava cake, it needs to be served almost immediately out of the oven to get that gooey effect. So there was a slight glitch in my first batch. I have served this with a white chocolate cream topping and the chocolate I used for the lava was also white chocolate.


You need:
  • 4 cups of all purpose flour / Plain Flour
  • 1 tsp baking powder
  • 3 cups of castor sugar/powdered sugar
  • 2 cups of butter/vegetable oil (1/2 tsp salt in case of unsalted butter)
  • 1 tsp distilled vinegar
  • 2 tbsp cocoa powder
  • 1 tsp vanilla extract/essence
  • 5 large eggs or 7 small-medium farm eggs
For the chocolate lava:
  • 300 grams of cold white chocolate, crushed in bits (using fine knife)
  • 1/2 stick of unsalted butter
For the fruit syrup(food colour):
  • 2 tsp red food colour or  any red fruit(s) ( I used strawberries and ground and strained pomegranate, if you have cranberries or cherries, then please use them. You can use a combination of red berries/fruits that would give you the red colour syrup)
  • 3 tbsp sugar (for the fruit syrup)
  • Drinking Water (quantity to half cover the fruits at surface)
For the cake topping:
  • 400 ml cold fresh cream
  • 200 grams of cold white chocolate, crushed in bits using fine knife
  • 100 gms unsalted butter, at room temperature (this was missing in my recipe and hence the outcome was a slightly runny topping, which I firmed up later in the refrigerator)
  • Sprinkles of your (or your little one's) choice


The Make

Makes 6 cupcakes and 1 cake (medium sized - 1.25 kgs) | Cooking Time: 45 minutes | Preparation Time: 15 minutes

1.  Half grind the fruits with a tad bit of water (esp if you are using cherries or cranberries). Place the crushed fruits, water and sugar in a deep-bottomed pan on medium-low heat. Stir and allow the fruits to bring out the color in the syrup. This takes about 8-10 minutes. Strain and set aside to cool. You can pre-make this syrup a day in advance as well and refrigerate.

2. Whisk the cream and add in the chocolate pieces and butter. Melt in a double boiler, whisking well to avoid any lumps. Strain and set aside and refrigerate. I would suggest to make this half a day in advance esp. during summer.

3. In a double boiler, melt the white chocolate and butter stick for the chocolate lava and refrigerate. You can choose to prepare this overnight or 8 hours prior of making the cake.

4. Preheat the over to 180°C and grease the cake pan and muffin tray with oil and dust some flour as well to avoid sticking to the bottom. Knock off any excess flour by tapping the tray upside down. You can also layer the muffin tray with cupcake paper holders and butter paper for the cake pan or foil paper. Just make sure if you are using foil paper to lightly oil the foil paper after neatly layering the tray. I would suggest to otherwise use a spring cake tray with butter paper.


5. In a large bowl, sift the flour, baking powder, sugar and cocoa powder and set aside.

6. In another bowl, whisk the eggs, oil,  vinegar,fruit (food) color and vanilla extract. Vinegar aids in the cake rising process.

7. Bit by bit, add the wet mix to the flour mix and whisk well. Set aside to stand for 5-10 minutes.

8. Pour the cake mix in the prepared cake tin and muffin tray and set in the oven (either one after the other or  together depending on the type of the oven you have) at 200°C. It will take the cake a max of 35-40 minutes to cook through. The muffins would take 15 minutes.


9. In the  last minutes 10 minutes of the rising process or before the cake top stiffens, add the lava chocolate in the center of the cake and return the cake tin back to the oven. For the muffins, add the lava chocolate in the last 5 minutes of the rising process or before the muffins rise fully.

10. Check with a skewer to see if the cake is cooked. The skewer must come clean. Check on the sides of the cake and the center. The center should return with white chocolate or a slight reddish-brown with white chocolate tinge. Turn off the heat and set aside to cool to room temperature.


11. Once cooled, top generously with the cooled cake topping and sprinkles if desired. This cake also tastes good if refrigerated however the lava would not be as flowing as desired.

This creation would be enjoyed by both adults and kids alike. If you have any queries/clarifications or suggestions, do add in the comments section below. Also if you decide to make this recipe creation, do write to me on gginazkitchenette@gmail.com regarding your experience. Also do not forget to add a photo(s) of your creation.


Monday, 8 April 2013

Mummy's Special Apple Pie

To celebrate crossing 10,000 visitors, I thought what better than this warm, comforting Apple Pie that my Mum used to make for us. Let me take this opportunity to thank all my readers for their interest in my food blog and I just want to say how thankful I am that I began this blog to share my recipe creations. Thank you for your kind support.

This indeed was a weekend of celebrations as my toddler had a very successful Annual Day Celebration at pre-school and we are so proud of her!

A new celebration would be in order soon as G'Gina's Kitchenette Facebook page is reaching 100 likes.. let's leave that to another day!

I have always loved Mummy's Apple Pie. In fact I remember during college days away from home, my mouth used to water just thinking of Mum's Apple Pie and I would wait keenly for the holidays to ask her to whip me some of these sweet delights.

Mummy's Special Apple Pie


To make this simple, delicious pie,

You need:


  • 2 cups all purpose flour
  • 1 tsp salt
  • cup powdered sugar (1/2 cup for dough, 1/2 cup for filling)
  • 1 tsp yeast
  • 4 apples, peeled and diced
  • 1 cup of filtered/drinking water
  • 1 tsp of cardamom powder or cumin powder (you can also use cinnamon powder)


Method:

Serves 2-4 | Cooking Time: 30-40 minutes | Preparation Time: 30 minutes

1. Mix the all-purpose flour, salt, sugar and yeast  and water and knead into a dough (just like for chapati/roti/flatbread dough). Cover with kitchen towel and allow to rest for at least half an hour.

2. Divide the dough into 2 large balls. Roll the dough ball as flat as possible into one large circle and set aside. Repeat for the second dough ball.

3. If the apples are soft, then you can directly use it otherwise, cover and cook the apples over medium-low flame in a little water and sugar for 2-3 minutes. Add cardamom or cumin or cinnamon powder as preferred. Uncover and cook to reduce the sugar syrup.


Reducing the sugar syrup

4. Place half of the dough circle on a lightly greased cake tray or tin foil or butter paper without tearing. Next add the apple or apple mix and cover with the hanging part of the remaining dough circle and hand crimp/tuck the sides avoid any open gaps.

Crimped and ready to bake

5. Place the cake tray in a preheated oven of 180°C and cook until golden brown or for 30 minutes.

Apple Pie served

The inner view of the Apple Pie

Close up of the inner view of the Apple Pie

You can also make mini apple pies and top with quartered apples and dust some sugar on top. Some pictures (not as clear as I would like it to be) of an earlier make.

Top of a mini apple pie

Side view of the mini apple pie