"This is a journey of my life since I was all of 12 yrs when I started my hand in cooking to now with displays of my learning and creations of recipes from around the world. My inspiration and role model has always been my Mum who has always created dishes from around the world and excellently well. I do not believe I would ever match to her culinary skills. I remember the times she could cook and bake almost 4-5 dishes in one go without ever letting one go under cooked or burnt! I was born and raised in Dubai, UAE and recently moved to India for family reasons. Kitchenette just means that over the decades, my kitchen has changed from that of my mum's to my uncle and aunt's, to my home in UAE and now in India. Pala't'te, describes both global cuisines ('Palatte'-diverse flavours) and pleasing diverse 'Palates'."
Showing posts with label Flour. Show all posts

Tuesday, 14 July 2015

Peanut Butter and Chocolate Chips Oatmeal Scones #BreadBakers

I have been away for too long once again and dear readers I have to apologise once again but this time as most of G'Gina's Kitchenette facebook readers are aware, I have moved cities. Yes again! So a new kitchen, a new beautiful home and lots of hopeful expectations for better cooks & bakes. For now it's brown cardboard boxes that are waiting to be unpacked while I rest to recuperate from hurting myself during the packing and unpacking process.  


Scones has always been on my to do list and what better time to try it out as the lovely Rocio Rivera Gentil of  Kids and Chic hosts this month's #BreadBakers event 'Oatmeal Breads'. Thanks Rocio for the wonderful opportunity.


Scones find its origin in the United Kingdom and I first had the most perfect scone on our family's visit to United Kingdom during my schooling age. My Mum had gained a nickname 'London Leela' owing to the fact that she was one of the early medical staff who had trained in her profession in London. She always raved of the ways things were done in London. She also adopted a lot of the food and English culture at home. I owe this recipe to her as well.


The scone is a part of the traditional cream tea or Cornish cream tea or Devonshire tea, which is  a form of afternoon tea as a light meal consisting of scones with with clotted cream and jam. It differs from teacake or sweet buns which are made out of yeast.


I have included an option for those who are allergic to nuts/peanut butter.


This is a simple recipe too!


You need:


  • 21/2 cups of all-purpose flour
  • 11/4 cup Quaker oats (not quick oats) or traditional rolled oats * see Notes 1. 
  • 7 tbsp cold unsalted butter, cut into cubes
  • 1 cup buttermilk
  • 1 egg, separated
  • ½ cup cold peanut butter (or 1 cup small bananas mashed) 
  • 1 tsp baking powder
  • 1 tsp baking soda
  • ¼ tsp salt
  • 1/2 cup dark brown sugar
  • 1 cup dark unsweetened or semi sweet chocolate chips
  • White powdered or raw sugar,castor sugar or icing sugar for sprinkling
The Make:
Preparation Time: 15 mins | Bake Time: up to 30 minutes | Makes 8 scones


1. Preheat the oven to 200°C and place a butter paper or baking sheet on your baking tray and set aside.
2. In a large bowl, blend the flour, oats, brown sugar, baking powder, baking soda and salt together. 
3. Add the butter and using your fingertips (* see Notes 2.) to blend the butter into the flour mixture.
4. In a small bowl, whisk the buttermilk and the egg yolk together taking care not to whisk too much.
5. Make a well in the center of the flour mixture and pour the buttermilk and yolk mixture into the well and then add the peanut butter and gently fold the mixture together until it blends together. 
6.Then add in the chocolate chips and gently knead with your hand until just incorporated taking care not to over mix the dough
7. Turn the dough out on to the butter paper or baking sheet and mould the dough into a round disk about 8-9" in diameter. Pat to smoothen the surface as much as possible.
9. Brush atop the dough with whisked egg white, and sprinkle the top with powdered sugar.
10. Cut the dough into 8 wedges taking care not to separate them.


11. Bake the scones for 25-30 mins, or until the scones are nice and golden brown or until a toothpick inserted in the center comes out clean or sometimes with a few crumbs attached
11. Remove from the oven and let it cool aside for 5 minutes, then slice the already wedged 8 pieces and separate them this time.
12. Transfer to a wire rack to cool completely, or serve slightly warm. Store in an airtight container at room temperature for up to 2 days or refrigerate and use up to 4 days. Slightly warm in the oven before serving though if refrigerated. Optionally serve with some plain unsweetened cream or even sour cream on top. 


 * Notes:
1. Rolled oats are traditionally oat groats (hulled kernels of oat cereal or the wholegrain of the oats that have been husked and includes the bran, cereal germ and endosperm) that have been de-husked, steamed and then rolled into flat flakes, then stabilised through light toasting process.
2. You can also use a pastry blender instead of using your fingertips.


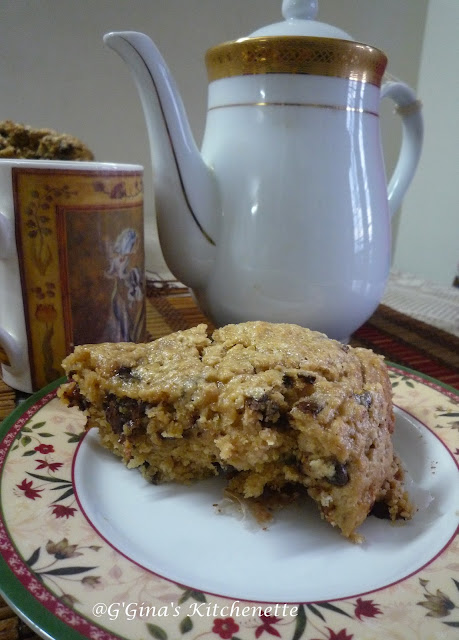
This is my cup of tea with my slice of scone on the next day of baking these scrumptious scones :)....

Tea and Scones Anyone? ...


#BreadBakers is a group of bread loving bakers who get together once a month to bake bread with a common ingredient or theme.  Follow our Pinterest board right here. Links are also updated each month on this home page. We take turns hosting each month and choosing the theme/ingredient. If you are a food blogger and would like to join us, just send Stacy an email with your blog URL to foodlustpeoplelove@gmail.com

Oatmeal Bread themed #BreadBakers:

  • Agave Oatmeal Sour Dough Bread from My Catholic Kitchen
  • Applesauce Oatmeal Bread from Hostess at Heart
  • Banana Oatmeal Loaf from Basic N Delicious
  • Blueberry Currant Oatmeal Bread from Cindy's Recipes and Writings
  • Cinnamon Raisin Oatmeal Bread from Karen's Kitchen Stories
  • Honey Oatmeal Bread from A Day in the Life on the Farm
  • Honey Oatmeal Bread from Recipes, Food and Cooking
  • Honey-Oatmeal Muffins from A Baker's House
  • Honey Oats Bread Loaf from Gayathri's Cook Spot
  • Honey Nut Oatmeal Waffles from Magnolia Days
  • Honey Wheat Oat Bread from Hezzi-D's Books and Cooks
  • Irish Oat and Whole Wheat Bread from Cali's Cuisine
  • Lemon Blueberry Oat Bread from Kids & Chic
  • Multigrain Twist Bread from What Smells So Good?
  • Oat Breadsticks from Passion Kneaded
  • Oatmeal and Whole Wheat Rolls from Sneha's Recipe
  • Oatmeal Buttermilk Bread from Ruchik Randhap
  • Oatmeal Porridge Sandwich Loaf from Bakers and Best
  • Oatmeal Stout Loaf from Food Lust People Love
  • Oat & Honey Bread from La Cocina de Aisha
  • Oats and Millet Idli from Spice Roots
  • Oats Bread with Maple and Walnut by Cook's Hideout
  • Oats Garlic Kulcha from SimplyVeggies
  • Peanut Butter and Chocolate Chips Oatmeal Scones from G'Gina's Kitchenette
  • Rolled Oat Sourdough Boule from A Shaggy Dough Story
  • Savory Oats Scones from Sara's Tasty Buds
  • Triple Seeded Oat Bread from Culinary Adventures with Camilla
  • Whole Wheat Honey Oatmeal Bread from Spill the Spices


  • BreadBakers

    Friday, 22 May 2015

    A Tribute to my Inspiration, my Mummy - Pie Meat & Mushroom buns with Sesame

    Two weeks ago I was happy and excited to let my inspiration, my Mum know of some new developments with regards to G'Gina's Kitchenette and even before I let my readers know, I wanted her to know as she is the very being of my culinary adventures. Unfortunately I did not get that chance and my Dad confirms that she did not know of the new development either. Little did I know that soon after my angel, my inspiration was preparing for the most important journey of her life...her journey to Heavenly Abode!


    My mum for all of you who do not know her was way beyond just my mum...She was an angel, a guide, a friend to the needy and all who walked into her life. Never have I heard of such words of praise, respect and gratitude of any other human being. Her leaving us is a big loss to each and every one of us. She has saved lives with just her intuition and experienced advice each time. I feel privileged to be born the child of such a mother. 


    Once someone with great vision of things beyond the physical world, told me of how blessed I was as I was born with two guardian angels unlike others who had only one. My mum she said was my guardian angel on earth! I cannot tell you the loss I feel with Mummy going to Heavenly Abode. She is my everything. I only pray that she will be with me every breath and step of the way guiding me as I go through this challenging life ahead!


    I have always wanted to bake bread and have to tell you that I was skeptical regarding any success I may have in doing so. I had already started my bread baking adventure with a little success in the past and more successful recently since Christmas 2014 actually. I have in the past mentioned how my culinary adventure began with baking and how I literally burned the house down with my cake bakes when I was all of 12 yrs.


    My mother has always been an inspiration to my cooking/baking feats. She has always cooked and baked creations from around the globe and I was always inspired and in awe of her cooking. Although I was never a foodie growing up, I knew somewhere back then that I would want to do something related to cooking (mostly baking). Also a lot of friends and family growing up would ask me to pursue the food line or to even start my own entrepreneurship or write my recipe creations through books (there were no blogs back then!)


    Recently a couple of friends of mine have been inspiring me with their recipe creations around #bread. Among them Dr. Reny Thomas, my school friend has been an immense inspiration with her creations with breads, buns, etc. Also my college buddy and fellow food blogger Shireen had recently posted regarding this fabulous and inspiring group called #BreadBakers, a wonderful group of bread lovers who inspire each other every month to bake theme based bread or with a common ingredient. I am proud to be associated with this group and this will give me a chance to whip out some bread baking skills. This was the much needed leap I required to get me out of my shell.


    What inspired me to make this bread was the renowned chef Jamie Olivier's pie creation. I always wanted to try a serious savoury pie and though I have made mince pies and the like during school/college days, I still wanted to perfect my pie making skills. The filling for this bread has very much been inspired by Jamie's pie creation whose recipe I will share very shortly with you.


    You need:

    For the stuffing/filling:


    • 500 gms beef skirt/ tender beef, cut into 1/2 cm chunks
    • Ground pepper
    • Olive oil
    • Rock/sea salt
    • 1/2 of a  nutmeg, grated
    • 1 large carrot, peeled and diced into cubes
    • 1 red onion, peeled and diced finely into cubes
    • 2 sprigs of fresh rosemary, separated from the stem
    • 125 ml pale ale / non-alcoholic beer / ginger-ale / chicken broth
    • 1 tbsp plain flour
    • 1 tbsp Homemade Tomato Puree
    • 125 g button mushrooms, diced small
    • 1/2 litre cold water


    For the bread:


    • 2 tsp Active Dry Yeast
    • 3 tbsp Sugar
    • 300 gms plain flour
    • 3/4 cup Milk
    • 1 tsp Salt
    • 3 tbsp lukewarm water
    • 1/3 cup Oil
    • 2 tbsps Sesame Seeds
    • 1 egg, beaten (to brush on the buns)
    • 1 tbsp water
    • 2 drizzles of oil


    The Make:

    Preparation time (including proofing/proving time and resting time for the meat): 1 hr, 50 mins  + 3-4 hrs or 8 hrs for resting the meat| Baking Time: 20 minutes | Cooking Time: 1 hr, 53 minutes | Yields 7-8 medium sized buns

    For the buns' pie meat filling:

    Source for the pie meat filling: Jamie's Olivier

    1. In a large bowl, add the beef chunks, 1 tsp of ground black pepper, a good pinch of rock salt and 1 tbsp of olive oil and massage well.
    2. Next add the grated nutmeg, toss and coat well. Set it aside.
    3. In a wide pan or wide-deep bottomed pot, add a drizzle of olive oil followed by the prepared beef chunks and brown on all sides, cover and cook for 15 minutes. Then uncover and allow and liquid to evaporate over the next 5 minutes, stirring frequently.
    4. Simultaneously in another flat pan, heat a drizzle of olive oil and cook the veggies including the rosemary over medium heat for 15-20 minutes or until caramelised and softened. Stir frequently to ensure even cooking. Remove from the heat.
    5. Next add the ale to the beef, turn up the heat to high and allow all the liquid to bubble ensuring you are scraping all the delicious sticky bits from the bottom of the pan.
    6. Add in the flour and tomato puree and cook for another 2-3 minutes or until a thick paste is formed.
    7.  Stir in the softened veggies into the larger pan with the beef and then pour in 1/2 litre of cold water. Add the mushrooms and bring to a boil.
    8. Lower the heat to medium, cover and simmer for about 1 hour. Then take off the lid and simmer for another 30 minutes or the liquid has thickened and the beef is tender.
    9. Season to taste and set aside for a few hours or preferably overnight in the fridge. The longer you rest the beef the better it gets. 


    For the Dough :

    1. Remember to use the yeast which has not expired. In a small bowl, mix the yeast and  2 tbsp sugar and dissolve it with 3 tbsp lukewarm water. Mix well and set aside for about 5 mins until it froths. In case it does not froth, throw away and use new yeast.

    2. In a large bowl, add the flour,1 tbsp sugar, salt, oil and mix well.
    Gradually add the milk and make a loosely formed dough.

    3. Sprinkle some flour on a clean surface, take the dough and knead it with your hands until the dough becomes soft and supple. Knead up to 5 minutes until the dough is no longer sticky but still soft.

    4. Take a large bowl, add a light drizzle of oil and put the dough and make sure it is coated with oil so that it does not dry out. Cover it with a cling wrap and let it sit at room
    temperature for about 90 mins or until the dough doubles in size.

    5. Line a flat baking tray with parchment or butter paper. Or you could directly grease the baking tray with a drizzle of oil and use directly (like I did!)

    6. This part is going to be fun. Take the doubled dough onto a flat surface and punch down the dough with your hands and knead it well so that all the air held in escapes
    from the dough. 

    7. Next divide the dough into 8 equal parts.

    8. Take one of the 8 parts of the dough, roll it into ball and then flatten it out into a disc about 3-4″ in diameter.

    9. Add a tbsp of pie meat stuffing in the center of the disc and fold the corners the disc towards the centre to cover the stuffing well. Keep a kitchen towel at your side to wipe your hands in case your fingers get messy with the filling in the process. Fight the instinct to wash your hands each time as you would get the dough sticky with damp hands.

    8. Repeat steps 8 and 9 until the remaining 7 bun dough is formed. Line them on the baking tray, folded side facing down and equi-distant giving enough space for the buns to rise and form. 

    9. Set aside the buns at room temperature for about half hour or until they begin to swell.

    11.  Preheat the oven to 180°C.

    12. Right before popping the bun dough into the oven, whisk 1 tbsp of water with the egg and brush all over each bun. Sprinkle the sesame seeds on top of each bun.

    13. Carefully set the buns in the preheated oven for 20 minutes until golden brown. Trust me the smell emitting from your kitchen will woo you to come in time to open the oven and take these beauties out.

    14. Remove the baking tray from the oven and let the buns cool and rest on a rack before serving.

    Now for my vegetarian friends, remember you can use other fillings such as Aloo Jeera (Potato with cumin seeds) or Kadai Paneer or mushrooms or the like.

    Bon Appetit!

    Monday, 2 February 2015

    Easy make Dinner bread rolls

    In speaking with a good friend of mine Kavisha Pinto, she mentioned how easy it is to make dinner rolls. I attempted this make over Christmas when the hubby was late coming home from work for Christmas Eve. I was too busy slaving in the kitchen to step out to buy rolls and I'm glad it worked out that way or else I would have delayed my attempt to make this super easy rolls.


    What you need:


    • 11/2 cup wheat flour
    • 1/2 cup plain flour
    • 1 tsp baking powder
    • 1 cup milk
    • 4 tbsp of mayonnaise
    • Pinch of salt (optional)


    The Make:
    Preparation time: 5 mins | Baking Time: 15-20 minutes | Makes 10 medium sized rolls

    1. Preheat the oven to 180°C. You can use a muffin tray if you are concerned about the shape or what I did was randomly divide the dough to 10 different parts and place it on a butter paper on a normal bake tray.

    2. In a large bowl, sift in the flour and baking powder. Then add the milk and mayonnaise and stir in well.

    3. Add the pinch of salt and mix once more.

    4. Bake for 15 to 20 minutes in the preheated oven until browned or nicely puffed up.

    Serve hot. Your family is sure to love this esp your little ones :)


    Tuesday, 24 December 2013

    Choco chip cookies and Gems or M&Ms or Smarties cookies

    I had made these cookies first when I was all of 12 yrs old :) It is such a super easy recipe to make. You can involve your little ones in the making of these cookies as well. The baking time is also quite short and no additional syrups, etc are required in the making of these cookies.


    You need:

    • 2 cups of plain flour
    • 1 tsp baking soda
    • 1/2 tsp salt
    • 1/2 cup unsalted butter (at room temperature)
    • 1/3 cup granulated sugar
    • 3/4 cup light brown sugar
    • 2 eggs
    • 1 tsp vanilla
    • 2 cup of choco chip cookies or gems (You can also divide the dough in 1/2 and add 1 cup of choco chips to one batch and 1/2 of gems to the other batch like I did)


    The Make:
    Cooking Time: 10 minutes per batch | Preparation Time: 10 minutes | Makes about 20-30 cookies (depending on the size)

    1. Preheat the oven to 180°C.
    2. Sift the flour, baking soda and salt in a bowl and set aside. You can avoid the salt if you are using salted butter.
    3. Cream the butter and sugar until light and fluffy.
    4. Add the eggs one at a time, whisking well after each addition.
    5. Blend in the vanilla essence.
    6. Thoroughly mix in the flour mixture until combined well.
    7. Using a spoon, fold in the choco chips and gems in batches or together or either one or as per your choice until evenly distributed across the batter. Don't fold in too much as to cause the chocolate to melt.
    8. Scoop about 1 heaped tbsp or teaspoon of the batter and place on a well-greased baking tray  or directly on a baking sheet. Continue doing this with sufficient spacing between the cookies to allow it to expand.
    9. Cook for 10 minutes or until the cookies are golden and crispy. Turn to a rack to cool down.


    You can serve hot or cold as desired. The kids would enjoy these cookies at Christmas time and it isn't too late yet to try them out!

    Tuesday, 12 November 2013

    Pazham Bonda - Fried Mashed Banana balls

    This is one from my mum's kitchen again. A very simple to make tasty tea-time snack! There are so many variants of Bonda but this one by far strides well with both kids and adults alike. This also makes for a good on-the-go snack and can be made in various sizes as well. It has a texture very similar to that of a doughnut.


    Normally bonda is made with plain flour (maida) only however as  I mentioned in my earlier posts and profile as well, Mum's kitchen has always adopted healthier options. This variant is made with a combination of wheat flour and plain flour. I would suggest you make this at home rather than buying it from a restaurant as it is simple to make and you know how sweet to make it and how much and what type of oil to use.


    You need:


    • 2 cups of Wheat flour
    • 1 cup of Plain flour (maida)
    • 6-8 Bananas, mashed
    • Jaggery/Sugar/Brown sugar/Cane sugar to taste
    • 1-2 cups drinking water
    • A pinch of baking powder
    • Cooking oil - to deep fry


    The Make:
    Preparation Time: 3-4 hours | Cooking Time: Under 30 minutes | Makes 8-10 medium sized balls

    1. Combine all the ingredients above into a dough.

    2. Set aside to rest for about 3-4 hours. You can leave it for longer if you have the time as well. This batch was rested for at least 6 hours.

    3. Once rested, divide the dough and roll it into tennis sized balls. You can make them smaller if you like as well.

    4. Heat a large/deep-bottomed wok with the oil for up to 2 minutes.

    5. Lower the flame and place the rolled balls carefully into the oil and deep fry till golden brown.

    6. Drain and place the bonda on a clean kitchen towel.

    7. Serve hot with tea or coffee.

    Bon Appetit!

    Monday, 17 December 2012

    Turkey Gravy - The Christmas Specials continue

    Turkey Gravy is the essence that binds the whole Turkey dinner or lunch. So you want to get it right. Remember the turkey drippings in the Turkey Delight roasting process was caught onto the roasting tray. We will use these drippings to make the gravy. The gravy is essentially a blend of the turkey drippings flavoured in the roasting process, flour, butter (optional) and additional stock (optional). The stock could be either vegetable stock (that you get during the boiling of the potatoes for the stuffing) or chicken stock or the turkey giblet stock itself that you raised during the making of the stuffing.


    The gravy must be not lumpy. To make this smooth, flavourful gravy,

    You need:
    • 3-5 tbsp of flour
    • 2 cups of liquid (water or stock)
    • Turkey drippings
    • Salt and Pepper to taste
    • 100 gms of butter (optional)
    • Worcestershire sauce (optional)
    • Juice of 1/2  lemon (optional)


    The make:

    1. Take off the drippings from the lukewarm roasting tray and transfer it to a skillet on a low flame. If the drippings are too little, add the butter and blend.
    2. Mix the flour with lukewarm stock or water as desired and whisk well to ensure there are no lumps. 
    3. Slowly add the flour mix to the skillet bit by bit, whisking continously to ensure there are no lumps.
    4. Add more stock or water as desired if you want the gravy to be thinner.
    5. You can add the worcestershire sauce if you would like your gravy to be browner.
    6. Add salt and Pepper to taste. Tip: Remember the stock and/or the drippings would have enough of salt. 
    7. You can also add the lemon juice for extra tang.
    Serve with the Turkey Delight and Turkey Stuffing for that winning meal! Merry Christmas in advance...hope you have a falalalala... lalalala time!