"This is a journey of my life since I was all of 12 yrs when I started my hand in cooking to now with displays of my learning and creations of recipes from around the world. My inspiration and role model has always been my Mum who has always created dishes from around the world and excellently well. I do not believe I would ever match to her culinary skills. I remember the times she could cook and bake almost 4-5 dishes in one go without ever letting one go under cooked or burnt! I was born and raised in Dubai, UAE and recently moved to India for family reasons. Kitchenette just means that over the decades, my kitchen has changed from that of my mum's to my uncle and aunt's, to my home in UAE and now in India. Pala't'te, describes both global cuisines ('Palatte'-diverse flavours) and pleasing diverse 'Palates'."
Showing posts with label Honey. Show all posts

Friday, 17 April 2015

Papaya and Cinnamon Honey Cooler

“When all is said and done, the weather and love are the two elements about which one can never be sure.” 
― Alice Hoffman, Here on Earth

As a child I loved summers, especially as I was born in the summer of August _ _ _ _!

Now being in this sultry, sultry place, I am beginning to hate it! Well more so the humidity rather than then heat itself. So I was pleasantly surprised to hear that two years ago Chennai did not have much of a summer as it practically rained that whole summer! Ah bliss! So like Alice Hoffman mentioned in the quote above, I pray that the weather this Summer is uncertain and bordering on a cooler, less sultry (non-existent would be perfect) weather!

Until then, I need to keep both my family and me, cool as a cucumber with some perfect summer drinks/coolers. Incidentally this recipe can also be made with a blend of cucumber :) Next time, perhaps!


Papaya is actually a healing fruit!Rich in antioxidants, it is known to heal both intestinal and cardiovascular diseases. It helps in healing internal inflammations.Ideally unripened (green) papaya is best juiced as its healing benefits are found in its green state!


Did you know that honey and cinnamon has weight losing properties as well? It is not to say that those who do not want to lose weight cannot consume this combination. It has a weight balancing features and other benefits as well.


You need:
  • 2 cups of water (chilled)
  • 2 tbsp honey (you may want to drizzle on more depending on how sweet you prefer it)
  • 2 tsps cinnamon powder
  • 4-5 ice cubes, crushed
  • 2 cups of papaya pieces (chilled)


The Make
Serves 2 | Preparation Time: 10 minutes

1. Blend the papaya, water and honey.
2. Next add in the cinnamon and give it a whirl.
3. Add the crushed ice cubes in each serving glass and pour in the blended drink. Then top with cinnamon powder. 
Note: 
i. In case you are serving this to kids, you may want to blend the cinnamon powder in step 1. with the papaya as kids don't usually like seeing little bits on top of their drink.
ii. Also you may want to skimp on the ice cubes or avoid it in case your kid does not drink chilled drinks as yet!

Saturday, 17 January 2015

Crunchy Rosemary and Honey Soda bread


This is by far the easiest bread recipe I have ever tried! I had handwritten it a while ago but only had the time to make it now.


Necessity is the mother of invention. Anup was away on work travel. I did not have a chance to step out of the home to buy store bought rolls, bread and had some extra kitchen time in between cooking the mains so what did I do when I realised I did not have yeast or any rising agents other than soda bicarbonate, look for the next best option! Which truly was the best option where it came to this recipe.


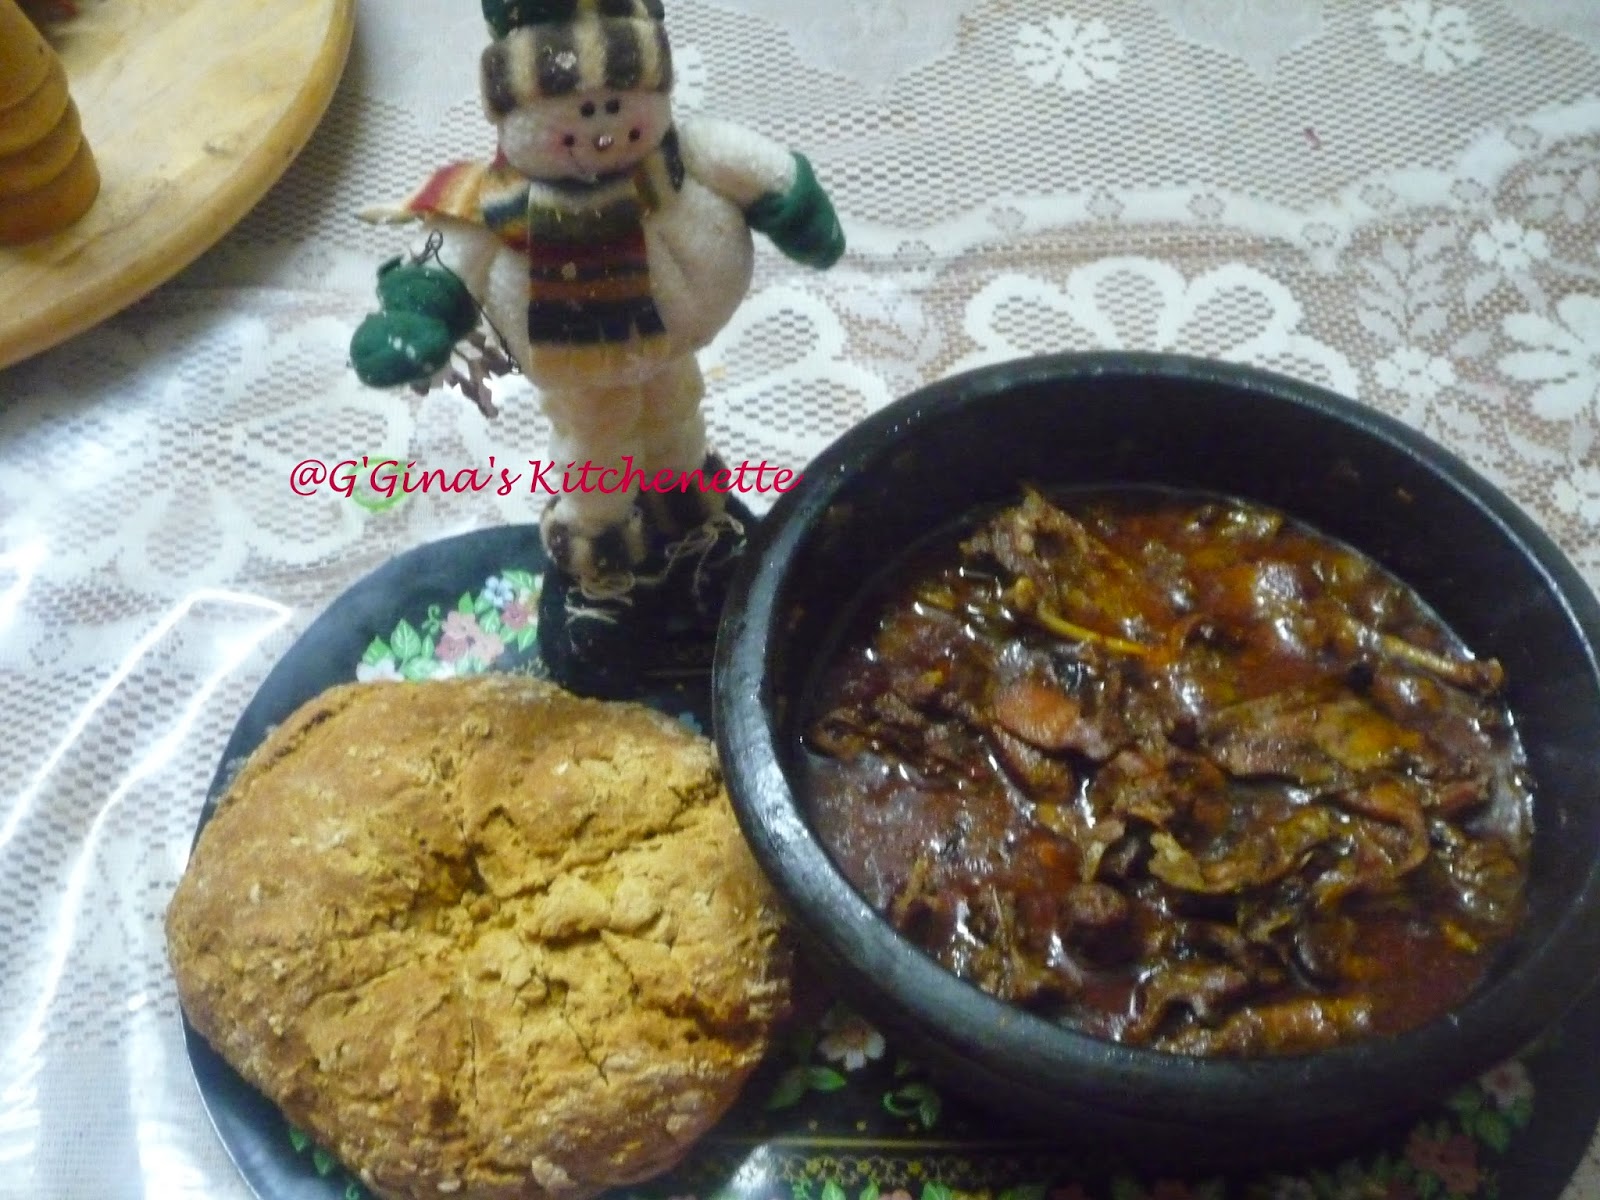
You can have it with melted butter, olive oil with some Mediterranean herbs or if you like sweeter options maple syrup, honey drizzle or jelly/jams or even peanut butter. I made this bread over Christmas Eve and we dunked it into some savoury Slow cooked duck gravy! Yumm! I will share the duck recipe soon as well.


This bread is best had immediately out of the oven so make sure you have your accompaniments of your choice ready to go and this is the last thing you take out from the oven. Crispy and crunchy on the outside, this is the bread to go when the weather outside is cold / chilly even! Hope you enjoy this bread as much as we did!


You need:

  • 400 gms of whole wheat flour or multigrain wheat flour
  • 475 gms of maida/plain flour
  • A pinch of salt
  • 8 tbsps of natural honey (if you do not have this you can use store bought varieties too)
  • 2 sprigs of rosemary or dried rosemary (in case you do not have the option for fresh varieties)
  • 600 ml buttermilk
  • 1 tsp of soda bicarbonate


The Make:
Serves 4 adults | Preparation time: 5 minutes | Cooking time: 40-45 minutes

1. Preheat your oven to 210°C
2. If you are using dried rosemary, you can use it directly from the air tight bottle. Otherwise remove the rosemary from the stalks and set aside.
3. In a large mixing bowl, mix the whole wheat flour with the plain flour, rosemary and salt.
4.Add the buttermilk and honey. Mix well till you get a soft dough. Next turn the soft dough onto a floured surface and knead well to a smooth mix.
5. Shape into two round loafs and stick a knife into the top of one loaf and cut a cross and then cut into another cross till you see eight triangles. Repeat for the second loaf.
6. Using a metal spatula carefully scoop each loaf onto lightly floured baking trays.
7. Bake for 30-40 minutes each. Bake test is to tap the base of the loaf lightly to hear a hollow sound.
8. Rest for 5-10 minutes. If you are not a fan of crusty bread, then wrap the loaf in a damp kitchen/tea towel.


Serve hot! Bon Appetit!

Thursday, 30 May 2013

Summer Thirst Quenchers - Watermelon Mocktails, Shooters, Punch and Coolers - 4 recipes in one

Wow! So this was an incredibly exciting make. I had an hour to do it all including prep the ingredients. Why? Well let's just say I decided to start out on it when day light was almost running out!

I thought about posting each recipe one by one but since they are simple makes I decided to include it all in one post as it features one main ingredient across the board - Watermelon! A definite summer fruit!


I made all 4 recipes with 3/4 of a medium sized sweet and juicy watermelon.

Recipe # 1: Margherita Style Watermelon Mocktail

This one was relished by my toddler, especially cause of the sugar on the rim and the kind of glass from which she was allowed to drink :)


For this recipe,

You need:

  • 1 cup fresh watermelon, chopped and pureed
  • 1 tbsp sugar, granulated
  • 1/2 tsp grenadine (Optional- I didn't add this)
  • 1 cup ice cubes
  • 1 tsp grenadine syrup (optional -  I did not use it)


The Make:
Preparation time: 5 minutes | Mixing/Serving time: 10 minutes | Serves 2


1.Blend all the ingredients in 10-15 seconds.

2. Strain the ingredients and pour into sugar rimmed martini glasses.


Recipe # 2: Cucumber and Watermelon Coolers

If you do not fancy too sweet a drink, then this is the perfect summer cooler for you!


You need:


  • 1 cup of watermelon juice (pureed and strained)
  • 1 large cucumber, skinned, cut into chunks and juiced (reserve the skins for garnish if you like)
  • A few mint leaves
  • 2 tbsp of natural honey
  • 2 tbsp of lemon juice
  • 1 cup ice cubes


The Make:
Preparation time: 10 minutes | Serves 2

1. Mix the watermelon and cucumber juice.
2. Combine the honey and lemon juice in another bowl.
3. Blend the watermelon-cucumber juice with the honey-lemon and ice cubes. Taste if more honey is required.
4. Pour into two tall glasses and garnish with the mint leaves and cucumber shavings. Serve cold

For the cucumber shavings, you can use a toothpick to hold it into a design.

Recipe # 3: Ginger-Celery Watermelon Shooters

I promise you that this drink would give you a rejuvenated kick and stay hydrated to beat this low due to summer heat.


You need:

  • 2 cups of watermelon , diced
  • 1/2 cup of diced celery
  • 1/2 tsp of grated ginger
  • 1 tsp of apple cider vinegar
  • Ice cubes (optional)
  • Celery sticks- chopped to garnish


The Make:
Preparation Time: 5 mins | Serves 2

Pumped with Vitamin C, this is a perfect pick-you up drink in the summer.


1. Blend the ginger, vinegar and celery for 20-30 pulses.

2. Combine the watermelon and blend for another 20 seconds until smooth.

3. Chill and serve cold or over ice.

4. Garnish with celery sticks

Recipe # 4: Melony Mango Cooler Punch

Your kid(s) would love this one! Sweet and cool to beat the summer dehydration. Pulpy or can even be strained if you do not like pulp.


You need:


  • 1 cup watermelon chunks, pureed
  • 1 cup of mango juice
  • 1 cup of cranberry juice (optional)


The Make:
Preparation Time: 5 minutes | Serves 1

1. Combine the watermelon puree and mango juice. Strain if you want to avoid pulp.

2. Chill (in a bowl for larger quantities) for 20 minutes before you serve.

3. Put in a funny straw for kids.

Tip: For kids make sure you make more than you feel they would normally drink. It is kids' party success drink :)

This would make a perfect party drink for kids.


Sunday, 24 February 2013

Banana French Toast with Cinnamon

I had requested my readers on G'Gina's Kitchenette's Facebook page to suggest what recipes they would like to view this week. By popular demand through FB messages, inbox message and others they have chosen Breakfast recipes. Thank you my valuable readers. I agree, as possibly the most challenging meal of the day would be the 'King of the Day' which is Breakfast. As you may know for health reasons and to be fit, Breakfast is normally treated as the King meal, Lunch the Prince and Dinner that of a Pauper. Also as you wake up from bed, it becomes so difficult to think of /create a King meal, simply because you are so busy running around getting ready for work or getting the family ready for work or school/college. I dedicate this week of Breakfast recipes to those hard working moms and dads responsible for plating up the most important meal of the day. To get to the next voting cycle, I would suggest you visit my facebook page on https://www.facebook.com/gginaflavorspalatte?ref=hl and hit 'Like' so you do not miss on the next choice of recipes.

Banana French Toast with Cinnamon is a recipe I came up with during this Lenten season when we follow a strictly vegetarian diet. Yes that means no eggs, no meat or fish until Easter. I was inspired this year to make a sacrifice for a very meaningful purpose for my family (including my extended families) and me. Here's hoping to greater months and years to come. The recipe I followed requires no eggs, however if you would like to include more protein in your diet, I would suggest you could add eggs whites to your recipe. I will make suggestions below in the ingredients list.

Banana French Toast with Cinnamon

You need:

  • 10 slices of wholewheat or multigrains bread
  • 1/2 cup milk of your choice
  • 6-8 plantains or 3-4 bananas mashed
  • 4 egg whites (*Optional - if you are using egg whites, then you could use 4-6 plantains or 2-3 bananas)
  • 2-3 tbsp honey or 1-2 tbsp sugar(powdered or granulated)
  • 1" stick of cinnamon powdered
  • 1 tbsp butter or 1-2 tbsp of cooking oil
  • 2-3 plantains or 1-2 bananas for topping (*Optional. You can also top with any other fruit of your choice)
  • Maple Syrup, Honey or Cream for topping (*Optional)


The make:
Serves 3 adults | Preparation Time: 10 minutes | Cooking Time: 20 minutes (depends on your pan size or type)

1. Heat a non-stick pan and in the meantime add the mashed plantains, milk, honey, powdered cinnamon in a large bowl and whisk on high.

Whisked Ingredients

2. Add the butter/oil on the pan and allow the butter/oil to just melt or heat and not brown or over heat. Spread to butter/oil cover the pan on all sides.

3. Dip the bread slices on-by-one into the batter and place on the pan on medium-low heat. Cover the pan if required.
Tip: Remember not to overcrowd the pan as you need to flip it on the other side as well. Also do not over dip the bread slice in the batter as it may break in the batter or pan.

4. Allow to cook for 2 minutes on each side or until golden brown. Repeat until all the bread slices are used.

5. Top with fruit of your choice and maple syrup, honey or cream if required.

Additional Tip: For fitness freaks or those who simply do not want to use any butter or oil base, you can also bake the bread slices on butter paper for 4-5 minutes on each side in the oven.

Topped wiith fruit of your choice

Bon Appetit! Wish all of you who are celebrating Easter, a peaceful, meaningful and blessed Lenten season.


Sunday, 14 October 2012

Banana Bread Pudding

Bread Pudding is well known in the English cuisine. Not so much "Banana" Bread Pudding but the concept is pretty much English! Traditionally Bread Pudding is accompanied with sour cream or toffee sauce. It goes well with honey, maple syrup or even ice cream.
Banana Bread Pudding

This is how I made mine. Inspiration to any banana bread pudding - browning bananas and stale bread. I am so lucky.. I had both the company of both this weekend :) Jokes apart, I guess Banana Bread may have emerged from the idea of avoiding food wastage and it is pretty excellent despite the deteriorating health of its prime two ingredients. This makes for a good breakfast meal or tea snack and would go well with a nice hot cup of tea.

There is a sense of satisfaction, in making this dish when you have slightly stale prime ingredients that almost always has no takers. This is what the wise mean by "Old is Gold". Caution: I think the Banana Bread Pudding can tickle your funny bone a lot in 4-6 hours after consumption :)

To make this delightful dessert/meal,

You need:
  • 8 slices of a day old bread
  • 3 large bananas (or in my case 2 large bananas and 3 plantains) Tip: use what you have available at home
  • 1/4 cup cane sugar or 1/2 cup of honey (you can use regular sugar as well - in fact you can use half the quantity of sugar and half the quantity of honey as honey tastes good with bananas)
  • 1 cup milk (of your choice)
  • 2 tsp of powdered nutmeg
  • 2 tsp of powdered cinnamon
  • 1/2 cup chopped walnuts (I used cashewnuts)
  • 1/2 cup of raisins
  • 1/4 cup dark chocolate chips (optional)
  • 1 large egg
  • 1 tsp vanilla extract or essence
  • 1 tbsp rum (optional)
  • Condiments (optional) - honey or maple syrup or sour cream or toffee sauce or ice cream, etc
Banana Bread Pudding just out of the oven

The make:

Cooking time: 30-35 minutes | Preparation time: 10 minutes | Serves 4 adults

  1. Soak the bread in the milk and set aside for at least an hour. You can also leave it overnight.
  2. In a separate bowl, whisk the eggs, sugar and/or honey and vanilla essence.
  3. Top the bread mixture with the whisked egg mixture and add the powdered nutmeg and cinnamon and  mix well.
  4. Next mash the bananas well and add it to the bread  mixture.
  5. Add the chopped nuts and raisins.
  6. Preheat the oven to 250C for at least 10 minutes. Grease a baking loaf tray or a pudding tray and carefully add the pudding mixture. Place an aluminium foil over the top to ensure even heat distribution (no need to tuck the foil at the sides of the tray)
  7. Lower the heat to 200C and place the pudding tray in the center of the oven ensuring even heat. 
  8. Allow to cook for at least 30 minutes. Use a skewer to check if the pudding is cooked well. 
  9. Turn off the flame once cooked and allow the pudding tray to cool on the rack. 
  10. Serve hot with your choice of condiments or as it is or with a hot cup of tea.
This makes for a nice dish on cold winter days. Enjoy! Bon Appetit!


 View from the side

Served up


Saturday, 29 September 2012

Mummy's Roasted Chicken with a twist

Mummy's Roasted Chicken has always been my personal favourite. Although initially when I made this at home 'A' would not like it at all as it would not get roasted properly or would turn out dry. I realise that I should have placed a foil covering the chicken as well as my cooking range was as old as I was and had lost it full capacity. However this cooking range has been a prized possession and has seen us through some great dinner parties and feasts at home. I finally gave in and 'A' bought me a brand new cooking range on my birthday. I have tried a different type of Chicken Roast recently which I will post very soon.
Roasted Chicken

I am posting this for a dear friend Savina Gois who plans on roasting one of my variants of roast chicken (with BBQ Sauce and Pepper marinade) for her loved ones this weekend. Hope to receive her pictures soon so as to share them with you.

Mum usually makes hers with Red Chili Powder, all spice (Indian) powder (Garam Masala), Salt and Lemon juice. I added a few new variants and it turned out good. In fact, 'A' particularly enjoyed this one as it turned out to be nice and juicy and well-done. The one thing that I missed was to take pictures of the chicken once cut. It was quite late into the night and we were really hungry. Hope to get you shots of this the next time the Chicken visits my oven :)

You need:

  • 1 kg whole Fresh Chicken (Skin-on) or Frozen Chicken (Skin on) *You can take out the skin later, it is just to retain the juiciness of the chicken during the cooking process. My vendor did not provide the Fresh Chicken with skin on, so I had to source a new vendor.
  • 6-8 cloves of garlic, crushed to a paste
  • 1/2 cup of honey
  • 1/2 cup of mustard (I used my Homemade variety of mustard)
  • 2 tbsp pepper powder
  • 1 tbsp of paprika
  • 1/4 cup apple cider vinegar
  • 1 tbsp of rock salt or kosher salt
  • Juice of 1 lemon
  • 1 tbsp of butter or oil


Method:

Cooking Time: 45 minutes to 1 hour | Preparation Time: 20 minutes | Serves 4-6 adults
  1. Clean the chicken and with your knife make short cuts in the thighs, wings, breast and back of the chicken. 
  2. In a bowl mix the pepper, garlic paste, paprika, salt, honey and mustard. Marinate the chicken with the mixed ingredients and allow it to rest for at least 2 hours. You can leave it longer.
  3. For the Apple Cider, you could also add it to the marinade mix. However I did not want the apple cider to overpower the other ingredients, so what I did was during the cooking process, I inserted a sachet made of foil containing the vinegar in the chicken so the vinegar could slowly release during the cooking process. The sachet had a tiny opening about the size of a mustard seed. 
  4. Line a baking tray with foil and dab some butter or oil on the base. Carefully place the chicken onto the tray. If your oven does not have upper heating, then cover with a foil (no need to tuck the sides into the tray).
  5. Preheat the oven on a high (about 250C) for 10 minutes. Lower the heat to medium (about 215C) and place the chicken into the oven and leave it to cook for 40-45 minutes.
  6. Marinated chicken flipped over
    Marinated Chicken on its back
    Remember I mentioned that I had not covered the chicken with foil, so I had to physically flip the chicken over. Always lower the heat if you attempt to do something like this. You can flip the chicken over after the first 25 minutes. Do not forget to turn the heat back up after flipping it over.
  7. Once the 45 minutes is up, use a skewer to check if the chicken is cooked well. If not leave it on for another 10-15 minutes.  Dress with lemon juice or leave it on the side in case of those who do not prefer it with lemon juice. You can also try it with my Homemade BBQ Sauce. This is not a very spicy dish, so kids love it!
  8. Serve with some warm bread or pita bread or flavoured rice. You can also set up a nice side salad. I will have some tried and successful salad recipes to follow shortly. Bon Appetit! I assure you that your loved one with thank you for this meal.

Saturday, 1 September 2012

Broccoli in Honey Mustard Sauce

This recipe came about when I felt like cooking up a tangy dish to accompany my crusted bread. Broccoli is a rich source of calcium and is especially the best option of calcium for those who cannot consume diary products. It also has Vitamin A, C, fiber and folic acid. It is known to control high blood pressure and may also prevent colon cancer.

Broccoli in Honey Mustard Sauce
I did not have much of a chance to click many pictures just the one above as we were quite hungry that night. I do recommend having this meal with a side of grilled potatoes or crusted bread. Worcestershire sauce as the name suggests was first made at Worcester, England under the brand name Lea & Perrins (coined from the surnames of its founders). To make this super simple dish,

You need:
  • 1 medium size Broccoli (cleaned and florets separated)
  • 1/4 cup of my Homemade Mustard Sauce
  • 1/2 cup of Honey
  • 1/2 tsp of Black Pepper or White Pepper
  • 2 tbsp of Worcestershire sauce (Veg option: Soya sauce)
  • 3 cloves of crushed garlic (optional)
  • 1/2 tbsp of cooking oil
The make:

Cooking Time: 20 minutes| Preparation Time: 15 minutes |Serves:2 adults
  1. Steam or blanch the broccoli florets until semi-soft and drain.
  2. Mix together the Homemade Mustard sauce, Honey, Pepper and Worcestershire sauce.
  3. Heat a skillet and add the cooking oil. Toss the garlic (optional).
  4. Next add the drained broccoli florets and add the Sauce mix and warm (do not boil).
  5. Serve hot with a side of grilled baby potatoes or crusted bread.
Bon Appetit!