"This is a journey of my life since I was all of 12 yrs when I started my hand in cooking to now with displays of my learning and creations of recipes from around the world. My inspiration and role model has always been my Mum who has always created dishes from around the world and excellently well. I do not believe I would ever match to her culinary skills. I remember the times she could cook and bake almost 4-5 dishes in one go without ever letting one go under cooked or burnt! I was born and raised in Dubai, UAE and recently moved to India for family reasons. Kitchenette just means that over the decades, my kitchen has changed from that of my mum's to my uncle and aunt's, to my home in UAE and now in India. Pala't'te, describes both global cuisines ('Palatte'-diverse flavours) and pleasing diverse 'Palates'."

Friday 28 December 2012

Sensuous Hot Chili Chocolate

With the temperatures dropping here and the ring of the New Year round the corner, I decided to finally make some Hot Chili Chocolate.  Chocolate has always been my favourite so much so I earned the nick name of being called "Chocolate" ;) . This makes for an excellent drink on a cold winter night and it is simple to make as well.  Cuddle up with your loved ones and share in the joy of CHOCOLATE! :)


You need:

  • 5 tbsp processed cocoa powder
  • 2 tablespoons sugar (not a must esp. in case of sweetened cocoa powder)
  • 1 tsp of cayenne pepper powder or 1 tsp of crushed ginger
  • 4-6 squares of bittersweet chocolate, finely chopped
  • 2 cups of milk
  • 2 strawberry, 1 small chocolate piece for garnish


The make:

Preparation Time: 10 minutes | Serves 2 adults

1. Take a pan and add the cocoa powder, sugar(optional) and 2-3 tbsp of milk. Heat and stir evenly till the mixture blends and lumps removed.
2. Boil the remaining milk with the ginger or cayenne pepper in a milk pan and add in the cocoa mix. Whisk well to blend in the cocoa mixture.
3. Remove from heat and add in the chopped chocolate and stir till the chocolate melts and set aside.
4. Reheat, stir well  and serve hot with a slice of chocolate at the edge of the glass or a slice of strawberry or if you are feeling especially adventurous coat the strawberry with melted chocolate before serving as garnish.
Enjoy this drink with loved ones on a cold, winter evening.

Tip: You may want to avoid the ginger or cayenne pepper if you are serving this to kids.

Thursday 27 December 2012

Trifle Pudding - Sweet New Year Special

Many of you may have leftovers of Christmas Pudding. What better way to make use of the Christmas Pudding than to make a Trifle Pudding for New Year. I would suggest that you add your own creative layers to this Pudding.


I made this one for Christmas as New Year would be spent in my parents' home. I would like to wish you all the very best for the New Year! There are many ways to make this Pudding. This pudding requires a layer of cake, so your Christmas cake could act for the layers of cake or you can get a store bought one. I used the one I made for my daughter's Christmas Class Party. You may need to moisten the cake and traditionally sweet sherry or wine is used. You can also just add sweet juices or non-alcoholic ginger ale. I made mine the non-alcoholic way as my guests of honour are expecting their first bundle of joy! Lots of various fruits can be used in the trifle.

You need:


  • 1/2 kg Christmas cake (or any cake)
  • Sweet juice or non-alcoholic ginger ale to moisten the cake layers (Sweet sherry or wine can also be used)
  • Fruits - Strawberry and Mulberries (you can also use seedless grapes, blackberries, clementines or oranges)
  • Whipped Cream - 1 packet  or you can try my Homemade Whipped Cream
  • Homemade Custard or leftover Christmas Pudding or Packet custard - 2 packs(follow the instructions on the pack)
  • Bar of chocolate - grated
  • Strawberry Jam (remember not to add much sugar in the whipped cream in case of using jam)


The make:

Preparation Time: 30 minutes | Assembling time: 20 minutes | Setting time: 4 hrs | Serves 6-8 adults

1. Start by making the custard (if no leftover Christmas Pudding) and the Whipped cream. Make sure to cover the custard bowl with some cling film to avoid thickening on top.

2. Take a large glass bowl. I like to use a glass bowl as it distinguishes between the various layers of the trifle. First place some of the cake and drizzle some of the sweet juice or ginger ale or sherry or wine. Next add some jam, top with custard, whip cream and top with fruits of your choice.

3. Repeat until the bowl is full and top with some whipped cream and grated chocolate.


If you want an extra chocolatty flavour, add some melted chocolate or sifted cocoa while making the custard.


4. Cover with cling film and set for 4 hours before serving.

Tip: You can use walnuts or almonds for some extra crunch! Also remember that since the custard may already be sweet, try to use a less sweeter variety of jam or do not add any additional sugar to the Trifle.


Hope you have a 'sweet' New Year celebration and enjoy with the trifle as a start to sweet beginnings! Good luck and God Bless your families and you for the New Year 2013!

Creole Black Eyed Peas with Ham and Rice - A New Year Special

In bright expectation for the New Year, most Southerns (Southern United States), include Black Eyed Peas in their menu. The reason? It is said to bring prosperity and in some parts of the world it is believed to ward off the evil eye. Hoppin' John is another such Lucky New Year recipe which can be made with bacon or ham and black-eyed peas. Black-eyed peas is said to bring about luck and hence it forms a part of G'Gina's Kitchenette's New Year Lucky food.You can also serve this dish with Pasta if you do not fancy rice much. In other parts of the world like Vietnam, black eyed peas is also used in a sweet dish called chè đậu trắng (black eyed peas and sticky rice with coconut milk).


This recipe is best cooking through slow cooking process over 6-8 hrs in a slow cooker.

 You need:

  • 500 gms of black-eyed peas
  • 600 gms of ham, diced
  • 500 gms of smoked sausage, diced 
  • 4 - 6 cups of water
  • 3-4 cloves of garlic, crushed
  • 1 large bell pepper, diced
  • 1 cup of  fresh chopped parsley
  • 1 large shallot, diced
  • 4-6 onions, diced
  • Salt to taste
  • 1 tsp Cayenne pepper or Paprika
  • 1 tsp black pepper
  • 1 tsp cajun pepper (optional)
  • Drizzle of Worcestershire sauce
  • 1 cup of Homemade Tomato Puree
  • A shake of dried oregano and dried thyme
  • Cooked rice of your choice or pasta of your choice as desired
  • Spring onions or green onions to garnish (optional)
The make:

Preparation Time: 20 minutes | Cooking Time: 1 hr to 8 hrs (depending on whether you are opting for slow cooking) | Serves 6-8 adults

1. Rinse and soak the black-eyed peas overnight with 3-4 cups of water more than the level of the peas in a deep bottomed vessel.
2. Drain the peas and place it in the slow cooker or a deep-bottomed pot with 4-6 cups of water. Add the ham to the pot.
3. Add in the remaining ingredients except the rice and garnish.


4. Turn the temperature of the slow cooker on the low (the same with the deep bottomed pot). Cover and cook. If using a slow cooker, cook for about 6-8 hrs and after about 5-6 hours, check to see if more water is required and give in a quick stir. If using the pot, then check in about 20-25 minutes and raise the temperature to medium, cover and cook.
5. If the peas seems too thick, add more water to desired consistency and cook for up to an hour in the deep-bottomed pot or up to 8 hrs in the slow cooker.


6. Serve over hot rice or choice of cooked pasta with garnish (optional).


You can also make this dish without the ham and sausage. It will taste just as good! G'Gina's Kitchenette would like to wish all of its readers a very Happy New Year 2013 in advance.

Post Christmas Turkey Soup - A Boxing Day Special

Hope you all had or are having a good Boxing Day. Boxing Day is traditionally the day after Christmas when those in service roles at home or work were given gifts, money, etc. The origins of the name is still uncertain. This day is also a public holiday in most Western countries. The recipe I have for you was also made last year after our Turkey meal for Christmas. It is a simple recipe made of the turkey carcass, some of the turkey meat and some veggies. I must say it is quite filling in itself.


Remove the usable meat from the turkey carcass which you can use to make nice, delicious turkey sandwiches (with some of the turkey drippings that were not used for the gravy) for the morning after Christmas. You can also use some of the turkey meat for this soup and make the stock right after the Christmas meal.


You need:

  • Turkey carcass, skin
  • Leftover turkey meat, giblets and drippings
  • 1 large shallot
  • 5-6 cloves of garlic
  • 1" crushed ginger
  • Water as required
  • 4 carrots, diced
  • 2-3 strands of fresh or dried thyme
  • 1 bay leaf
  • 1-2 Celery
  • 1-2 bunches of parsley, diced
  • Crushed Peppercorns to taste
  • 2 diced tomatoes
  • 200 gms of diced button mushrooms
  • 1 onion diced
  • Noodles/Rice - optional
  • Mashed potatoes - optional
  • Salt and Pepper to taste
  • Dash of tobasco or hot chili sauce


The make:

Preparation Time: 20 minutes | Cooking time: 60 minutes | Servings depend on quantity of unused turkey

1. Break up the leftover bones in a large, deep bottomed pot along with some of the turkey skin and cover it with water by about an inch. Some of the drippings that were not used for the gravy and the unused giblets can also be added to the pot. Add a diced shallot, some garlic, 2 carrots, parsley, bay leaf, celery tops and the peppercorns.

2. Bring the contents in the pot to a boil on high temperature. Lower the heat to low-medium . Skim off any fatty residue that arise on the surface.

3. Add salt and pepper to taste. Remember the turkey and drippings may contain sufficient salt so take care on adding more salt to the mix.
4. You can either continue to cook the soup over a medium or low flame for about an hour or turn to an oven of about 150C for about an hour. You can later take off any residual foamy contents from the surface.
5. Next strain the contents through a fine, mesh sieve.
6. Return the strained stock to the deep bottomed pot  and add your choice of veggies - carrots, onions, mushrooms, celery, parsley, sage and/ or thyme on a medium-low heat and cook the veggies.
7. Once the veggies are cooked, add the tomatoes and you can add noodles, pasta or some cooked rice. You can now add the turkey meat. Top with some salt and pepper or a dash of tobasco or hot chili sauce for an extra kick.

Enjoy with some crusty bread or a simple green salad!

Monday 24 December 2012

Mummy's Special Christmas Cake

I would like to wish my eldest sister a very Happy Birthday today! Without you sis, this life would not be the same! Thank you for being such a wonderful big sis! I love you and can't wait to see you home soon (just a few more days...yaay)!


This is one cake that featured in all our Christmas-es to date. The last two years have been different as I was the one baking as per Mum's instructions over the phone. Simple to make and  has one pre-baking task, which is soaking the nuts and raisins . The earlier you do it the better.


This year I did not use only the cashew nuts and included raisins and soaked them way in advance in October. So there is a slight difference but the rest is just the same.


Christmas 2012

I have not eaten a whole slice as we are on pre-Christmas lent. So I cannot tell you how it tastes but textural there is a very slight difference from Christmas cake 2011 and 2012.


Mum used to make this cake for our family and relatives and this cake has been tasted and feasted by many as she used to pack them up and send it to us when we were studying away from home.


This year I have staged the Christmas meals (unlike last year...whew!) since the last few days however I still have a lot to do before I am done with final touches, as I am sure you do to, so I will get right to it.


You need:

  • 500 gms of cashew nuts
  • 250 gms of raisins (optional - mum used to soak cashews only)
  • 700 ml of brandy or rum (* instead of alcohol)
  • Zest of 1 orange (optional)
  • 1 tsp of nutmeg 
  • 1 kg flour
  • 1 kg castor sugar or powdered sugar
  • 500 gms of butter, room temperature
  • 12-14 eggs
  • 2 tbsp of extra flour**
  • 2 tsp baking powder
  • 1 cup of sugar (burnt sugar process. Please check Ginger Wine)


The make:

Preparation time: 1-2 months for soaking the nuts, 1 hour pre-baking time | Baking Time: 2 hrs, 10 minutes

1. Soaking the nuts: This is normally done at least a month in advance. Soak the whole cashews 1-2 months in advance with brandy or rum in a tightly sealed jar.Remember the level of the alcohol dips as the cashew nuts absorbs the alcohol and increases in size. So top up by add the alcohol in stages. I added first 175ml, followed by another 175ml and them 350 ml. *Tip:If you do not want to use alcohol, you can also just soak the nuts a few days in advance in cranberry or grape juice and store in a cool, dry place.You can add the raisins if using during the mixing process or after chopping cashew nuts. Chop the cashew nuts, add the raisins to it and set aside.
2. Preheat the oven to 250C. Grease the cake tray(s) with butter on all sides. If your cake trays are a little old, then I would suggest using a foil and then greasing the foil before lining the cake tray. I did that with one of my cake trays that had a few scratches or you can just use butter paper. Now I cannot tell you how many cake trays each of you would need. However what I can tell you is that it would fit approximately two 9" * 10" * 2" cake trays.

Ready to go into the oven
3. Add the flour, baking powder and sugar and fold in with a spoon. Allow it to stand for at least 20 minutes.
4. Whisk the eggs in a large deep-bottomed bowl until fluffy. Add the butter and blend well.
5. Slowly add the flour mixture one ladle at a time to the egg-butter mixture until cake consistency is achieved. Add the nutmeg and/or the optional orange zest. I have never used this so far as Mum does not include the orange zest.
6. Next add the chopped cashews and raisins with the residual alcohol. Now with the ladle just mix in the the cashews and raisins. No need to beat the mixture at this stage. Add the burnt sugar. If the mixture seems to be slightly watery its either that you have not mixed the nuts, raisins and alcohol enough or that the mixture has thinned due to the alcohol quantity, in which case dust the top of the mixing bowl with the extra flour** and mix again with a spoon (although this is not advisable so try not to add all of the residual alcohol if over a few tablespoons).
7.  Allow the mixture to stand for another 20 minutes before pouring into the cake tray(s). Pour the mixture halfway of  the cake tray leaving room for the cake to rise.
8. Lower the oven heat to 170C and slowly place the cake tray. The first cake tray may take a tad longer than the subsequent ones by 10 minutes. Check in 30 minutes, if the cake has risen to a full. Then open the oven and using a fork or skewer, check if the cake has cooked. If cooked, the fork would come clean. The first cake tray may take between 40-45 depending on the size of the cake tray. Repeat until all of the batter is used.

This cake will go well with the Ginger wine recipe I posted recently. Enjoy!

I assure you this cake is one to be served during Christmas week and I sincerely apologise for the delay in posting this recipe. Hope you try it anyways or next year is always there. Over the next few weeks I will be away but will find time to post you more treats of the Christmas week that you can try over the New Year. Merry Christmas and Happy New Year 2013 from our family to yours.


Friday 21 December 2012

Christmas Shortbread Cookies

With a school going toddler who is completely excited by the idea of Christmas - Santa, Carols, Christmas trees, stars....cookies, cakes...and more, you know you have to be at your best in making Christmas treats. Tomorrow is Izzy's Christmas Class Party. I was always planning to bake a cake and Christmas cookies for her class and staff with or without a party. So I was glad to know today that they have a Christmas class party tomorrow.

These shortbread cookies are so super simple and I got an excellent batch, which were pre-tested by my husband and my excited toddler. I was a bit worried that I would find the cookie jar empty by the time I was done making the batches of these cookies.

Now I normally used to make these cookies as a slightly wet mix, so I have never owned a cookie cutter. With  a toddler around, like I mentioned earlier, you just have to be on your best creative behaviour. I found a handy star shaped Fisher Price block in my little one's play pen. After cleaning and drying it, it became the Christmas Star! Problem solved!

Christmas Star Shortbread Cookies


You need:

  • 250 gms of salted butter
  • 500 gms of flour
  • 125 gms of icing sugar or castor sugar
  • 125 gms of cornstarch


The make:

Preparation Time: 30 minutes | Cooking Time: 30 minutes | Makes 30-40 cookies (depending on the cookie size)

1.  Place all the ingredients in a large bowl and knead well using your fist and knuckles until the mixture holds well together. Continue kneading and folding in until the dough cracks. Tip: Unless you knead well, the dough will not hold together for the next step (rolling process)
2. Gently roll the dough evenly till it is thin enough however not wafer-thin. Tip:Make sure you maintain the same thickness for each roll-out process as some of the cookies may cook faster than the others.
3. Cut out shapes with cookie cutters of your choice and toss the extra dough back in the bowl with the remaining dough. Repeat this process till all of the dough in the bowl is used.
Cookie dough cut and ready to be baked


4. Preheat an oven to 250C for 5 minutes. Lower the heat to 180C. Place the cookies onto a butter paper or  cookie sheet  and carefully place in the oven. Bake for 8-10 minutes in batches as required. Remember that each subsequent batch would need lesser time in the oven than the first. I took the first batch in for the whole 10 minutes, the second batch took about 7 minutes and the third 5 minutes.
5. You can decorate them as desired. I planned on icing the class kids' names however the cookie's were too small for the precious little ones' names. Maybe in my next attempt, after I invest in larger cookie cutters! I did hand cut a heart for my munchkin and she was particularly pleased as she knows it was a special heart among the stars! I got a nice big thank you, hug followed by rains of kisses!

Merry Christmas darling little ones!


**New: Since my little one enjoyed these cookies so much over Christmas, I decided to bake them with one of her favourite flavours, Chocolate! I made chocolate Shortbread Cookies for her birthday and sent them to school which was again well-received! I wanted to share some pictures with you of the same. Additionally (to the above ingredients), add 100 gms of cocoa powder (sweetened is better if it is for the little ones)


Mummy's Ginger Wine - A Christmas Special

What better to include in the Christmas celebrations than Ginger Wine. I decided to make Mum's perfect Ginger Wine as our Christmas beverage. The last Christmas I was back home and had a taste of her delicious Ginger Wine. With your eyes closed, it tasted so much like a high-end branded sparkling wine. No exaggerations!

I must say that I truly did not expect this batch of wine to turn out as good as it did. I started it out in October as it takes a good 21 days to  ferment after the initial prep and then another 21 days resting time after straining. Home made wine tends to be sweet and if not made well in advance tastes like a non-alcoholic, albeit festive flavoured beverage. When the wine ages over time, it gives you that extra feel good spirit and serves well with your elaborate Christmas lunch or dinner! You can also add Cinnamon sticks in the first 21 days for extra colour and flavour which compliments the ginger well.

Ginger Wine served
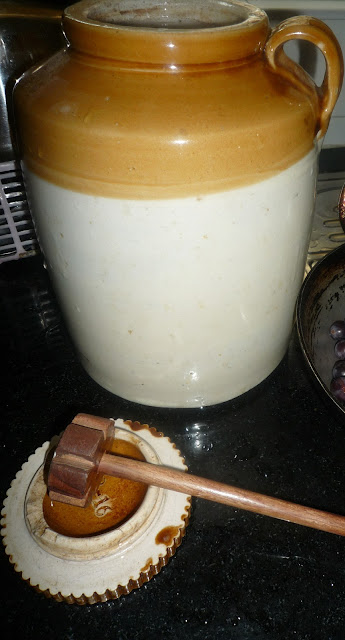
I have seen mum making many a homemade wine to know that you need a ceramic jar (bharani) to store the wine. Storing ingredients to make wine in steel or plastic jars is not advisable. The other reason to use a ceramic jar is that the wine ages well in a cool, dark place and glass jars do not serve this purpose either. If the wine for some reason gets spoiled due to exposure to light or contamination by using unsterilised utensils, then the only option you will have is to toss it out!

Ceramic Jar with wooden pestle

You need:

Utensils: sterilised and dry
  • Ceramic Jar
  • Clean Cloth for additional sealing of the jar
  • A cloth string or ribbon to affix the cloth in place
  • a Wooden Pestle or grinder
  • A large spoon
  • Deep bottomed vessel for the sieving process
  • Deep bottomed skillet for boiling process and later for the burnt sugar process
  • Large clean sieve (remember to buy a new one as sieves can be hard to clean/sterilise perfectly once used for any other food ingredient)
  • Funnel to fill bottles after resting time
  • 2 glass bottles / empty alcohol bottles
Ingredients
  • 1 kg ginger, skinned and washed well
  • 1 kg refined sugar, castor sugar or dermerera or brown sugar
  • Water just enough to cover the ginger in the boiling process (4-6 cups)
  • 1 tsp of yeast (optional)
  • 1" cinnamon sticks (2 nos) - optional
  • 1 cup of sugar for browning, 1 cup of water - optional
The make:

Preparation time: 40 minutes | Fermenting time: 21 days | Resting Time: 21 days

1. Wash the ginger well and crush in the grinder (without water) or using the wooden pestle. It does not have to ground to a paste, just crushed well to allow the juices to be extracted once left for fermenting.
2. Boil the ginger well with water enough to just cover the ginger.
3. Add the sugar and stir lightly. Set aside and allow to cool.
4. Once lukewarm, you can add the yeast if desired and lightly stir. You can also add the cinnamon sticks.  Transfer the ginger and liquids in the ceramic jar. Seal the jar with its original lid and top with a clean cloth and seal with a cloth string or ribbon. This is to avoid any contamination or exposure to light.


5. This is important - Store in a cool, dark place to avoid any exposure to light for 21 days.
6. On the 22nd day, strain the contents of the jar to a large deep bottomed vessel. Transfer the strained ginger juice to the ceramic jar, discarding the strained ginger.

7.  This is an optional step. For added colour, you can take the 1 cup of sugar and place it in the deep bottomed skillet. Heat the skillet on high and stir in circular motion. The sugar browns and melts to a sticky residue. Reduce the heat to the lowest. Add the 1 cup of boiling water and stir once the sizzling reduces. Turn off the flame and add it to the ceramic jar when lukewarm. Lightly stir. Cover the jar back as before and allow it to rest another 21 days.

Burnt Sugar
8. You can strain the contents of the jar once more in the deep bottomed vessel. If you find some burnt sugar at the bottom of the jar, then just pour some of the strained wine back in to the jar and stir out the contents back into vessel. Bottle the strained wine using the funnel.


Your wine is ready to be served on the 43rd day onwards.

All thanks goes to my Mum for all the tips and tricks in making this exquisite wine and her original recipe. Cheers Mum, you are simply the best! Merry Christmas all!

Ginger Wine' all bottled up for Christmas!

Monday 17 December 2012

Turkey Gravy - The Christmas Specials continue

Turkey Gravy is the essence that binds the whole Turkey dinner or lunch. So you want to get it right. Remember the turkey drippings in the Turkey Delight roasting process was caught onto the roasting tray. We will use these drippings to make the gravy. The gravy is essentially a blend of the turkey drippings flavoured in the roasting process, flour, butter (optional) and additional stock (optional). The stock could be either vegetable stock (that you get during the boiling of the potatoes for the stuffing) or chicken stock or the turkey giblet stock itself that you raised during the making of the stuffing.


The gravy must be not lumpy. To make this smooth, flavourful gravy,

You need:
  • 3-5 tbsp of flour
  • 2 cups of liquid (water or stock)
  • Turkey drippings
  • Salt and Pepper to taste
  • 100 gms of butter (optional)
  • Worcestershire sauce (optional)
  • Juice of 1/2  lemon (optional)


The make:

  1. Take off the drippings from the lukewarm roasting tray and transfer it to a skillet on a low flame. If the drippings are too little, add the butter and blend.
  2. Mix the flour with lukewarm stock or water as desired and whisk well to ensure there are no lumps. 
  3. Slowly add the flour mix to the skillet bit by bit, whisking continously to ensure there are no lumps.
  4. Add more stock or water as desired if you want the gravy to be thinner.
  5. You can add the worcestershire sauce if you would like your gravy to be browner.
  6. Add salt and Pepper to taste. Tip: Remember the stock and/or the drippings would have enough of salt. 
  7. You can also add the lemon juice for extra tang.
Serve with the Turkey Delight and Turkey Stuffing for that winning meal! Merry Christmas in advance...hope you have a falalalala... lalalala time!

Turkey Stuffing

To stuff the turkey in Turkey Delight, you can make the stuffing separately and stuff the bird or just make it separately and use the stock of the giblets for the turkey flavour. The former is possible in case of a smaller bird and the latter is preferred for a bigger bird as it would as it is take longer to roast.


To make this deliciously moist and flavourful turkey stuffing, 

You need:

  • Stock of the the turkey giblets or Chicken stock - about 3-4 cups
  • 1/4 cup of fresh parsley
  • 1 tsp of dried thyme
  • 1 tsp of dried basil
  • 1 large shallot, diced
  • 1 celery, diced
  • 1 large potato, diced and half cooked
  • 1 loaf of bread (it is better if the bread is a day or 2 old), diced into cubes
  • 1 cup of chopped walnuts
  • 3-5 tbsp of butter
  • 1 crispy apple, peeled, cored and diced
  • 1/4 cup of raisins (optional)
  • 1 cup of pimento green olives, diced
  • Salt and pepper to taste
  • Paprika- 1 tsp (optional)
  • Juice of 1/2 lemon

The make:

Preparation Time: 1 hour | Cooking Time: 45 minutes to 1 hour | Serves 6 adults

1. Make the stock out of the turkey giblets - heart, gizzard and neck and bring to a boil, uncovered for about an hour. Strain the stock and set aside to use with the stuffing. You can also use chicken stock, however I preferred the former.
2. Toast the walnuts either on a skillet under browned (ensure you do not burn them) or in a microwave oven for about a minute until you get the toasty aroma. Set aside to cool. Next toast the bread cubes in a pan with half of the butter quantity. Old bread is used as it would be dry and you would end up with a perfect consistency of stuffing. If not old bread, you could end up with mushy stuffing. Tip: if the bread is not old, dry them out in the oven for about 10 minutes before use.
3. Heat a deep-bottomed skillet with the remaining butter. Lower the heat to medium and toss in the shallots and celery until cooked for about 5 minutes. 
4. Add the apples, raisins, parsley, potatoes and olives and mix well. Next add the bread and give it a good stir. 
5. Add 1 cup of the giblet stock enough to cook the contents in the skillet. Add the thyme, basil, paprika, salt and pepper and the lemon juice and mix well.
6. Cover and cook for about 40 minutes or until the apples have softened. Check intermittently and mix to avoid the stuffing sticking to the bottom of the skillet. Add stock as required to keep the stuffing moist.
Now you can either stuff the bird with the stuffing or just set aside to serve with the Turkey Delight and the Turkey Gravy. Enjoy!


Thursday 13 December 2012

Turkey Roast Delight- A Thanksgiving Special for Christmas!

Seasons Greetings all! Its a season to be jolly...falalalala...lalalala! Hope you have not been too naughty this year! ;)

Thanksgiving is celebrated in various parts of the world. Although we do not celebrate Thanksgiving, Turkey used to feature in our Christmas lunches at home almost every Christmas and I would like to share this attempt at Turkey that I tried my hand in after arriving to India. I must say it was a task as we did not get the prepared Butterball variety. So I actually had a tedious turkey cleaning process last Christmas.

This is the first of my Christmas recipes for this year. Hope you enjoy making them. My guests certainly enjoyed the meal I whipped up for them last year.

Mummy's cooking always woos us and her Turkey lunches for Christmas is greatly missed..sigh! After moving to India, I don't think she has had the chance to make us her famous Christmas meal although whatever she makes is amazing!

I had made an elaborate Christmas dinner last year that I seriously had no time to reach out for my cam nor click the Turkey in its full form although it would have been worth it after the immense effort I went through in making this bird. I do hope I get a chance to post the Turkey picture in whole the next time I roast one. So please excuse me this time.

To make this delightful Turkey meal,

You need:

For the Turkey roasting:

  • 3 kgs of Turkey (Butterball usually has a conversion of lbs to number of servings, however after much research, I came up with a 1:2 ratio, so 3 kgs of turkey would serve 6-7 adults. Necessity is a mother of invention would rightly apply in this case)
  • Olive oil or melted butter
  • 1 large shallot
  • 1 leek stem finely diced (optional)
  • 2-3 carrots, half diced for stuffing and rest for topping (when served)
  • 1 bunch of celery
  • 1 half boiled potato, quartered (optional)
  • 1 bunch of fresh parsley
  • Sprigs of thyme or rosemary (you can also use a combination of both)
  • Juice of 1 lemon
  • 1 tbsp of paprika
  • Salt and pepper to taste
* Mum would usually not add the celery, rosemary or thyme but I added it for extra flavour.

The make:

Preparation Time: overnight + 1 hour | Cooking Time: 3-3.5 hours | Serves 6-7 adults

Tip:Remember to defrost the turkey overnight or the morning of as it does take time to bring it to room temperature. While doing so some tips to remember, let the turkey defrost in the packing/plastic in the refrigerator (not freezer) on a separate pan overnight so the juices would be confined to the pan. Do not immerse in hot water to speed up the process as the skin would pull away. If you are defrosting it the morning of, then you can leave it to defrost outside, just make sure you keep it the pan itself and cover with a net or a foil sheet to avoid contamination. Clean the turkey as if you were cleaning chicken and remove any left over feathers or stubs. In case of stubborn stubs like I found in the one I got last Christmas, use a new scrubber (which you can discard after use to light scrub the stubs out and/or pick out with previous washed and sterilised tweezers or just use a new pair of tweezers). Pat dry with paper towels. Reserve the spare parts such as the neck and giblets(heart, liver, gizzard) to make stock for the stuffing.


  1. Marinate the turkey with the juice of half a lemon both on the inside and oil. Next rub on some of  the olive oil or butter  and some pepper and salt both on the inside and out.
  2. Preheat the oven to 215C (approx 400F).
  3. Stuff the inside of the turkey with the carrots, tops and bottom of the celery, sprig of thyme and a sprig of rosemary, half of the shallot - peeled and quartered, diced bunch of parsley, half of the carrots diced, the potato and leek. Add a ball of foil paper in the body cavity to prevent the stuffing from falling out. Next carefully tie the legs of the turkey with a kitchen string (avoid colored string or any other strings other than the ones used for roasting as you may end up like Bridget Jones with a coloured turkey bottom or maybe in whole!). You can also use metal skewers to close up the turkey cavity.
  4. Stuff the turkey neck with some parsley and rosemary sprigs and close it up with string and thin skewers. Make sure to fasten the turkey wings with a string around the body.
  5. Rub more butter or olive oil on the outside of the turkey with a good sprinkle of salt and pepper and/or paprika.
  6. Now depending on the type of oven you use, flip the turkey on its breast side first or the roasting  rack with a roasting tray at the bottom of the rack to retain the juices that drip from the turkey. The idea behind this is to ensure that the turkey breast retains the juices of the turkey and is succulent. Add sprigs of thyme and/or rosemary to the outside of the turkey as well for extra flavour.
  7. Now cook the turkey on a high 215C (approx 400F) for the first half hour. For the next two hours, reduce it to 200C and for the last hour at 180C. You can flip the bird on its back on a high of 250C for about 3-5 minutes, in case you want the breast side slightly more brown. You can either monitor the temperature of the turkey using a meat thermometer or just use a butter knife to insert into the breast, the juices should be clear and not pinkish. Once you take out the turkey from the oven, wait about 10-15 minutes before you carve the meat.
  8. Serve on a bed of cleaned romaine lettuce with remaining diced carrots, rosemary/thyme sprig and with choicest rolls or spiced rice of your choice! Serve with Turkey Stuffing and Gravy! Enjoy!

Wednesday 12 December 2012

Uncle John's Chana Masala Special (Spiced Chick Peas)

I do not know if you remember when I started this blog, I mentioned the name of my blog arrives from the fact that my cooking experience was derived first from Mum's Kitchen and then to several kitchens thereafter. Hence the name Kitchenette. Uncle John and Aunty Felcy's kitchen was one of the kitchens where I learnt some delicious Mangalorean recipes. Uncle John prepares the best chana masala I have ever had!


Recently, when I spoke to Uncle's son, he mentioned how ever many times, he tries to get his Dad's recipe for Chana Masala, it never turns out as delicious as he makes it. Well to cut a long story short, I called uncle and asked him for his recipe and made sure I took notes to the T!

I can safely say that this attempt definitely takes me back to the good ol' days, when I stayed at uncle and aunty's loving home as I definitely got the flavour right minus the love and care that uncle especially puts in it. Lemon juice is an optional ingredient (as I am not sure if his son liked it in the dish). I remember uncle had added it in when I visited his home about a year ago with my little one Izzy and hubby Anup.

So here goes, its a super simple recipe and one you must try whether you are a vegetarian or not. Trust me, you will argue with your better half for the last spoon of this dish or will divide it equally not just give it away. Miss you Uncle and Aunty. Thank you for taking care of me ..you definitely made it hard to miss my parents a lot when I was away from them those years.

To make this super delicious and simple recipe,

You need:

  • 250 gms of kabuli chana/Chickpeas, soaked overnight in 2-3 cups of water
  • 1 tbsp of MTR Chana Masala powder(if you do not have this you can use 1/2 tbsp of chili powder and 1/2 tbsp of Garam masala, although it will not be perfectly the same, it will serve the purpose)
  • 2 cups of water
  • 2 tomatoes, finely diced
  • 1 large onion, finely diced
  • 1 tbsp of ginger-garlic paste
  • 1 green chili, slit lengthwise (optional)
  • 1 bunch of coriander leaves, finely diced
  • 1 tbsp of coconut oil
  • 1 tsp mustard seeds
  • 2-3 cloves of garlic (skin-on)
  • Juice of 1 lemon (optional)
  • Salt to taste


The make:

Preparation Time: 8 hrs(overnight)|Cooking Time: 30 minutes| Serves 4 adults


  1. Strain the water from the puffed up chana and pressure cook the chana with salt and about 2 cups of water.
  2. Heat the coconut oil in a clay pot and splutter the mustard seeds.
  3. Lower the flame and add the garlic cloves until softened or lightly brown.
  4. Add the green chili and onion and saute till golden-brown. 
  5. Next add the ginger-garlic paste and stir for about a minute.
  6. Next add the tomatoes. Cover to cook for about 3-4 minutes.
  7. Add the MTR Masala and stir well. Allow to cook for 2 minutes.
  8. Next add the chana with the water and saute well. Cover and allow the spices to blend into the chana for 10 minutes. Add the (optional) lemon juice if preferred.
  9. Top with coriander leaves. Serve hot with rice or flatbreads such as paratha, puris or roti of your choice. Bon Appetit..


Tip: Once served, leave the cover off the claypot and let it cool. Once cooled to room temperature, cover and let it stand overnight. This improves the flavour. The chana masala taste better the next day as the chana absorbs the masala.


Drumsticks in Spinach Gravy

A nutrition enriched dish that is excellent for children and adults alike. Drumsticks, also known as the wonder stick is a great blood purifier and useful in strengthening bones. It is also good for pregnant women as it helps in any pre or post delivery complications. It also helps ease any chest congestion,  coughs and sore throat. Inhaling the steam off water in which drumsticks have been boiled in helps relieve asthma and lung problems.


I made this dish along with Lamb curry and served it with rice. I must say that although it was on-the-fly, the combination was amazingly in sync with each other.

Drumsticks in Spinach Gravy served over rice


To make this super simple dish,

You need:


  • 12 drumsticks, each stick chopped into 3 pieces
  • 2-3 bunches of green spinach, finely chopped
  • 6 cloves of garlic and 1" ginger crushed to a paste
  • 1 large shallot finely diced
  • 2 green peppers chopped
  • 2 tsp turmeric powder
  • 2 tsp of dry mango powder or 1 cup of tomato puree
  • 1 tbsp of paprika powder
  • 1 tsp of white pepper
  • Juice of 1/2 lemon
  • 1 tbsp of cooking oil
  • 1 cup of filtered water
  • Salt to taste


The make:

Preparation Time: 10 -20minutes| Cooking Time: 30 minutes| Serves 4 adults


  1. Soak the drumsticks and spinach in some vinegar, salt and turmeric powder and allow to stand for 10-20 minutes. Rinse well and strain. 
  2. Heat the oil in  a deep bottomed non-stick skillet on a high temperature. Lower the heat and toss in the shallot and the green peppers and saute till the onions turn translucent.
  3. Add the ginger and garlic paste and saute for 1 minute.
  4. Next add the paprika, white pepper and salt and saute for a minute. 
  5. Add the tomato puree and  and spinach. Cover and cook for 10 minutes. 
  6. Add lemon juice, water and drumsticks. Stir well and cover and cook for 15 minutes.
  7. Uncover and check if the drumsticks are cooked well. If not, additionally cook for another 5-10 minutes.
  8. Serve hot with rice or pasta as desired. Bon Appetit