"This is a journey of my life since I was all of 12 yrs when I started my hand in cooking to now with displays of my learning and creations of recipes from around the world. My inspiration and role model has always been my Mum who has always created dishes from around the world and excellently well. I do not believe I would ever match to her culinary skills. I remember the times she could cook and bake almost 4-5 dishes in one go without ever letting one go under cooked or burnt! I was born and raised in Dubai, UAE and recently moved to India for family reasons. Kitchenette just means that over the decades, my kitchen has changed from that of my mum's to my uncle and aunt's, to my home in UAE and now in India. Pala't'te, describes both global cuisines ('Palatte'-diverse flavours) and pleasing diverse 'Palates'."
Showing posts with label Indian all spice powder. Show all posts

Thursday, 19 December 2013

Duck Roast Gravy (Tharavu Roast curry) - A Christmas Savoury delicacy

In the spirit of the festive season, I am trying to bring to you as many recipes as possible to help you prepare for your big Christmas lunch or dinner! If you are a member of my Facebook page, you would have seen some of the posted recipes related to Christmas. If you have not yet seen our facebook page, please visit here and 'Like' the page so as to have it bookmarked. Spread the word with your family and friends as well.


Duck roast is often taken as an option to the western Christmas tradition of Turkey Roast especially in Christian families in the South of India in the state of Kerala. Duck Roast would often be accompanied with Appam,  either 'KallAppams' (Indian Toddy Pancakes) or 'PaalAppams' (Milkhoppers). You could also serve this with Kappa Vevichathu (Tapioca Steamed and Fried) or Rice of your choice or Rice Iddiappam (which looks like miniature rice noodles). Hopefully I will post the Kappa Vevichathu recipe very soon :) Although Duck Roast is normally accompanied with Appams or Fried Rice even during Christmas.

I hope you enjoy this creation of mine. Sorry I don't have better pictures of the process as this was taken way earlier than I had intended to start this blog. I will definitely upload better pictures should I try this again. Hope you are having a great Christmas season!

I meant to post this recipe last week but my system decided to have some technical issues at about the same time. It is resolved now so hope I get time (amidst all the baking and cooking) to post as many recipes to Christmas and even the New Year 2014 to help you design your dinners/lunch/desserts :)


You need:
  • 1 kg Duck, cleaned well (soak for at least 20-30 minutes in turmeric, salt and vinegar), fat removed, skinned and cut into medium pieces*
These ingredients are required for the Marinade:
  • 2 tbsp Red chili powder
  • 2 tbsp Coriander powder
  • 1/4 tsp turmeric powder
  • Salt to taste
Remaining ingredients required for the recipe:
  • 2 roughly torn  long dried red chilies
  • 1 sprig of curry leaves
  • 6-8 green chilies, slit lengthwise
  • 2 tbsp of cooking oil (although you should use coconut oil if you want it to taste as close as possible to the traditional version)
  • 2-3 large purple onions, diced finely
  • 10-12 small red onions, diced finely
  • 1 tsp mustard seeds
  • 2 medium-sized tomatoes, finely sliced
  • 1" ginger, finely diced
  • 6-8 cloves garlic, finely diced
  • 3-4 tbsp Garam Masala
  • 1/2 tsp  Turmeric powder
  • 2 tbsp Coriander powder
  • 3 tbsp of Red Chili powder
  • Coconut milk - 2 extracts : 1st extract 1 cup and 2nd extract 2 cups. You can try the Homemade version here as I did for this recipe. Just make sure to adjust the water accordingly as required for this recipe.
  • Salt to taste
*Optional: you can leave a few pieces with skin on possibly the wings or even portion of the legs/breast

The Make:

Preparation Time: 20 minutes | Cooking Time: 1 hour | Serves: 5-6 adults

It is best to leave a few pieces with the skin on and you can opt to take it out later to add some flavour of the duck fat in the dish. I have tried it without as well and I can vouch for the former. You can take off the excess oil off the top of the finished dish. Make sure before marinating to drain out any water content from the duck meat.

Marinate the duck meat for 4-6 hours. You can choose to do it for longer or lesser. The more you marinate the duck meat, the more flavourful the end result. I ended up marinating my Christmas duck roast for 8-10 hrs. I had a huge banquet of dishes for this particular Christmas :) Trust me not a drop of the gravy was left to the next meal let alone the next day.

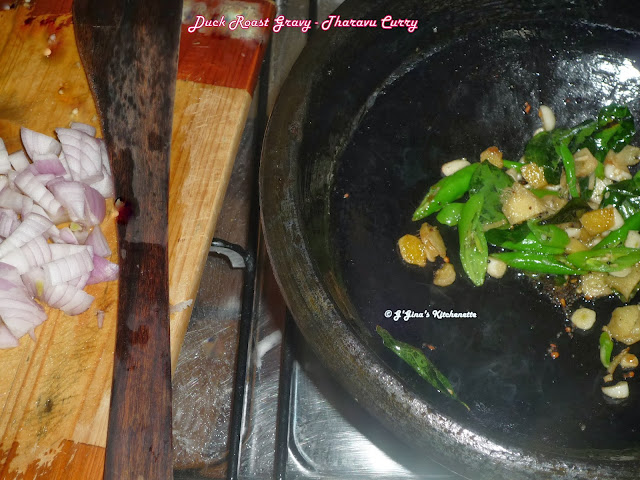


1. Heat the oil in a clay pot or deep-bottomed wok or even a pressure cooker and splutter some mustard seeds.
2. Toss in the curry leaves, red onions, dried red chilies, ginger and garlic and saute well for 2-3 minutes.
3. Next add the diced purple onions and saute till translucent.
4 .Toss in the green chilies and saute till the onions turn lightly brown.
5. Add the marinated duck meat and salt. Cover and cook for 40 minutes on medium-low heat. If you are using the pressure cooker, make sure to add enough water to just about cover the meat or about a cup lower as the duck fat would also release making the gravy very watery. It should cook for about 5 whistles on medium-high. You would have half-cooked duck meat at this stage using either of the methods.
6. In a bowl, mix the turmeric, red chili, coriander powders and garam masala and add the 2nd extract coconut milk bit by bit mixing well.
7. To the half-cooked duck, add the 2nd extract spiced coconut milk on low heat and mix well. Cover and cook until the gravy has just thickened and the meat cooked.

If the duck meat is of good quality it would be soft and tender.

8. Lastly but more importantly add the thick 1st coconut milk extract and mix gently. Bring to almost a boil and set aside.

Serve with hot Appams or Fried Rice or Kappa any other flatbread/rice of your choice.

Bon Appetit! Tis' the season to be jolly falalalalalalala....Seasons Greetings all!


Sunday, 30 June 2013

Sunday Lamb Biriyani - Hyderabadi Dum Biriyani

There used to be a time when I lived in the UAE that I would love to have Biriyani on a Friday afternoon followed by an afternoon snooze. But after my health went downhill, I gave up on that routine. My mom makes the best biriyani ever. Something funny though, she would make biriyani to feast on by a large gathering and would even pack what was left for our thoroughly satisfied guests but would not even eat a bite. For some reason, she dislikes biriyani. She would eat plain rice or pulav/fried rice but never biriyani :) Our guests though never had a problem with that, which just meant more for them :D Seriously it is that good. 


One Saturday my dearest hubby asked me for Biriyani on Sunday. So made my version of Hyderabadi Dum Biriyani. The response: nothing short of praise, claps and hoots! My toddler said 'Wow Mama...yummy!' So that was enough for me to know that this recipe needs to go into the blog! For my Vegetarian readers, do not fret, you can make this recipe with your choice vegetables instead of lamb. Instead of the egg you can add potato.


Hyderabadi Dum Biryani as you may know (esp. from its name) is a signature dish from Hyderabad, the City of Pearls. In fact it was the first dish I tried from various restaurants in Hyderabad. There are several versions I like. It is a blend of Mughal and Persian cuisine. Basmati rice is slow-cooked with layers of marinated meat or chicken in a deep bottomed vessel and sealed with a dough paste. This process of cooking is also known as 'Dum' . The key is to ensure that your rice turns out to be fluffy and perky. Initially I must admit my rice used to turn out to be quite sticky. This is one of the reasons why I never cooked biriyani when mom was around. I didn't want to disappoint her. She gave me a few pointers to cook basmati rice and I have included them in the recipe. However I also took tips from Jamie Oliver ;)


For the Lamb, you need:
  • 1 kg boneless Lamb, cleaned and cut into bite sized cubes, drained (use a sieve and set aside to dry)
  • 3 tbsp, crushed Ginger & Garlic or paste
  • 2 cups yoghurt
  • 3 tbsp Kashmiri chilli powder
  • 1/4 tsp Turmeric powder – ¼ tsp
  • 3 tbsp Homemade Garam Masala (Indian all spice powder)
  • 2 sprigs mint leaves,  finely diced
  • 4 sprigs of Cilantro/Coriander leaves, finely chopped
  • 2 small lemons, juiced
  • ½ tbsp Salt
For the rice, you need:
  • 1 kg of Basmati rice
  • Drinking water - double the quantity of rice
  • 1 tsp black cumin seeds
  • 6 whole green cardamoms
  • 4 cloves
  • 6 whole black peppercorns
  • 2-3 bay leaves
  • 2-3 star anise
  • 1 tbsp of cooking oil or clarified butter(ghee) (optional)
  • 2-3 tbsp of salt
For the Biriyani:
  • 4 onions, diced finely
  • 4 tbsp cooking oil
  • 2 pinches of saffron,  soaked in lukewarm water or 2 pinches of red-orange food colour
  • Sticky dough made of wheatflour and water (enough to cover the mouth of the biriyani vessel)
  • 2-3 boiled eggs, cut in halves
  • Pinch of cilantro/coriander leaves
The Make:
Cooking Time: 45 minutes Preparation Time: overnight or min of 2 hours (includes marination time) Serves 6-8

Marinating the lamb:
1. Mix all the marinade ingredients in a large bowl till well combined. 
2. Add the lamb and mix well. 
3. Cover and let it rest for at least 6-8 hours or overnight if possible. 
This would enhance the flavours in your biriyani as it cooks through.

Cooking the rice:
* Ensure you use a deep-bottomed and wide vessel to cook the rice. 

1. Then follow the steps in  http://gginaflavorspalatte.blogspot.in/p/how-tos-or-tips-kitchen.html for a nice and fluffy rice cook.

2. When the water comes to a running boil, toss in the dry spices, salt and oil/clarified butter and boil for a minute.  Next follow the steps in http://gginaflavorspalatte.blogspot.in/p/how-tos-or-tips-kitchen.html 

3. Immediately drain the rice along with the spices in a strainer. Let all the residual water drain off. Set aside.


Assembling the Biriyani:

1. In a skillet, add the oil and toss in the onions. Saute until crisp and golden brown and set aside on a kitchen towel. Toss away the residual oil.

Biriyani vessel is usually layered in a large vessel as shown in this image. However for 6-8 adults and the quantity of rice and meat, you could use 1/4 this size of the vessel shown in the image. Thanks to mom, I inherited her biriyani vessel :).

2. Preheat the oven to 200°C. Place the Biriyani vessel on a stove top with medium-low heat. You may need to turn on two burners depending on the size of your vessel. Let the vessel get slightly hot and turn off the heat. Alternatively, you could place the vessel in your oven and allow it to heat for a minute.

3. Now add  first half of  the marinated meat at the bottom of the vessel, followed by half of the crispy onions. This becomes your first layer.

4. Next add a layer of the half cooked basmati rice. You can chose to add a tbsp of clarified butter/ghee or oil at this stage. I had not as I did not want my rice to be too greasy seeing as I chose lamb for meat.

5. Repeat step 3 and 4 and then artistically pour the saffron mix or food colour mix on top of the rice (try a circular spiral fashion starting from center and going to the corner of the vessel. This would give an amazing colour combination of slightly white to coloured rice.

6. Next, add some sticky dough paste to the mouth of the vessel and cover with its own lid or aluminium foil. You can also place the aluminium foil and then add the sticky dough to the corners and then cover with the vessel's lid.

7. Carefully place the sealed vessel in the oven and lower the heat to 180°C. Cook for 30-40 minutes. Turn off the heat and let it rest in the oven for at least 10 minutes.

8. Uncover and serve from one side of the vessel making sure to dig deep to the bottom of the vessel and place in a biriyani pot (handi). This method of serving ensure you get all the layers of the meat, rice and spices and  the saffron/food colour.

9. Top with boiled eggs (cut in halves) and a pinch of cilantro leaves. Serve hot with papad, lime/mango pickle, green salad or just some raw onions with lemon juice and salt and vegetable raitha or plain yoghurt. 

Traditionally in Hyderabad, Hyderabadi Dum Biriyani is served with Mirchi Ka Salan (Chili and Peanut curry). Since Anup dislikes it, I didn't bother to make it. I too am not a great fan of Mirchi Ka Salan.


Tips:
  1. Tips for a nice fluffy basmati rice: http://gginaflavorspalatte.blogspot.in/p/how-tos-or-tips-kitchen.html
  2. Adjust the spices to your taste.
  3. Remember the key factors for a well-cooked Hyderabadi Dum Biriyani is:
  • Well-marinated meat. You can even marinate it the night before and refrigerate. Remember to stand the meat in its own juices and spices before refrigerating.
  • A nice and fluffy basmati rice.
  • Good quantity of spices mix and rice layered well in the assembling process.
  • Whilst serving, ensure you get all the layers by digging deep into the biriyani vessel. Pretty much like you would do for an English trifle to ensure you get all the layers. You'd need a good long handle and wide mouthed ladle to do so. 


Bon Appetit! Hope you enjoy this recipe. If you do try it, please do not forget to leave me a comment here or mail me a picture of your make with your comments / feedback on gginazkitchenette@gmail.com. Alternatively you can also visit our facebook page and 'Like' our page and add in your comments there! We are also on Twitter now! Follow us here.

Happy Sunday!

Sunday, 14 October 2012

Lamb Curry

Off late I have made a couple of recipes using Lamb. This interest came about as I was avoiding chicken for several months due to health reasons and as per the Ayurvedic doctor's advice for alternate meat options. I have also opted for dry mango powder (again the Ayurvedic's advice - avoiding tomatoes for a while). I got a good produce of lamb from the vendor. I am not too keen of boneless meat unless it is a good cut of steak otherwise I am known to enjoy the boned meat esp. the marrow. The marrow bone otherwise known as the whistle in my home has been a cause of many a sibling argument :)

Lamb Curry for the soul -  comfort food!

This recipe was inspired by my taste buds one afternoon and is quite simple as I wanted to have some comfort food that afternoon. These are the times one really misses one's mum. I thought of her all the while when I planned to make this dish, to making it and whilst eating it as well :) No wonder it turned out so well.

You have two options to cook this curry, one is through slow cooking which is preferred however if you do not have a slow cooker, you can also opt for the pressure cooker.

You need:

  • 800 gms of Lamb cut into medium pieces
  • 2 tbsp ginger-garlic paste
  • 1 tbsp of finely sliced ginger
  • 1 tbsp finely diced garlic
  • 1 large shallot finely diced
  • 2-3 green chilies slit length wise and chopped in half
  • 1 stem of curry leaves
  • 1 tbsp of dry mango powder/amchur powder (or 1 large tomato diced)
  • 1 tbsp of Garam Masala
  • 1 tbsp of Kashmiri Chili Powder (or Paprika Powder)
  • 1 cup of thick Coconut milk (first milk only) (or 1 tbsp of corn flour or corn starch diluted well with 2-3 tbsp of water) *optional
  • Salt to taste
  • 1 tbsp of Meat Masala powder (optional in case you are using my Homemade Garam Masala)
  • 1 tbsp of cooking oil
  • 1 tsp mustard seeds
  • 2-3 tbsp of water
The Make:

Cooking Time : 60 minutes | Preparation time: 15 minutes | Serves 6-7 adults

As I mentioned, this curry can be made using a slow cooking process, however I will describe the easier process. 

  1. Marinate the cleaned lamb pieces with ginger-garlic paste, amchur powder, salt and Garam Masala for at least 15 minutes - 1 hour. As with any meat marinating process, the longer the better (just make sure if its longer, you cover it properly and store in the fridge for up to 3-4 hours).
  2. Pressure cook the marinated lamb pieces for 35-40 minutes. It takes at least 3 whistles on high and 1 on low heat. Try not to overcook it. 
  3. In a large deep bottomed skillet, heat the oil, splutter the mustard seeds and add the curry leaves. Toss in the shallot and diced ginger and garlic and saute till translucent on medium heat.
  4. Add the green chilies and saute for about a minute. Next add the Chili Powder and Meat Masala and mix well for about a minute. Add 2-3 tbsp of water to avoid the masala sticking to the bottom and allow to reach almost a  boil. Then lower the heat.
  5. Give the contents of the pressure cooker a good stir and then transfer the contents to the skillet and mix well and allow it to reach a boil which would take about 5-7 minutes on medium heat. Note: Choose if you want to add the entire stock of the lamb. If you would like to leave some behind as you had initially added too much water, then make sure you stir well before you transfer the contents. To avoid this choice, do not add too much water to the pressure cooker whilst cooking. Try the 1:1.5 ratio.
  6. This next step is optional. You can add either Coconut milk extract or Cornstarch mixed in water to get a thicker gravy. However, what I did was add half a cup of coconut milk and then I topped it with corn starch. It turned out well. However I know there are people who do not consume Coconut Milk or Corn starch in which case you can end with step 5. 
  7. Lower the heat, and add the corn starch dilute and mix well. Allow it to reach a boil on medium heat. Then lower the heat and add the coconut milk extract and stir well and allow to warm. Turn off the heat and serve hot with your choice of rice, bread or Appams and your favourite greens on the side. My recipe on Spinach and Drumsticks gravy will follow soon.
Bon Appetit! Enjoy!
Lamb Curry served with Rice and Spinach and drumsticks gravy

Lamb Curry!
Lamb curry served with Rice


Friday, 17 August 2012

Andhra Chepala Pulusu (Tangy Tilapia Fish Curry)

I had been away for a little over a month in Kerala and have many posts to come to delight my readers. I have been asked many a time to post my Andhra cuisine adventures. Well here goes...
Tangy Tilapia Fish Curry (Chepala Pulusu)

Tilapia is a fresh water fish that is common to  Bengali cuisine in India. 'Chepala' indicates River fish or Fresh water fish. This type of 'Pulusu' preparation is indicative of the tanginess and is common to places like Nellore in Andhra Pradesh, India. Andhra dishes are quite spicy and are not for the faint hearted. This is especially because the Red Chilli Powder that you find in AP is quite spicy itself. I compare it with the likes of Kerala and it is nowhere close to the spiciness of the Chili powder in Kerala.

In most of my Indian dishes I nowadays use Kashmiri Chili Powder as it is close to the Sweet Paprika and not so spicy as the Chilli Powder I find here in AP. Also as you get older I believe the stomach lining can take only so much:)

As an alternate to Tilapia, you can use Mullet or Blue Warehou if you cannot find Tilapia in your local produce.

Remember not to stir this fish around much as I can guarantee it would break during the cooking process. When I indicate "stir" in this recipe, make sure you are rotate the pot around.

Ready to be served
This preparation goes well with boiled rice or even idlis or Appams (although Appams are not common to this region as much as in Kerala).

To make this dish,

You need:
  1. 1 kg Tilapia fish - cut into medium size pieces
  2. 2 onions - 1sliced finely lengthwise, 1 grated to a paste (with Cinnamon-optional)
  3. 4 tbsp Ginger-Garlic paste
  4. 2-3 green chillis slit lengthwise
  5. 3 medium size tomatoes diced
  6. 1-2 lemon-sized Tamarind pieces
  7. 1 bunch of cilantro or coriander leaves diced finely
  8. 1" cinnamon (optional)
  9. 2-3 tbsp of Red Chili Powder (I used Kashmiri Chili Powder)
  10. 1/2 tsp of Turmeric Powder
  11. 1 tsp of Garam Masala powder
  12. Oil - as needed or about 5-6 tbsp
  13. Salt to taste
The make

Cooking Time: 35-40 minutes| Preparation Time : 30 minutes| Serves 6 adults

  • Marinate the clean pieces of fish with 2 tbsp of ginger-garlic paste, turmeric, salt and 1 tbsp of Red Chili Powder. The longer you leave it to stand the better. You can do this for 30 minutes at minimum.
  • Heat the oil in a rounded pan or a clay pot. Fry the marinated fish pieces about a minute on each side or until lightly brown. Once this is done, set aside the fried fish and add the sliced onion and toss till translucent on medium heat in the same pot adding additional oil as required.
  • In the meantime, take the tamarind pieces and tomatoes in a small vessel and add boiling water to it and leave it to stand for about 5-10 minutes. Strain and remove all the pulp and set aside the strained juices.
  • Next add the slit green chilis to the same pot and toss for about a minute and add the remaining ginger-garlic paste and toss till light brown.
  • Add the onion paste and fry till a thick paste it formed. Next add remaining Chili Powder, Garam Masala and salt as required and blend well.
  • Bring to a boil
  • Add the tomato-tamarind juices and stir well. Cover and cook for about 5 minutes on a medium-low heat. Uncover and add water as required for the gravy and bring it to a boil. 
  • Lower the heat and add fried fish pieces and allow it to cook and blend in for about 5-10 minutes. Turn off the flame and top with diced cilantro.
Your Fish curry is now ready to be served with rice or idlis or Appams as per your choice. Bon Appetit!


Served up with rice

Thursday, 7 June 2012

Garam Masala (Indian Spice Powder)

Garam Masala(Hot mixture literally translated) powder is easy to make and you can make it ahead of time. Some people do not add the dry red chilis but I prefer it. Easy way to remember it is the 6 'Cs': Cloves, Cardamom, Cinnamon, Cumin, pepper Corns, dry red Chilies or the 5 'Cs' if you want to avoid the Chilies.

Grind the following to a dry powder: 

  • 2-3 cloves
  • 1-2 cardamom (skinned)
  • 1” piece cinnamon
  • 2-3 pepper corns
  • 1 tsp black cumin seeds (jeera)
  • 1-2 piece of dry red chilies. (tops off)


Tip: You can make this dry mix ahead of time and store for 3-4 weeks in room temperature.