"This is a journey of my life since I was all of 12 yrs when I started my hand in cooking to now with displays of my learning and creations of recipes from around the world. My inspiration and role model has always been my Mum who has always created dishes from around the world and excellently well. I do not believe I would ever match to her culinary skills. I remember the times she could cook and bake almost 4-5 dishes in one go without ever letting one go under cooked or burnt! I was born and raised in Dubai, UAE and recently moved to India for family reasons. Kitchenette just means that over the decades, my kitchen has changed from that of my mum's to my uncle and aunt's, to my home in UAE and now in India. Pala't'te, describes both global cuisines ('Palatte'-diverse flavours) and pleasing diverse 'Palates'."
Showing posts with label Dessert. Show all posts

Wednesday, 5 October 2016

Crispy Chocolate Surprise Balls #FoodieExtravaganza

Aaaah I'm back and for one of my favourites 'Chocolate'! Thank you Kathleen for my favourite Chocolate theme in time for me to pick up the pace on my food blog as well.


Kathleen Coe Clegg is the wonderful hostess of our October's theme 'Chocolate' over at Foodie Extravaganza. She is the owner of 'Fearlessly Creative Mammas', a wonderful blog sharing recipes from her home.


This time I wanted to do something similar to cake pops except it is presented a lot differently.


I enjoyed making this treat as I knew my little girl would love it.


Friday, 10 June 2016

Ramadan Kareem : Iftar 2016 : Mango Soufflé with Caramelised Ginger and Caramel

Ramadan Kareem!


My earlier batch of Mango Soufflé that I made and posted to celebrate G'Gina's Kitchenette crossing over a 100,000 page views was made slightly differently. The flavour was varied too in the second make. In fact I preferred the second one to the first.


I have always enjoyed making desserts for my loved ones and when someone asks to taste a dessert of mine, I tend to go all out and whip up a huge batch. Funnily enough, it turns out better than I ever imagined and more than the original recipe I created. So when it was mentioned how I had shared my first batch with a couple of my neighbour friends I was asked to make it again for a few more of my neighbour friends.


I made this recipe for my dear and sweet friends and neighbour Zaira Shaan, Shaan Rahman and their all too adorable son Rayaan Shaan (Rayu darlin'). Actually my chief taster was darling 5 year old Rayu who said he loves desserts and when I asked which one, he said yellow one with caramel. I asked if the yellow meant Mango as being Mango season it was all about mangoes for me! Zai prompted he meant cremé caramel.


Wednesday, 1 June 2016

Celebrating crossing 100,000 page views - Mango Soufflé #FoodieExtravaganza

G'Gina's Kitchenette has crossed another milestone and I am so thankful to all our readers. Reaching this milestone would never have been possible without my Good Lord and my constant inspiration Mummy.


So to celebrate this milestone, I would like to share my Mango Soufflé recipe as a part of our Foodie Extravaganza June event. I had a choice to either bake this soufflé or to use the normal double boiler method. I preferred the latter to allow the natural flavours of mango to appear. Not only did my little one like this soufflé, two of my friends (and neighbours) Divya and Ribu, did too. I missed on giving some to another friend and neighbour, so I may make this again this afternoon. In fact the talk of my making this soufflé was two-fold, one was as a part of the Foodie Extravaganza challenge and the other one is because there is a tradition that I follow from Mum. We never return an empty container back to anyone who offers us their food/delicacies. Ribu made this awesome fish curry for me to try and Divya offered me one of my many staples I used to regularly have in Hyderabad (Gongura Pickle). 


Friday, 17 January 2014

My Chocolate Souffle - Happy New Year 2014

Happy New Year 2014 my dearest readers, family and friends! I started this New Year with three letters of the alphabet 'Y.E.S'! This is the year of Good Tidings and all Good News! So for my first recipe of the New Year, I wanted to begin with something deliciously sweet. Incidentally, it also something borrowed (from almost a decade ago) and a rather simple make!


This recipe creation is one dear to my heart. It reminds me of a time when I was with my family in Dubai. This was before I was married and was staying with my parents, sisters and bros-in-law. My eldest sis was expecting her first bundle of joy then! My BILs used to tease me with the name souffle (sou-fly, etc.) I had made 'my chocolate souffle' all too often and it was a welcome dessert at home. It was a sure way to get to the heart! No wonder I remember this recipe so fondly!

You can make this recipe with cocoa or chocolate. You can also choose to use the dark-bitter sweet chocolate, white chocolate or regular cooking chocolate. I had used cocoa, a decade ago when I used to make the souffle often. This time I tried it with cooking chocolate.


Now for the souffle, it would be advisable to use ramekins however if you do not have ramekins available, your options could range between sturdy coffee cups, thick glass bowls, steel bowls or even orange peels as pointed out by my foodie group friend Sanaa.


You need:

  •  500 gms butter
  • 150 ml milk
  • 75 gms castor sugar/ brown sugar
  • 25 gms cocoa or 20 gms of cooking chocolate
  • 100 gms plain flour and 1/2 tsp of baking powder or 100 gms of all-purpose flour
  • 3 eggs, separate whites and yolks
  • Extra castor sugar for dusting
  • Water for cooking souffle and melting chocolate


The Make:
Makes 4 standard size ramekins | Preparation Time: 5 minutes | Cooking Time: 20-25 mins

1. Butter the ramekins well on all corner even the rim of the ramekin and set aside.
2. Melt the butter, milk, sugar and cocoa or chocolate in a double boiler.
3. Once melted, turn off the flame and set aside.
4. Add in the sifted flour in the melted chocolate mix and whisk well.
5. Whisk in the egg yolks and mix well.
6. Next add in the egg whites and whisk well till evenly blended.

For the cooking process, you can do this two ways, either on stove top or in the oven. In both cases, you need to place the ramekins in a deep-bottomed pot with a lid. Make sure to add enough water to half cover the ramekins from the base.

7. Pour the whisked batter into the prepared ramekins up to 3/4th of each of the ramekins allowing room for the souffle to expand. Tap the bottom of each ramekin on the table top to ensure the batter evenly sits in the ramekin.
8. Place the ramekins carefully in the prepared pot on a medium-low flame. Cover and cook for 20 minutes. If you are using the oven, preheat the oven to 180°C and place the deep-bottomed pot in the center of the oven and allow to cook for 15-20 minutes.
9. The souffle would have risen over the ramekin at least to 2/3rd its original height and would jiggle a bit but the top would be set.

I personally love having this souffle nice and warm but you can also have it at room temperature or cool as has been enjoyed by a few friends of mine.

Hope you enjoy making and serving this souffle. I call this 'My Chocolate Souffle' as I have experimented with this souffle so much over the years that it has become 'mine' :)

With Valentine's Day in less than a month you might want to try experimenting with/practicing this recipe creation ;) This recipe as I mentioned earlier is a sure way to one's heart :) You can  serve the souffle by making a small dip in the center of the souffle and adding a spoon of ice cream or cream or grated white chocolate or even melted cheese.

Bon Appetit!

Wednesday, 7 August 2013

Double Chocolate Brownies - The ultimate chocolate brownie recipe..

We have been celebrating quite a few birthdays since July, starting with my hubby Anup's to my Dad's and mine which was just 2 days ago. I love baking and most esp. for my loved ones. Incidentally for those of you who do not know me, I entered the kitchen through baking. Started with crash and burns and messing up my mum's cake tins :D I was known as the Dessert Queen for a long time as my explorations were limited to desserts. There were these almost two whole years I never touched a cake mixer or had anything to do with desserts. I kind of abandoned making them (used to still eat them though ;) ). Well that's a long story that needs another blog post.

These were special brownies and I sent them over to Izzy's CLO at school as she loved my Anniversary Love Cake surprise pics that is on my blog. She loved these brownies. In fact her message read, "It is really yummy, thanks a lot... U r a gr8 cook...Thanks once again". Rhea you are most welcome. I love baking for friends and loved ones so will do it again :) just be ready to try them out and share your feedback :)

So dear readers, if you follow these recipe details to the 'T', you will not go wrong. I know as I have experimented with variations of chocolate, butter and eggs. This post is dedicated to my dear friend 'Vidhya Venkatachalam' who has been asking me to post these brownies for a while now. I used to make these brownies quite often when I stayed with Mom in Dubai through school years and thereon. It was really a sweet surprise to hear from you. Miss you lots g-friend!


It will be sometime before I can bring you more of my recipe creations as I am going on a short break soon. Until then, I have a request. Please do visit G'Gina's Kitchenette Indiblogger Awards 2013 nomination page and click on 'Comment'. You comments are not only counted as a valuable vote but also will determine the nature/authenticity of my food blog by the jury in deciding if I win! Please visit today if you can. It takes only a minute and only requires that you log into your Facebook page. Thanks heaps in advance and hope you all enjoy a wonderful Eid that is soon to arrive. Eid Mubarak!


You need:

  • 1/2 cup flour
  • 1/2 tsp baking powder
  • 2 eggs
  • 1/4 cup milk
  • 1 tsp vanilla
  • 2 tbsp of unsweetened cocoa powder
  • 4 squares (1" per sqaure) of unsweetened baking chocolate
  • 1/4 cup butter, softened at room temperature
  • 1 cup sugar
  • Pinch of salt (not required if you are using salted butter)
  • 1/4 cup of chopped walnuts


The Make:

Preparation Time: 10 minutes | Cooking Time: 25 minutes | Serves 4

1. Preheat the oven to 210°C.

2. Melt the butter and the chocolate either in a double boiler on the stove top, whisking intermittently or in the microwave at the 30 minutes increments and stir at each increment up to a minute. Give it one last whisk and set aside.

3. Mix the dry ingredients. Place the flour, sugar, baking powder and salt in a mixing bowl. Using a whisk, toss the ingredients well until they are fully incorporated.

4. Add in all the the wet ingredients except the milk and eggs and mix well. Next add in separately whisked eggs and give it one more swirl.

5. Next pour in the chocolate and butter mixture, milk and eggs and stir the mixture together with a ladle until the batter mix is perfectly smooth and lump free.

6. Line the cake tin with parchment paper or butter paper to avoid the brownies from sticking and for a finer finish.


7. Pour the batter into the baking pan. Give the tin a tap on the kitchen top to ensure that the batter is even across the tin. Smoothen the top with the back of a ladle if required.

8. Turn the prepared cake tin to the preheated oven and turn down the temperature to 180°C.

9. Bake the batter for about 20-25 minutes. Test with a skewer or toothpick and ensure it comes clean when inserted into the center of the cake tin.

10. Allow it too cool to room temperature before cutting in. Try to cut the brownies in even squares each.


I still have not purchased my new cake tins and made this one which was given to me by Anup's cousin's wife Anu Abraham. Thanks a lot sis :) The cake tin is round and I could not cut all the pieces to even squares each owing to the shape.


Hope you all enjoy this recipe. It's simple to make and you can have it ready in under 30 minutes.

Bon Appetit! Eid Mubarak once again to all my dear readers!

Please do visit G'Gina's Kitchenette Indiblogger Awards 2013 nomination page and click on 'Comment'. Thanks whole heaps in advance!

Thursday, 23 May 2013

Roulade with Toasted Almonds and Strawberries - G'Gina's Kitchenette celebrates its First Blogiversary

Happy Blogiversary to G'Gina's Kitchenette and me:) I want to thank my friends and family who convinced me to do something about the acquired talent I gained over the years besides feeding them with my creations! Special thanks to my Mom and Hubby Anup whose recipes feature here now and then. Special thanks also goes out to my readers whose comments, likes, suggestions and more keeps me going!

G'Gina's Kitchenette's facebook page has also inspired many new readers. I have recently started G'Gina's Kitchenette's twitter page as well for those who prefer tweets than facebook.


Roulade is something I always wanted to try and wish I did when there were fresh strawberries. I had to go for the frozen variety which wasn't the best option and what I had to choose since this is Mango season:)

The roulade can also be topped with several berries including but not limited to cranberries, raspberries. pitted cherries and blueberries. Roulades can be made both sweet and savoury but since this is a Blogiversary celebration, I decided to go the sweet way!


You need:

  • 2 large egg whites
  • 110 ml cream-lightly whipped
  • 110g caster sugar
  • 55 g flaked almonds (you can also try this with Blanched Walnut flakes or flaked Macademian nuts)


For the garnish:

  • Strawberries or different berries (cranberries, cherries, raspberries, blackcurrant,etc)
  • Fresh Basil/Mint leaves to garnish


The Make:
Serves 3-4 adults| Preparation Time: 10 minutes | Cooking Time: 20 minutes

1. Line a medium cake tray (6 x 3 inches) with butter paper or parchment paper ensuring that both the base and the sides are covered.


2. This is the only critical part in the recipe.Next add the egg whites into a large glass or mixing bowl and whisky on medium-high until the mixture forms stiff peaks. You can use an electric hand whisk or a standing food mixer for this process. When the mixture has formed the peaks add in the sugar gradually, whisking thoroughly between each addition. The first time you make this if you are using an electric hand whisk, you may need some help here to add in the sugar.


3. To test if the correct consistency is achieved, i.e the mixture should be glossy and stiff, turn the mixing bowl upside down - if the mixture does not come out of the bowl you can proceed to the next step. If it falls, you need to restart the process.

4. Once the consistency is achieved, spread the mixture onto the prepared baking sheet and sprinkle with the flaked almonds.

5. Heat the oven to 180°C and bake for 20 minutes or less (until light brown on surface).

6. Let the mixture cool in the tin.


Assembling the Roulade:


7. Invert the cooled baked mixture, facing down the side with the flaked almonds on a large sheet of butter paper/ parchment paper dusted with castor/icing sugar.

8. Touch and feel to ensure that the meringue is completely cooled and then spread lavishly with freshly whipped cream.

9. Randomly top with the chopped strawberries (or other berries chopped) and roll up quickly. You can use the edges of the butter paper to help you roll the roulade.

10. You can top the roulade with whipped cream or pipe the cream and top with some assorted berries or strawberries in halves. Place the mint/basil leaves creatively.

11. Carefully lift the roulade off the butter paper and serve on the serving plate of your choice. You can dust some castor/icing sugar on top.


Tips from errors: 

1. Use a flat bake tray not a cake tray. I used the latter and the spread was not in the best shape.
2. Use as much of fresh fruit as you can. The options mentioned in the ingredients section above is the best to choose from.
3. I did not have Walnuts or Macademian nuts and this recipe would go well with them. You can use a combination of these nuts as well.
4. Took the pictures in unnatural light as I had made this in the evening.

Bon Appetit!

Wednesday, 8 May 2013

Celebrating over 10,000 blog visits and over 100 likes on Facebook (gginaflavorspalatte) - Red Velvet Chocolate Lava Cupcakes and Cake - An Anniversary Special


Thank you dear readers, fellow bloggers, friends and family for making this milestone possible! G'Gina's Kitchenette has had over 10000 visits and the facebook page has over 100 likes. I am thrilled and humbled at the same time for having achieved this milestone which at one time I must admit I thought was never possible! I would like to apologise for the delay in this blog post as our family has been grieving the loss of my dear aunt (God rest her soul!). She was an excellent cook and hostess as well! I will miss her very dearly.


I started this blog with friends insisting that I should publish my food creations and hope one day that dream would be realised in print and other wise. I am thankful most especially to 'my mum' who unknowingly has inspired me as a child to create cuisines from all over the world - be it Indian, English, American, Italian or Mediterranean. For those of you who do not know this, this is how I christened the theme of my blog - 'Flavors from around the world'. Mum always was and will always be my mentor, guide and more. The love she puts into the food she creates has always touched our hearts (through our tummies of course ;-) ). The one thing I learnt from Mum is that always cook for 4 even if there are only 2 guests, you never know as more may drop in. (She actually got that from my granddad (God rest his soul!). Which has always been the case with Mum, there were always additional guests to share in the wonderful meals she cooked. Not only has she been an excellent cook, she is an excellent hostess as well. 
Thank you dear readers, family and friends! Immensely grateful!
http://www.facebook.com/gginaflavorspalatte


Now let me get right to the recipe. I had created this recipe for our 4th Wedding Anniversary which was on April 19th. 4 years flew past and we have a wonderful daughter, who I must say enjoyed this creation. So your little ones would definitely enjoy this make.


Red Velvet Cake is normally made with cream cheese topping but I could not do that as the icing needs to be firm and for the chocolate lava cake, it needs to be served almost immediately out of the oven to get that gooey effect. So there was a slight glitch in my first batch. I have served this with a white chocolate cream topping and the chocolate I used for the lava was also white chocolate.


You need:
  • 4 cups of all purpose flour / Plain Flour
  • 1 tsp baking powder
  • 3 cups of castor sugar/powdered sugar
  • 2 cups of butter/vegetable oil (1/2 tsp salt in case of unsalted butter)
  • 1 tsp distilled vinegar
  • 2 tbsp cocoa powder
  • 1 tsp vanilla extract/essence
  • 5 large eggs or 7 small-medium farm eggs
For the chocolate lava:
  • 300 grams of cold white chocolate, crushed in bits (using fine knife)
  • 1/2 stick of unsalted butter
For the fruit syrup(food colour):
  • 2 tsp red food colour or  any red fruit(s) ( I used strawberries and ground and strained pomegranate, if you have cranberries or cherries, then please use them. You can use a combination of red berries/fruits that would give you the red colour syrup)
  • 3 tbsp sugar (for the fruit syrup)
  • Drinking Water (quantity to half cover the fruits at surface)
For the cake topping:
  • 400 ml cold fresh cream
  • 200 grams of cold white chocolate, crushed in bits using fine knife
  • 100 gms unsalted butter, at room temperature (this was missing in my recipe and hence the outcome was a slightly runny topping, which I firmed up later in the refrigerator)
  • Sprinkles of your (or your little one's) choice


The Make

Makes 6 cupcakes and 1 cake (medium sized - 1.25 kgs) | Cooking Time: 45 minutes | Preparation Time: 15 minutes

1.  Half grind the fruits with a tad bit of water (esp if you are using cherries or cranberries). Place the crushed fruits, water and sugar in a deep-bottomed pan on medium-low heat. Stir and allow the fruits to bring out the color in the syrup. This takes about 8-10 minutes. Strain and set aside to cool. You can pre-make this syrup a day in advance as well and refrigerate.

2. Whisk the cream and add in the chocolate pieces and butter. Melt in a double boiler, whisking well to avoid any lumps. Strain and set aside and refrigerate. I would suggest to make this half a day in advance esp. during summer.

3. In a double boiler, melt the white chocolate and butter stick for the chocolate lava and refrigerate. You can choose to prepare this overnight or 8 hours prior of making the cake.

4. Preheat the over to 180°C and grease the cake pan and muffin tray with oil and dust some flour as well to avoid sticking to the bottom. Knock off any excess flour by tapping the tray upside down. You can also layer the muffin tray with cupcake paper holders and butter paper for the cake pan or foil paper. Just make sure if you are using foil paper to lightly oil the foil paper after neatly layering the tray. I would suggest to otherwise use a spring cake tray with butter paper.


5. In a large bowl, sift the flour, baking powder, sugar and cocoa powder and set aside.

6. In another bowl, whisk the eggs, oil,  vinegar,fruit (food) color and vanilla extract. Vinegar aids in the cake rising process.

7. Bit by bit, add the wet mix to the flour mix and whisk well. Set aside to stand for 5-10 minutes.

8. Pour the cake mix in the prepared cake tin and muffin tray and set in the oven (either one after the other or  together depending on the type of the oven you have) at 200°C. It will take the cake a max of 35-40 minutes to cook through. The muffins would take 15 minutes.


9. In the  last minutes 10 minutes of the rising process or before the cake top stiffens, add the lava chocolate in the center of the cake and return the cake tin back to the oven. For the muffins, add the lava chocolate in the last 5 minutes of the rising process or before the muffins rise fully.

10. Check with a skewer to see if the cake is cooked. The skewer must come clean. Check on the sides of the cake and the center. The center should return with white chocolate or a slight reddish-brown with white chocolate tinge. Turn off the heat and set aside to cool to room temperature.


11. Once cooled, top generously with the cooled cake topping and sprinkles if desired. This cake also tastes good if refrigerated however the lava would not be as flowing as desired.

This creation would be enjoyed by both adults and kids alike. If you have any queries/clarifications or suggestions, do add in the comments section below. Also if you decide to make this recipe creation, do write to me on gginazkitchenette@gmail.com regarding your experience. Also do not forget to add a photo(s) of your creation.


Monday, 24 December 2012

Mummy's Special Christmas Cake

I would like to wish my eldest sister a very Happy Birthday today! Without you sis, this life would not be the same! Thank you for being such a wonderful big sis! I love you and can't wait to see you home soon (just a few more days...yaay)!


This is one cake that featured in all our Christmas-es to date. The last two years have been different as I was the one baking as per Mum's instructions over the phone. Simple to make and  has one pre-baking task, which is soaking the nuts and raisins . The earlier you do it the better.


This year I did not use only the cashew nuts and included raisins and soaked them way in advance in October. So there is a slight difference but the rest is just the same.


Christmas 2012

I have not eaten a whole slice as we are on pre-Christmas lent. So I cannot tell you how it tastes but textural there is a very slight difference from Christmas cake 2011 and 2012.


Mum used to make this cake for our family and relatives and this cake has been tasted and feasted by many as she used to pack them up and send it to us when we were studying away from home.


This year I have staged the Christmas meals (unlike last year...whew!) since the last few days however I still have a lot to do before I am done with final touches, as I am sure you do to, so I will get right to it.


You need:

  • 500 gms of cashew nuts
  • 250 gms of raisins (optional - mum used to soak cashews only)
  • 700 ml of brandy or rum (* instead of alcohol)
  • Zest of 1 orange (optional)
  • 1 tsp of nutmeg 
  • 1 kg flour
  • 1 kg castor sugar or powdered sugar
  • 500 gms of butter, room temperature
  • 12-14 eggs
  • 2 tbsp of extra flour**
  • 2 tsp baking powder
  • 1 cup of sugar (burnt sugar process. Please check Ginger Wine)


The make:

Preparation time: 1-2 months for soaking the nuts, 1 hour pre-baking time | Baking Time: 2 hrs, 10 minutes

1. Soaking the nuts: This is normally done at least a month in advance. Soak the whole cashews 1-2 months in advance with brandy or rum in a tightly sealed jar.Remember the level of the alcohol dips as the cashew nuts absorbs the alcohol and increases in size. So top up by add the alcohol in stages. I added first 175ml, followed by another 175ml and them 350 ml. *Tip:If you do not want to use alcohol, you can also just soak the nuts a few days in advance in cranberry or grape juice and store in a cool, dry place.You can add the raisins if using during the mixing process or after chopping cashew nuts. Chop the cashew nuts, add the raisins to it and set aside.
2. Preheat the oven to 250C. Grease the cake tray(s) with butter on all sides. If your cake trays are a little old, then I would suggest using a foil and then greasing the foil before lining the cake tray. I did that with one of my cake trays that had a few scratches or you can just use butter paper. Now I cannot tell you how many cake trays each of you would need. However what I can tell you is that it would fit approximately two 9" * 10" * 2" cake trays.

Ready to go into the oven
3. Add the flour, baking powder and sugar and fold in with a spoon. Allow it to stand for at least 20 minutes.
4. Whisk the eggs in a large deep-bottomed bowl until fluffy. Add the butter and blend well.
5. Slowly add the flour mixture one ladle at a time to the egg-butter mixture until cake consistency is achieved. Add the nutmeg and/or the optional orange zest. I have never used this so far as Mum does not include the orange zest.
6. Next add the chopped cashews and raisins with the residual alcohol. Now with the ladle just mix in the the cashews and raisins. No need to beat the mixture at this stage. Add the burnt sugar. If the mixture seems to be slightly watery its either that you have not mixed the nuts, raisins and alcohol enough or that the mixture has thinned due to the alcohol quantity, in which case dust the top of the mixing bowl with the extra flour** and mix again with a spoon (although this is not advisable so try not to add all of the residual alcohol if over a few tablespoons).
7.  Allow the mixture to stand for another 20 minutes before pouring into the cake tray(s). Pour the mixture halfway of  the cake tray leaving room for the cake to rise.
8. Lower the oven heat to 170C and slowly place the cake tray. The first cake tray may take a tad longer than the subsequent ones by 10 minutes. Check in 30 minutes, if the cake has risen to a full. Then open the oven and using a fork or skewer, check if the cake has cooked. If cooked, the fork would come clean. The first cake tray may take between 40-45 depending on the size of the cake tray. Repeat until all of the batter is used.

This cake will go well with the Ginger wine recipe I posted recently. Enjoy!

I assure you this cake is one to be served during Christmas week and I sincerely apologise for the delay in posting this recipe. Hope you try it anyways or next year is always there. Over the next few weeks I will be away but will find time to post you more treats of the Christmas week that you can try over the New Year. Merry Christmas and Happy New Year 2013 from our family to yours.


Tuesday, 13 November 2012

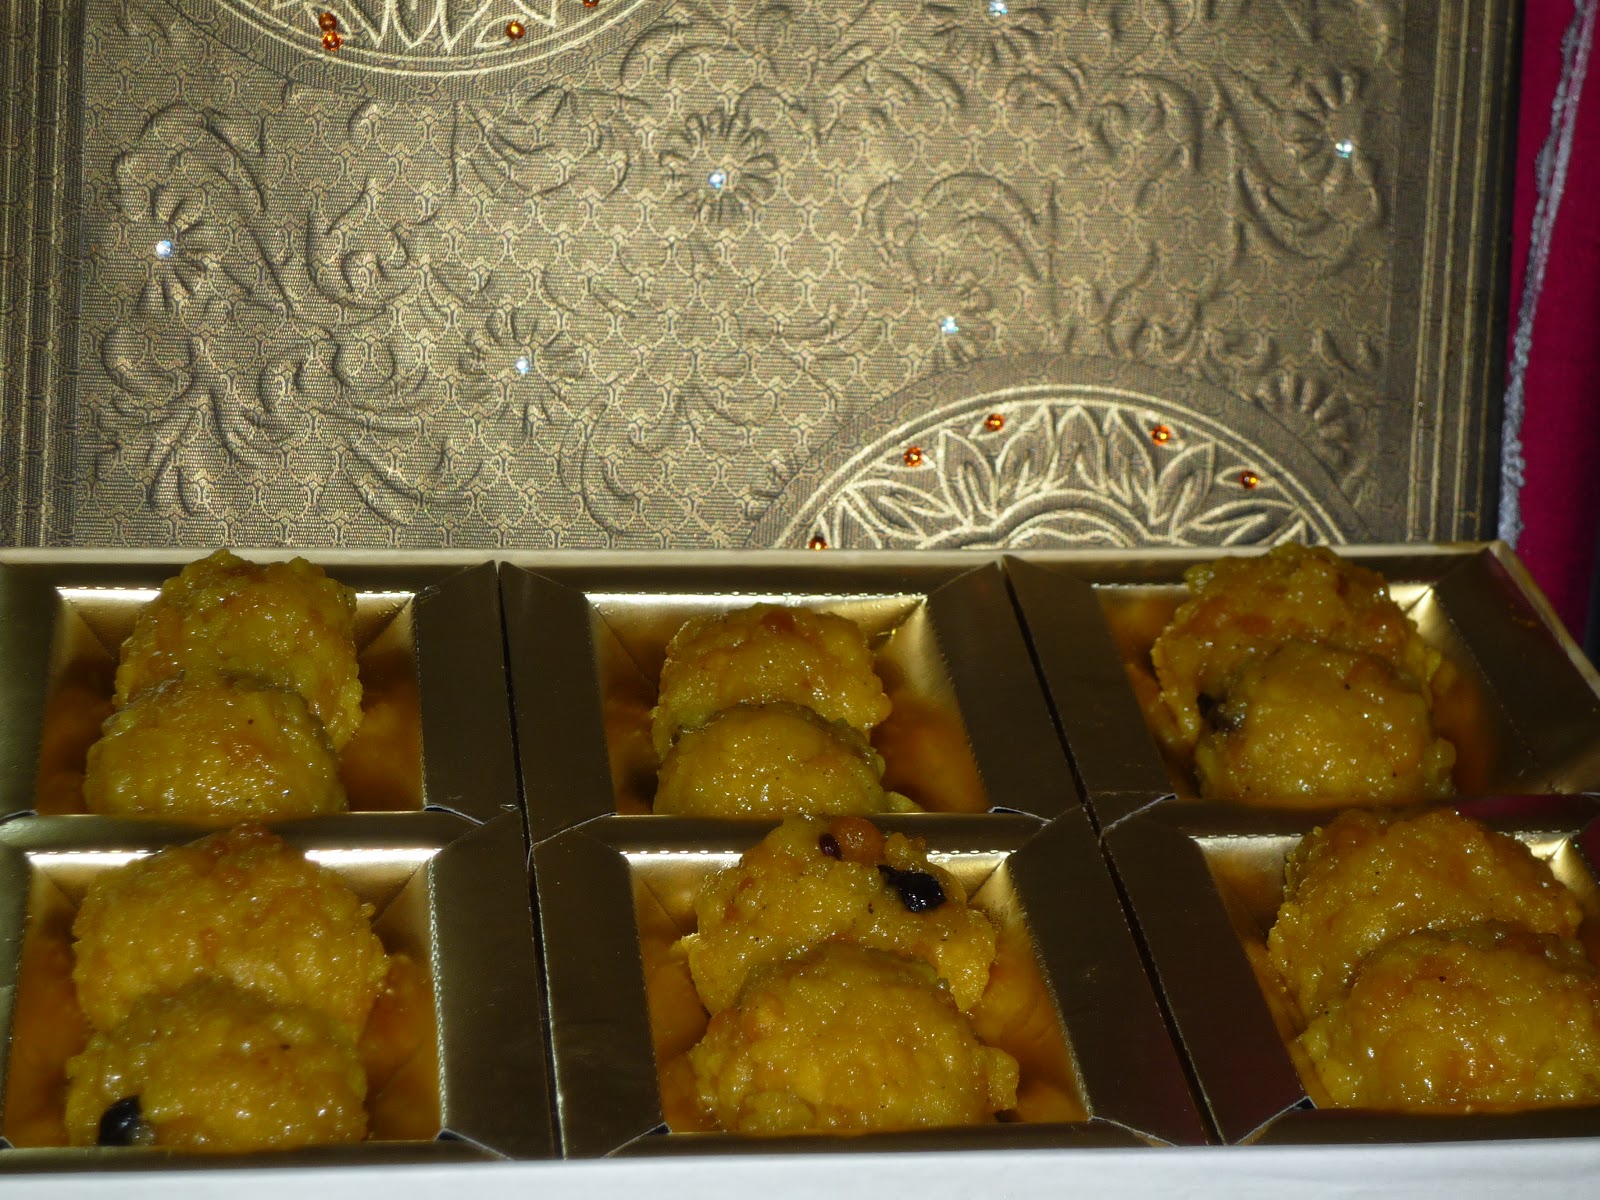
Boondhi Besan Laddoos (Gramflour sweet small balls) - Happy Diwali

Happy Diwali one and all. May the festival of lights bring love, prosperity and peace to you and your loved ones.
Happy Diwali!


I tried this recipe after almost 21 years. My cousin Gigy who was also my neighbour is an ace graduate of home science and she had made this in her home science lab at school. I had it in my handwritten recipe book from the older times. As I made these laddoos last night into the wee hours of the morning, I recollected the good times we spent during my childhood in my neighbourhood with neighbours from diverse cultures. So thinking back, I remembered all the diverse types of laddoos that I had growing up as a child - Indian which itself had many different versions and flavours owing to our large subcontinent's diverse states and cultures, Pakistani, etc.

Laddoos boxed up for Diwali celebrations


I would also like to congratulate my friend Shireen Pais Sequeira who just had a baby princess 8 days ago. I had mentioned in my earlier posts that Shireen, a successful food bloggist of Ruchik Randhap http://ruchikrandhap.blogspot.in was the most recent motivator to enable me to start this blog. I wish her continued success in both her blogging and personal life. These laddoos goes out to your little munchkin Shirs.


Another close up

Close up
I just realised how difficult it is to convert Indian sweet names to English. For example, the literal translation of Laddoos is Small Balls. 

Ever since Green Gold's Chota Bheem has taken on to the silver screen and to the twinkle of our little one's eyes, Laddoos have been a sweet delight and interest in the homes of toddlers and little kids. So I am sure your little one will take to this sweet with awe and interest. Laddoos can also be had as a tea time snack.


For this sweet mouthful,

You need:

  • 250 gms of gramflour or besan
  • 250 gms of sugar
  • Pinch of Lemon Yellow Food colour
  • Pinch of Salt
  • 1/2 cup of raisins
  • 1/2 cup of Cashewnuts (chopped)
  • 300 ml of refined oil
  • 200 ml of ghee or clarified butter (I used this organic cow's ghee. I must say it was so light)
  • 12 cloves of cardamom, de-seeded and powdered
  • 1.5- 2 cups filtered or boiled/cooled water

Tools used
Tools required:
  • One large deep bottomed skillet or frying pan
  • 2 large perforated ladles (1 of them must have the perforation, the size of a whole peppercorn)
  • 2 spoon
  • 1 mixing bowl
  • 1 large deep bottomed pot (you can use a non-stick one also)
  • 1 small skillet
  • 1 large bowl
  • 1-2 large sheets of butter paper
  • 1-2 large sweet boxes (Recycling is good esp. since these days a lot of effort is used in making these boxes. I just do not feel like throwing them away. I usually save my old sweet boxes and re-use them after wiping with a dry cloth)
  • 1 large plate
To make these laddoos, it is essential to have your utensils ready prior to the cooking process. Ensure it is clean and dried (free off water). The perforated ladles are required as one of them would be used to form the droplets of pearl shaped fried balls(boondhis). The other one would be used to strain the boondhis once fried.

The make:

Cooking Time: 45 minutes| Preparation Time: 10 minutes | Makes roughly 12 golf ball sized laddoos

  1. In the small skillet, heat 1-2 tbsp of ghee and toss in the raisins and cashews until lightly brown. You can add the cashews first as it takes slightly longer than the raisins. Set aside.
  2. Next it is best to get working on the sugar syrup before working the batter as it takes a good 8-10 minutes to get this done. Take the deep-bottomed pot or non-stick deep bottomed skillet and add the sugar and 1 cup of water and bring to a boil on medium to high heat. Stir well to dissolve the sugar. Simmer till about half thread consistency or until bubbles form on the surface. Turn off the heat and set aside.
  3. In a mixing bowl, add the gramflour and 1/2 cup of water and stir well ensuring no lumps are present. Add a pinch of salt and the lemon-yellow food colour. The mix should have a slightly thicker consistency than dosa batter. Test the batter by using the perforated ladle to see if it drops through the perforations without intervention. If not add a tablespoon of water to the batter and stir and test again until required consistency is achieved. I had to repeat 3 times to get the consistency right.
  4. Heat the oil on high and the ghee in the frying pan. Do not overheat or else the oil turns brown and affects the boondhis. Remember that the frying pan should have at least 1.5" of oil. Test to see if the oil is the right temperature by taking your little finger and dipping it in the batter and dropping it into the heated oil. If it rise immediately then it is ready.Lower the heat to medium.  
  5. Place all the vessels close to each other as shown in the picture above - the sugar syrup pot, the batter mixing bowl and the frying pan. Hold the perforated ladle about 1.5"inches above the oil over the center of the frying pan with one hand. With your other hand, take the spoon pour some of the batter onto the perforated ladle to cover all of the holes without spilling over the edge of the ladle. Tip: if you hold the ladle higher than 1.5" inches above the oil, the boondi will not be round. It gets more of a tear-drop shape.
  6. The batter will start dropping through the holes into the oil. Move your hand with the batter-perforated ladle in clockwise direction to avoid the batter concentrating in one position in the pan and layering. Drop enough boondis into the oil so they just cover the surface of the oil in frying pan in a single layer without overlapping.
  7. Fry them for a few seconds and/or until the sound of sizzling stops and boondis are light gold in color but not crispy. Drain the boondi out of the oil with the second perforated ladle so as to allow the oil to drain from the boondhi back into the frying pan and transfer the drained fried boondhis to the sugar syrup pot and mix with another spoon.
  8. Tip: Remember to wipe the perforated batter-ladle before adding the next scoop of batter. This helps to keep the boondi round and avoids blocking to allow free flow of the batter through the perforations.
  9. Repeat this process with rest of the batter. Let the boodhis soak in the syrup for few minutes.
  10. Next add the powdered cardamom seeds, roasted cashews and raisins to the syrup and mix.
  11. Drain off the excess syrup by taking out the boondhis from the syrup into a large bowl.
  12. If the boondis are still hot, let them rest till warm and easy to handle. Ensure they do not become cold or you will not be able to roll them into balls to make the laddoos.
  13. To make the laddoos, scoop up some of the boondi mixture into your palm with a spoon. Gently squeeze the mixture between both palms to shape into a round ball about the size of a golf ball. You can also make bigger laddoos as required. As you are squeezing some of the syrup will come out.  
  14. As you finish making each laddoo, put it on a plate with a sheet of butter paper and continue on to make the next laddoo. 
Transfer to plate
  • As the Laddoos cool to room temperature they will become      firm but they should still be moist.
  • Laddoos will keep at room temperature in a covered container for up to 7-10 days depending on the weather and for one month in the refrigerator. If you make it in the summer, I suggest transferring it to the refrigerator after 2 days.
Additional tips:
  • Remember if you leave the boodhis to cool down to room temperature(below warm), the sugar crystallises. 
  • The syrup should be of the right temperature, so warm up slightly before draining the boondhis if it turns cold.
  • If you have too much of boondhis, set aside as a salt snack or you can add it to yoghurt and have it with lunch/dinner. If you have already added it to the sugar syrup, then you can drain and have it as sweet boondhi as well. You can also serve the sweet laddoos with the salty boondhis as a tea time snack.
Namkeen boondhis
Boxed up!

Enjoy this sweet delight ...Wish you all a safe and fun-filled Diwali!

Thursday, 27 September 2012

Onam Special Semiya Payasam (Vermecilli Milk Pudding)

It has been a long while since Onam celebrations has come and gone. I have been quite under the weather with one ailment after another but that is no excuse for not rejoicing in this special sweet delight. You can make this dish at any time of the year for birthdays, anniversaries or any special occasion. Among all the various 'Payasams' (Milk Puddings), my favourite one has always been the one with Vermicelli and now I find is my daughter's favourite one too.


Vermicelli Milk Pudding

Mum usually makes vermicelli payasam with raisins and cashews, however I had a variance. I included blanched almond thinly sliced. To know how to blanch almonds, take a look at my page on Peach Melba where I have detailed instructions on how to blanch almonds:

You need:

  1. 250 gms of Vermecilli (Roasted, or you have to roast over a pan)
  2. 500 ml of milk
  3. 1/2 cup coconut milk or condensed milk (if using condensed milk, not much sugar) -*optional
  4. 1/2 cup cashews chopped finely
  5. 1/4 cup raisins (washed and dried)
  6. 1/4 cup blanched almonds (diced finely)
  7. 200 gms finely granulated sugar or 250 gms jaggery (chopped finely, at room temperature)
  8. 4-6 cardamom seeds ground to a fine powder
  9. 2 tbsp butter or ghee (clarified butter)

Method:

Serves: 4-6 adults | Preparation Time: 10 minutes| Cooking Time: 20 minutes


  • First heat about 1/2 tbsp of butter or ghee in a deep bottomed skillet and then lightly roast the vermicelli and set aside.
Roasted Vermicelli and Boiled milk

  • Clear the skillet from the vermicelli bits or there would be burning of the milk. Wipe the pan to make sure there are no remnants of the vermicelli. Alternatively, you can use another deep bottomed skillet. Heat the remaining ghee and add the raisins and cashews and toss for about a minute, until both are lightly brown and raisins plump. Set aside after draining the oil from the raisins and cashew nuts.
  • Next bring the milk to a boil in a large saucepan. I used fresh milk. Set aside and add the sugar or jaggery and stir well.
  • Return the saucepan back to a medium-low heat and add the cardamom powder. Add the roasted vermicelli and simmer for 10-12 minutes, stirring continuously to avoid the vermicelli from sticking to the base or unevenly cooking. Once the vermicelli is cooked  and payasam begins to thicken, you can additionally add some condensed milk or coconut milk at this stage only for a minute as coconut milk tends to split. Remember if you are adding condensed milk, then reduce the amount of sugar or jaggery intially.
  • Turn off the flame and add the fried cashews, raisins and almonds. You can also add crushed pistachios if you like.
  • Serve hot or cold although I like both, I do enjoy the cold version better.


Vermicelli Milk Pudding
Semiya Paysam served for two


Tip:
  • *Ensure that once you have added coconut milk(optional) you do not leave it on the flame for more than a minute.
  • Ensure consistent stirring of milk and also once the vermicelli is added to avoid burning and to ensure even cooking of both the milk and vermicelli.
  • You can get the store bought variety of roasted vermicelli to shorten the cooking process

Tuesday, 29 May 2012

Peach Melba


This recipe is one which I tried almost 2 decades ago and then this weekend when I had some friends over for dinner. It turned out to be as much a stunner as it was many years ago! And I recently learnt of course through my favourite MasterChef Australia of the origins of the Peach Melba and of its creator, French Chef, Georges Auguste Escoffier. Peach Melba was made in honour of Nellie Melba, an Australian Operatic Soprano. You can read more of the origins of Peach Melba here

Cast/Characters:
Blanched and chopped Almonds


For the Peach Melba:
Peaches – quartered and deseeded or deseeded and served whole
Ice cream – preferably Vanilla

For the Prepared WhipCream in case you are not using fresh whipped cream:
 Cold Milk
Ready-made whip cream sachet

   
For the Whipped cream – made from scratch (Homemade): http://gginaflavorspalatte.blogspot.in/2012/05/homemade-whipped-cream.html

Cooking Time: 20-30 minutes| Preparation Time: 20 minutes| Serves 4 adults, 1 toddler

Method to blanch almonds:
Add boiling water to the almonds just about to cover the almonds. Leave it for a minute and drain immediately. Run under cold water and drain again. Pat dry, you will find that the skin slips off.  Do not let the almonds sit in the boiling water for too long or it will lose its crispness. You can add the almonds to caramelised sugar to add more flavour to the almonds.

Method to prepare Caramelised Sugar(optional):
Heat a skillet. When warm add granulated sugar about 1-1.5 cups and allow it to melt slightly stirring on a medium flame. Then turn to a low flame and add boiling water taking care not to splash or burn yourself. Stir well and you will find a golden brown translucent texture. Once slightly cooled, add the blanched almonds and take out immediately. It is best to do this process of caramelising and dipping of almonds just before plating up.

Assembling the Peach Melba dish:
      Place the peaches in individual glasses, top with ice cream. Top the glass with the cooled melba sauce, then the prepared whip cream or freshly prepared whipped cream and blanched(and caramalised) almonds. Serve immediately. You can also add a layer of jello above the whipped cream if you like. Bon Appetit. 
     
    My guests enjoyed this dish very much!
Layering the Peaches

Note: (other alternatives)
You can also poach the peaches (if fresh peaches are used), in the melba sauce and lay the poached peach in a bed of ice cream and melba sauce. (see the link image). The one I did was a simpler version of Escoffier's Peach Melba. If you see in the image provided in the link, the peach is served as a whole. What you could do is cut the peach in half, de-seed it and serve it as whole peach on a bed of vanilla ice cream, topped with Melba sauce. OR
Topped with Icecream and Melba Sauce

You could take some cold water in a sauce pan, add powdered sugar/castor sugar and add some vanilla extract or split vanilla pod(lengthwise) and mix well. Then add the peaches cut in half(deseeded -do not bruise the peach while deseeding or add it with the seed and later remove once cooled) and then bring it to a gentle simmer. Turn off and allow to rest for 20 minutes. Then remove the skin and/or the seed and add it on a bed of icecream, top with the Melba sauce and some of the poaching liquid.
Topped with blanched almonds